My dear creator, I am overjoyed you have chosen to bring this golden calf to life. There is a profound magic in transforming simple loops of chenille into a companion with such soulful, wide-set eyes. Let your hands move with purpose and your heart fill with the joy of making.
About This Creation & Angle
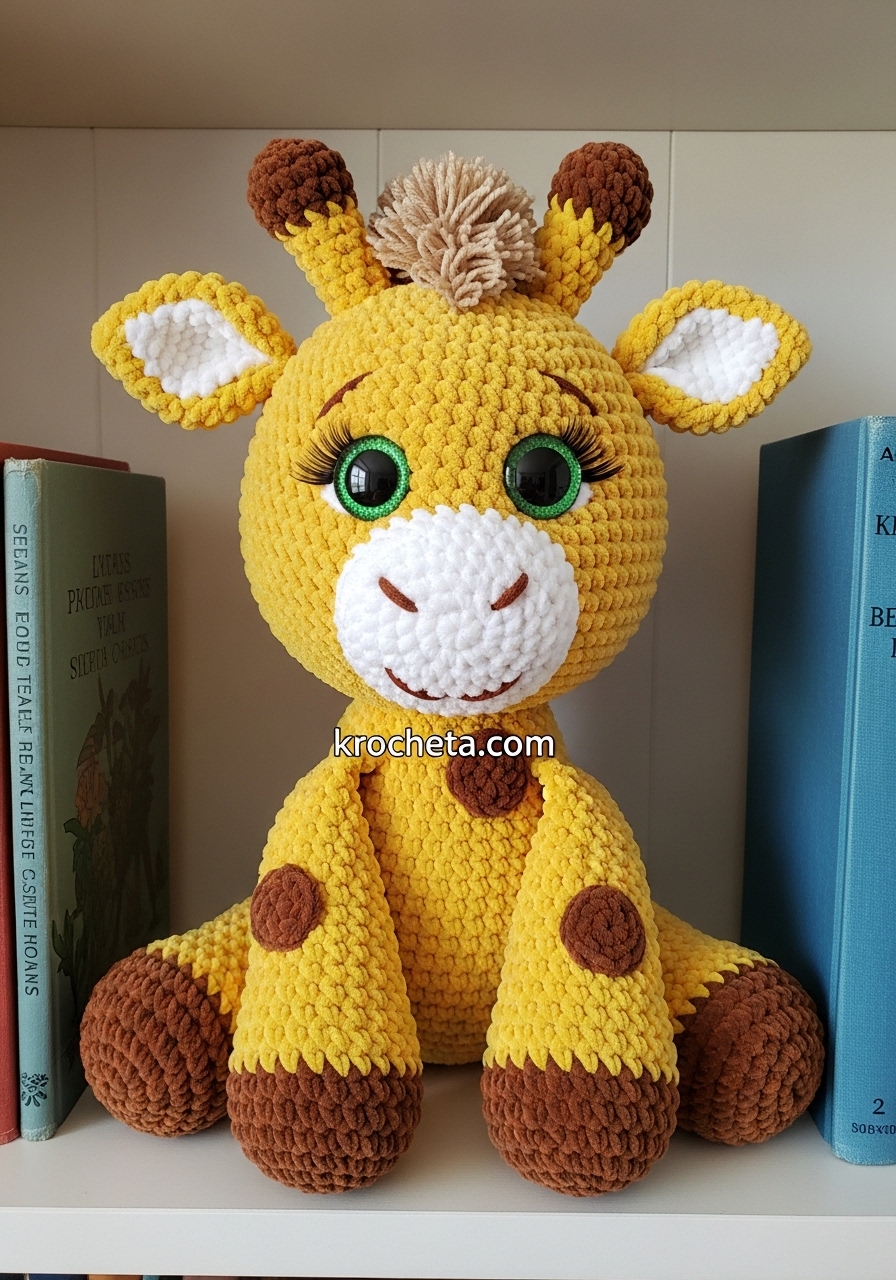
This golden baby giraffe captures the gaze of innocence through careful shaping and strategic eye placement. We are utilizing super bulky chenille yarn to achieve the embrace of softness, ensuring every curve is perfectly chubby and endlessly huggable. The commercial angle here is undeniable. Chunky yarn projects are highly sought after by makers and buyers alike for their quick workup times and premium, market-ready finish. This pattern is engineered to perfectly support a wonderfully oversized head on a sturdy, sitting body.
Project Snapshot
📊 Difficulty: Intermediate
⏰ Est. Time: 6 to 8 hours
📏 Size: Approximately 30cm (12 inches) seated
“The true soul of amigurumi lives in the placement of the eyes; give them space to speak.” – Patricia Poltera
Materials & Tools Needed
🧶 Yarn: Super Bulky (Weight 6) Chenille Yarn in Golden Yellow, White, and Dark Brown. Light tan fluffy yarn for the crown.
🪡 Hook: 5.0mm crochet hook.
✨ Other Materials: 30mm safety eyes with green rims, false eyelashes, heavy-duty polyester fiberfill, yarn needle, stitch markers, black and dark brown embroidery thread.

Abbreviations & Stitches Used
ch: chain
sc: single crochet
inc: increase (2 sc in one stitch)
dec: invisible decrease (sc 2 together)
sl st: slip stitch
The Complete Golden Giraffe Pattern
The Oversized Head (Golden Yellow)
Rnd 1: 6 sc in a magic ring (6)
Rnd 2: 6 inc (12)
Rnd 3: 1 sc, 1 inc – repeat 6 times (18)
Rnd 4: 2 sc, 1 inc – repeat 6 times (24)
Rnd 5: 3 sc, 1 inc – repeat 6 times (30)
Rnd 6: 4 sc, 1 inc – repeat 6 times (36)
Rnd 7: 5 sc, 1 inc – repeat 6 times (42)
Rnd 8: 6 sc, 1 inc – repeat 6 times (48)
Rnd 9: 7 sc, 1 inc – repeat 6 times (54)
Rnd 10: 8 sc, 1 inc – repeat 6 times (60)
Rnd 11: 9 sc, 1 inc – repeat 6 times (66)
Rnd 12: 10 sc, 1 inc – repeat 6 times (72)
Rnd 13 to Rnd 22: 72 sc (72)
Rnd 23: 10 sc, 1 dec – repeat 6 times (66)
Rnd 24: 9 sc, 1 dec – repeat 6 times (60)
Rnd 25: 8 sc, 1 dec – repeat 6 times (54)
Rnd 26: 7 sc, 1 dec – repeat 6 times (48)
Rnd 27: 6 sc, 1 dec – repeat 6 times (42)
Rnd 28: 5 sc, 1 dec – repeat 6 times (36)
Rnd 29: 4 sc, 1 dec – repeat 6 times (30)
Rnd 30: 3 sc, 1 dec – repeat 6 times (24)
Rnd 31: 2 sc, 1 dec – repeat 6 times (18)
➡️ Artisan Note: Insert 30mm safety eyes between rounds 18 and 19, spacing them 12 stitches apart. Apply the false eyelashes behind the eyes before securing the safety washers.
The Stout Body (Golden Yellow)
Rnd 1: 6 sc in a magic ring (6)
Rnd 2: 6 inc (12)
Rnd 3: 1 sc, 1 inc – repeat 6 times (18)
Rnd 4: 2 sc, 1 inc – repeat 6 times (24)
Rnd 5: 3 sc, 1 inc – repeat 6 times (30)
Rnd 6: 4 sc, 1 inc – repeat 6 times (36)
Rnd 7: 5 sc, 1 inc – repeat 6 times (42)
Rnd 8: 6 sc, 1 inc – repeat 6 times (48)
Rnd 9: 7 sc, 1 inc – repeat 6 times (54)
Rnd 10 to Rnd 17: 54 sc (54)
Rnd 18: 7 sc, 1 dec – repeat 6 times (48)
Rnd 19 to Rnd 20: 48 sc (48)
Rnd 21: 6 sc, 1 dec – repeat 6 times (42)
Rnd 22: 42 sc (42)
Rnd 23: 5 sc, 1 dec – repeat 6 times (36)
Rnd 24: 36 sc (36)
Rnd 25: 4 sc, 1 dec – repeat 6 times (30)
Rnd 26: 3 sc, 1 dec – repeat 6 times (24)
Rnd 27: 2 sc, 1 dec – repeat 6 times (18)
➡️ Artisan Note: Stuff the base of the body firmly to create a heavy center of gravity for sitting.
The Sweet Muzzle (White)
Rnd 1: Ch 8. Starting in 2nd ch from hook, 6 sc, 3 sc in last ch. Work along the opposite side: 5 sc, 2 sc in last ch (16)
Rnd 2: 1 inc, 5 sc, 3 inc, 5 sc, 2 inc (22)
Rnd 3: 1 sc, 1 inc, 5 sc, 1 sc, 1 inc – repeat 3 times, 5 sc, 1 sc, 1 inc – repeat 2 times (28)
Rnd 4 to Rnd 6: 28 sc (28)
➡️ Artisan Note: Stuff very lightly before attaching to maintain a wide, soft oval shape that does not protrude too far.
The Front Legs (Make 2)
Start with Dark Brown.
Rnd 1: 8 sc in a magic ring (8)
Rnd 2: 8 inc (16)
Rnd 3 to Rnd 5: 16 sc (16)
Change to Golden Yellow.
Rnd 6 to Rnd 16: 16 sc (16)
➡️ Artisan Note: Stuff the hoof firmly. Leave the top third of the leg unstuffed so it sits flush against the body.
The Back Legs (Make 2)
Start with Dark Brown.
Rnd 1: 8 sc in a magic ring (8)
Rnd 2: 8 inc (16)
Rnd 3 to Rnd 5: 16 sc (16)
Change to Golden Yellow.
Rnd 6 to Rnd 13: 16 sc (16)
Rnd 14: 2 sc, 1 dec – repeat 4 times (12)
➡️ Artisan Note: These are slightly shorter than the front legs to accommodate the seated posture perfectly.
The Ears (Make 2)
Start with White for the Inner Ear.
Rnd 1: Ch 6, sc in 2nd ch from hook, 3 sc, 3 sc in last ch, 3 sc on opposite side, inc (12)
Rnd 2: inc, 3 sc, 3 inc, 3 sc, 2 inc (18)
Change to Golden Yellow.
Rnd 3: 2 sc, inc – repeat 6 times (24)
➡️ Artisan Note: Fold the base in half and stitch it together before attaching to the head to create a gentle, cupped shape.
The Ossicones / Horns (Make 2)
Start with Dark Brown.
Rnd 1: 6 sc in a magic ring (6)
Rnd 2: 6 inc (12)
Rnd 3 to Rnd 4: 12 sc (12)
Change to Golden Yellow.
Rnd 5: 6 dec (6)
Rnd 6 to Rnd 10: 6 sc (6)
➡️ Artisan Note: Stuff the dark brown tops firmly, but leave the yellow stems empty.
The Fluffy Crown
Using light tan fluffy yarn, ch 10.
Row 1: sc in 2nd ch from hook and across (9). Fasten off.
➡️ Artisan Note: Sew this textured strip directly to the top center of the head, sitting cozily between the horns.
The Giraffe Spots (Make 5)
Using Dark Brown.
Rnd 1: 6 sc in a magic ring (6)
Rnd 2: 1 sc, 3 sc in next st – repeat 3 times (12)
➡️ Artisan Note: This creates an irregular, organic triangle shape that mimics true giraffe markings.
The Little Tail
Using Golden Yellow.
Row 1: Ch 12. sl st in 2nd ch from hook and each ch across.
➡️ Artisan Note: Attach a small fringe of Dark Brown yarn to the tip and trim it neatly.
Facial Details
Using black embroidery thread, sew a small, gentle curved line for the mouth beneath the muzzle. Use dark brown thread to stitch short, expressive eyebrows angled slightly upward above the eyes to enhance the innocent expression.
Assembly & Final Touches
Sew the heavy head firmly to the body, adding extra stuffing to the neck joint right before closing.
Attach the muzzle securely, centered between the eyes.
Pin the front legs to the lower front of the body so the giraffe sits naturally upright.
Sew the back legs to the sides of the lower body, pointing forward.
Secure the folded ears just below the ossicones on either side of the head.
Scatter and sew the dark brown spots organically around the back and sides.
Tips & FAQs
➡️ Q: How do I prevent the heavy head from flopping?
➡️ A: The secret lies in the stuffing. Pack the neck area as firmly as possible. You may also insert a foam hair roller inside the neck opening to act as a stable internal spine.
➡️ Q: Can I wash this chenille amigurumi?
➡️ A: Yes, but with immense care. Hand wash gently in cold water and allow it to air dry naturally to preserve the incredible softness of the yarn.
A Final Word
Your golden calf is now complete, standing as a testament to your patience and skill. May this handmade treasure bring endless warmth and joy to its forever home.