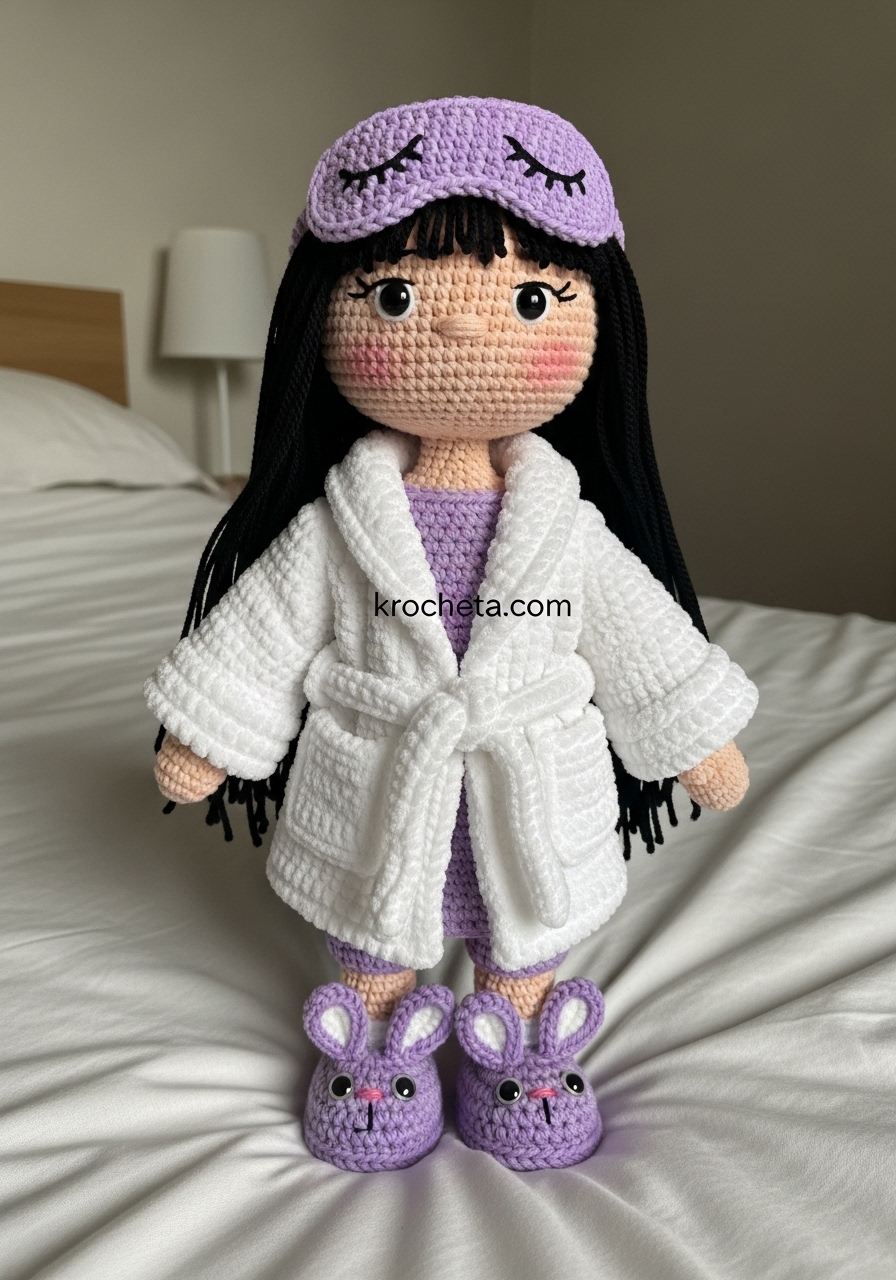
There is a profound joy in crafting pieces that evoke rest and relaxation. Our Sleepy Time Companion is designed with ultimate coziness in mind, acting as a beautiful project to practice texture mixing. You will work with smooth cotton for her skin and transition to incredibly plush, tactile yarns for her gorgeous oversized robe. This contrast not only makes her visually striking but also turns the making process into a highly soothing experience. She is the perfect handmade gift for anyone who cherishes a quiet night in, and she photographs beautifully for your own handmade portfolio.
Project Snapshot:
📊 Difficulty: Intermediate
⏰ Est. Time: 12-15 Hours
📏 Size: Approximately 25 cm (10 inches) tall
“Every stitch is a quiet wish for sweet dreams.”
Materials & Tools Needed
🧶 Yarn: DK weight cotton in light peach, soft purple, and black. Super bulky fluffy or chenille yarn in white for the robe.
🪡 Hook: 2.5mm for the doll, 4.0mm for the fluffy robe.
✨ Other Materials: 8mm safety eyes, black embroidery thread, pink embroidery thread, soft polyester fiberfill, stitch markers, yarn needle, small piece of plastic or cardboard for slipper soles.

Abbreviations & Stitches Used
➡️ ch: chain
➡️ sl st: slip stitch
➡️ sc: single crochet
➡️ hdc: half double crochet
➡️ inc: increase (2 sc in one stitch)
➡️ dec: invisible decrease (sc 2 together)
➡️ BLO: back loops only
The Complete Bedtime Doll Pattern
The Head
➡️ R1: With light peach yarn, 6 sc in a magic ring (6)
➡️ R2: 6 inc (12)
➡️ R3: (1 sc, inc) repeat 6 times (18)
➡️ R4: (2 sc, inc) repeat 6 times (24)
➡️ R5: (3 sc, inc) repeat 6 times (30)
➡️ R6: (4 sc, inc) repeat 6 times (36)
➡️ R7: (5 sc, inc) repeat 6 times (42)
➡️ R8: (6 sc, inc) repeat 6 times (48)
➡️ R9: (7 sc, inc) repeat 6 times (54)
➡️ R10: (8 sc, inc) repeat 6 times (60)
➡️ R11-R23: sc in each stitch around (60)
Artisan’s Note: Place your 8mm safety eyes between rounds 18 and 19. Space them 9 stitches apart to create that wide, innocent gaze. Embroider a tiny button nose spanning 3 stitches right between and slightly below the eyes.
➡️ R24: (8 sc, dec) repeat 6 times (54)
➡️ R25: (7 sc, dec) repeat 6 times (48)
➡️ R26: (6 sc, dec) repeat 6 times (42)
➡️ R27: (5 sc, dec) repeat 6 times (36)
➡️ R28: (4 sc, dec) repeat 6 times (30)
➡️ R29: (3 sc, dec) repeat 6 times (24)
➡️ R30: (2 sc, dec) repeat 6 times (18)
Fasten off, leaving a very long tail for sewing. Stuff the head firmly, ensuring the cheeks remain rounded.
Rosy Cheeks (Make 2)
➡️ R1: With pink yarn, 6 sc in a magic ring (6)
➡️ R2: 6 inc (12)
Fasten off and leave a tail.
Artisan’s Note: Sew these firmly just below and slightly to the outside of each eye to emphasize her youthful softness.
The Hair Foundation & Strands
➡️ R1-R10: Repeat rounds 1 through 10 of the Head using black yarn (60)
➡️ R11-R15: sc in each stitch around (60)
➡️ Hair Strands: sl st into the next stitch. ch 45. sc down the chain starting from the second chain from the hook (44 sc). sl st into the next stitch on the cap. Repeat this process around the entire edge of the cap to create her flowing locks.
The Legs & Body (Worked Continuously)
➡️ R1: Start with soft purple for the pajama pants. Make 2 legs. 6 sc in a magic ring (6)
➡️ R2: 6 inc (12)
➡️ R3: (1 sc, inc) repeat 6 times (18)
➡️ R4-R15: sc in each stitch around (18)
Fasten off the first leg. Do not fasten off the second leg.
➡️ R16: Chain 3 from the second leg. 18 sc around the first leg, 3 sc across the chain, 18 sc around the second leg, 3 sc across the other side of the chain (42)
➡️ R17-R28: sc in each stitch around (42)
➡️ R29: (5 sc, dec) repeat 6 times (36)
➡️ R30-R33: sc in each stitch around (36)
➡️ R34: (4 sc, dec) repeat 6 times (30)
➡️ R35-R38: sc in each stitch around (30)
➡️ R39: (3 sc, dec) repeat 6 times (24)
➡️ R40: sc in each stitch around (24)
➡️ R41: (2 sc, dec) repeat 6 times (18)
➡️ R42: sc in each stitch around (18)
Fasten off. Stuff the body firmly, emphasizing the soft belly.
The Arms (Make 2)
➡️ R1: Start with light peach. 6 sc in a magic ring (6)
➡️ R2: 6 inc (12)
➡️ R3-R5: sc in each stitch around (12)
➡️ R6: Change to soft purple. Working in BLO, sc in each stitch around (12)
➡️ R7-R22: sc in each stitch around (12)
Fasten off, leaving a tail for sewing. Stuff the hands lightly, but leave the upper arms empty so they rest flat against her sides.
The Sleep Mask
➡️ Row 1: With soft purple yarn, ch 15. sc in 2nd ch from hook, 13 sc across (14). Ch 1, turn.
➡️ Row 2-4: sc across all 14 stitches. Ch 1, turn.
➡️ Border: sc around the entire rectangle, placing 2 sc in each corner to keep the edges soft and rounded.
Embroider resting closed eyes with black thread.
➡️ Band: Attach yarn to one side, ch 30 (or enough to fit comfortably around her hair), attach to the opposite side.
The Plush Robe
➡️ Row 1: With fluffy white yarn and a 4.0mm hook. Ch 25. hdc in 3rd ch from hook, 22 hdc across (23). Ch 2, turn.
➡️ Row 2: (hdc, hdc inc) across to the last stitch, hdc in the last stitch (34). Ch 2, turn.
➡️ Row 3: 5 hdc, ch 6, skip 6 stitches, 12 hdc, ch 6, skip 6 stitches, 5 hdc. This creates the armholes. Ch 2, turn.
➡️ Row 4-R12: hdc across all stitches and chains. Fasten off.
➡️ Sleeves: Attach fluffy yarn at the armhole. Work 15 hdc evenly around the opening. Continue for 6 rounds. Fasten off. Repeat for the second sleeve.
➡️ Belt: Ch 45 with fluffy yarn. Fasten off and knot the ends.
The Bunny Slippers (Make 2)
➡️ R1: With soft purple, ch 6. sc in 2nd ch, 3 sc, 3 sc in the last ch. Working down the opposite side of the chain: 3 sc, 2 sc in the last ch (12)
➡️ R2: inc, 3 sc, 3 inc, 3 sc, 2 inc (18)
➡️ R3: Working in BLO, sc around (18)
➡️ R4: sc around (18)
➡️ R5: 5 sc, 4 dec, 5 sc (14)
➡️ Ears: Ch 6, sc down the chain. Attach to the front of the slipper. Make two per slipper.
Insert tiny 4mm safety eyes and embroider a pink nose on the front of the slipper.
Assembly & Final Touches
Sew the head securely to the body, adding extra stuffing to the neck to prevent wobbling.
Attach the arms to the sides of the body, right below the final round of the neck.
Place the hair cap on the head, aligning it just above the sleep mask line, and sew it down firmly.
Wrap the plush robe around her shoulders and secure it with the fluffy belt tied in a gentle knot.
Slide the adorable bunny slippers onto her feet.
Tips & FAQs
Q: How do I handle fluffy yarn without losing my stitches?
A: Fluffy yarn requires patience. Feel for the next stitch with your fingers rather than relying purely on your eyes. Using stitch markers at the very beginning of your rows is absolutely essential to keep your edges straight!
Q: Can I use acrylic yarn instead of cotton?
A: Yes, certainly. However, cotton provides superior stitch definition for the doll’s skin and pajamas, contrasting beautifully with the plush robe.
A Final Word
Your beautiful creation is now complete and ready to bring a gentle calm to your home. May your hands always find joy in the making, and may your heart always find peace in the art.