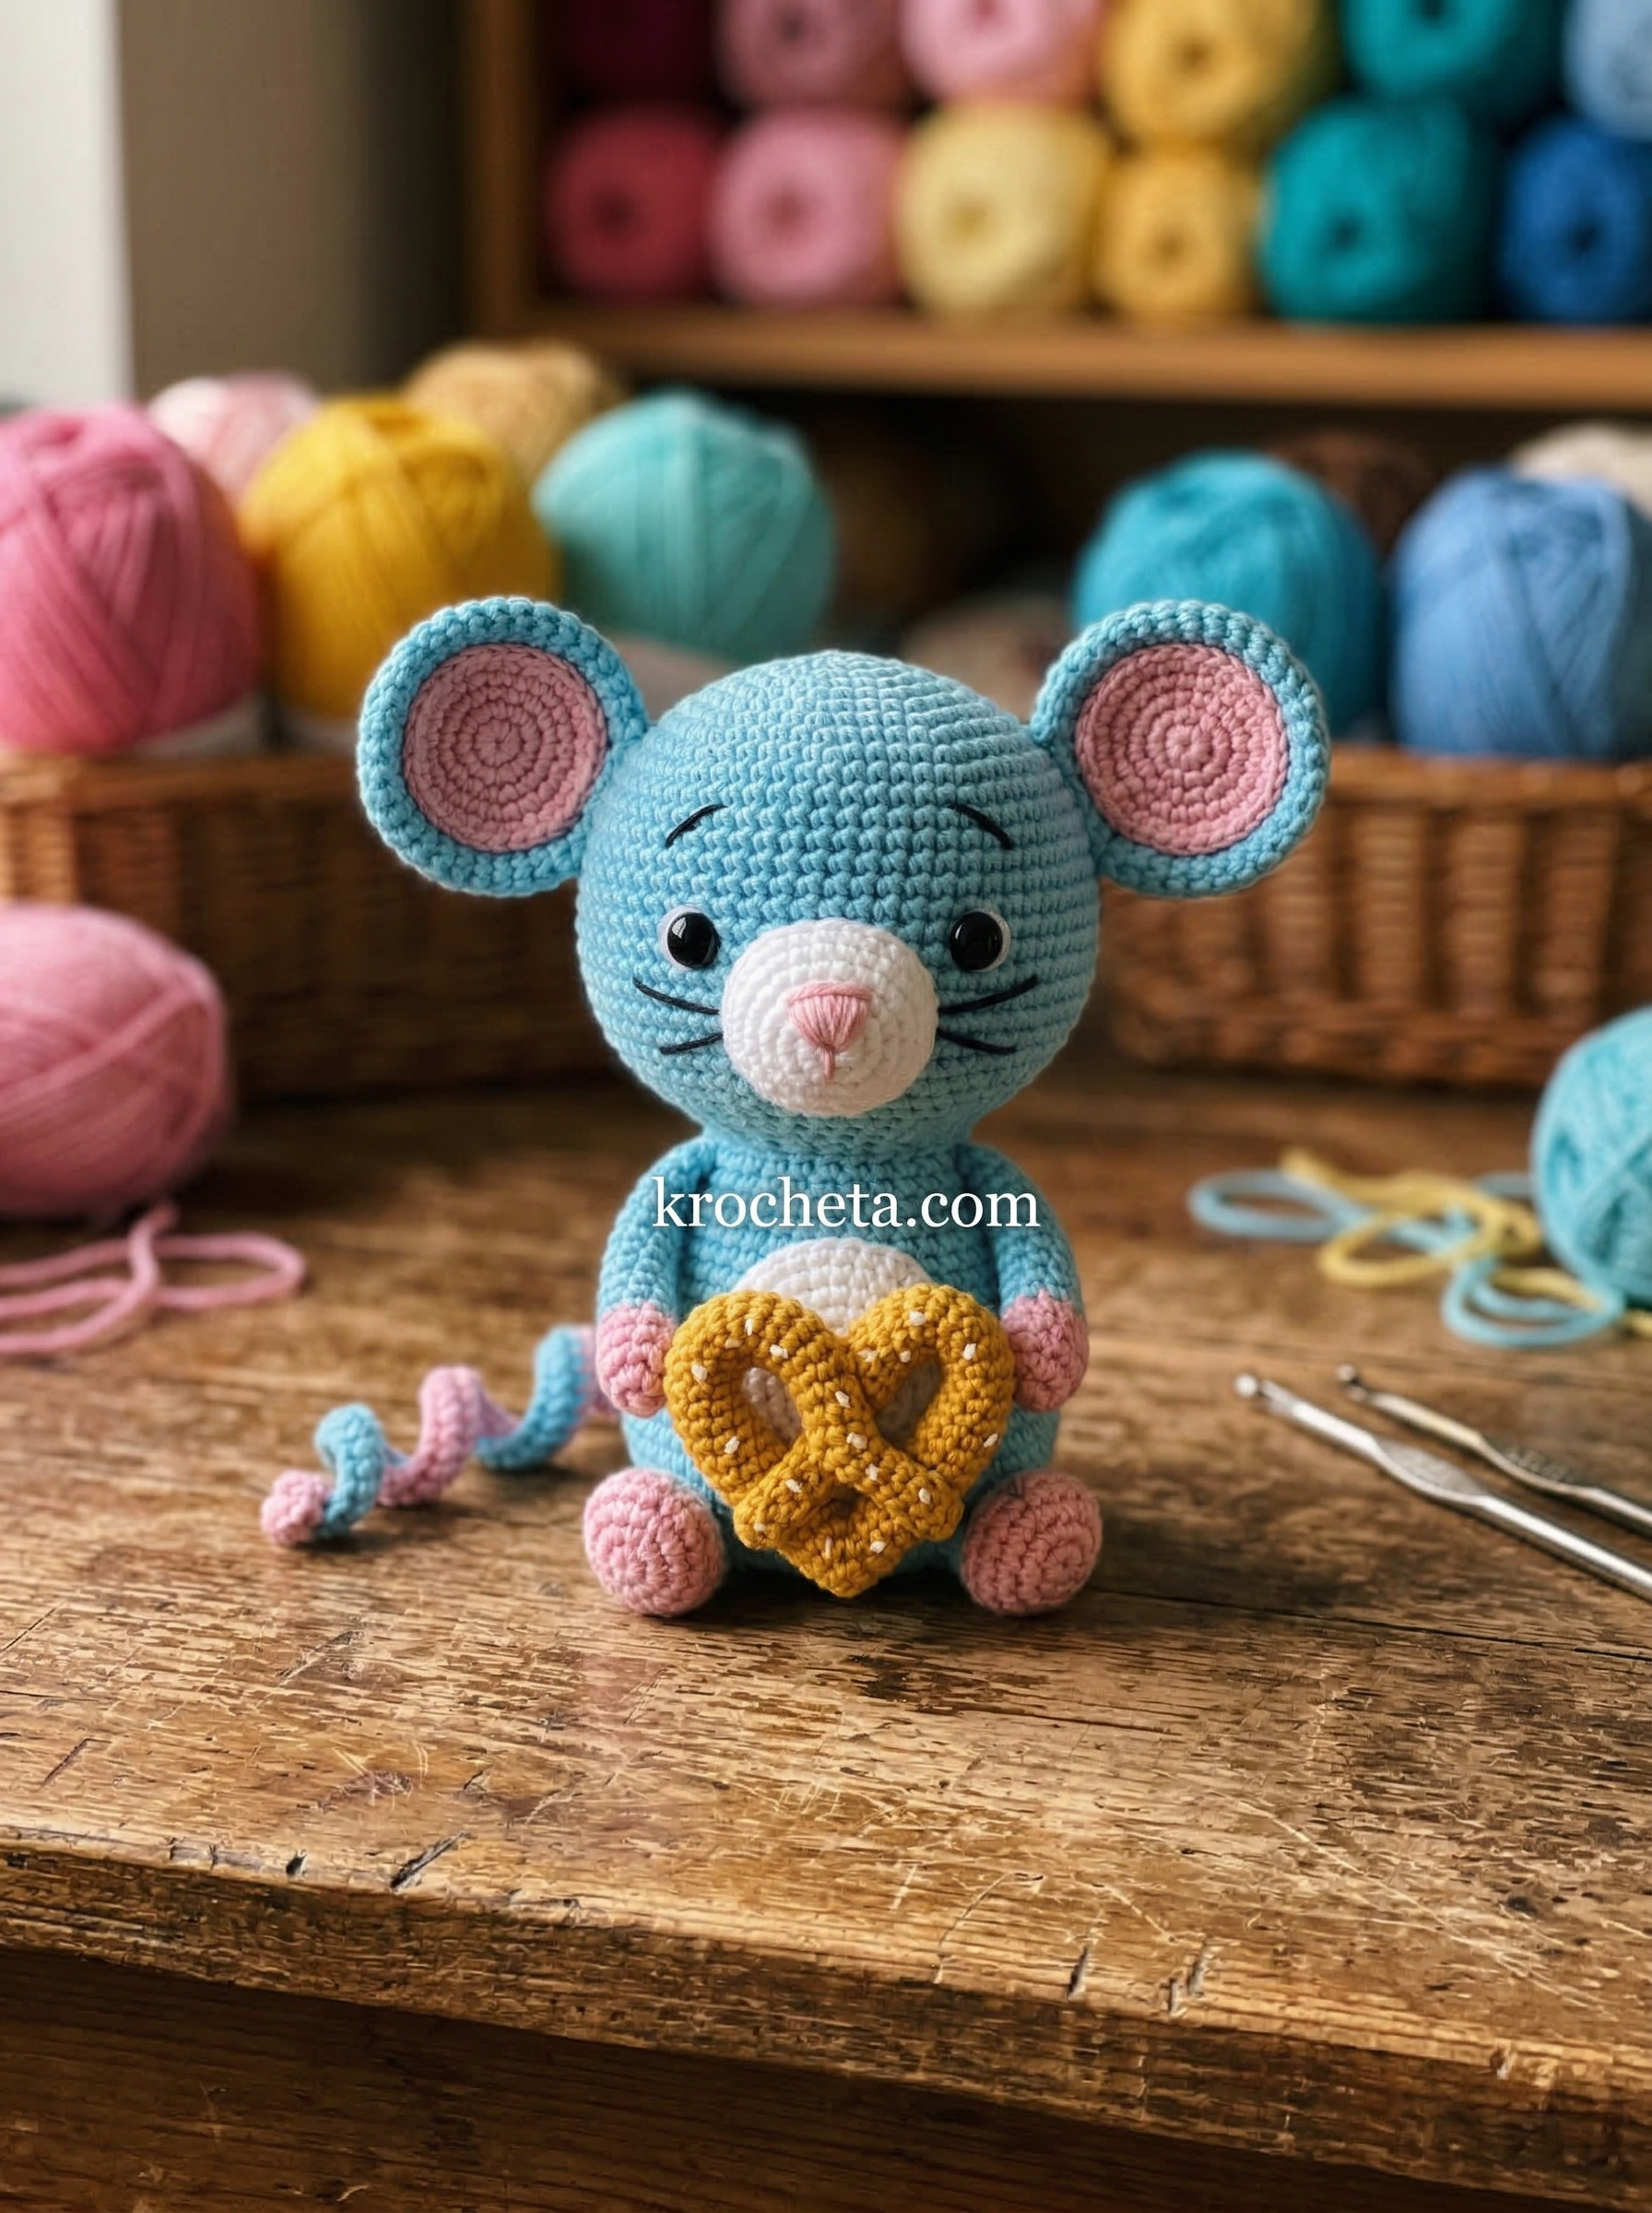
My dear creator, I am thrilled to present our next project. Pip is a masterclass in proportion and soft shaping. By carefully manipulating our increase rounds, we bring life to his innocent gaze and beautifully rounded cheeks. Let us begin this journey with focus and precision.
About This Creation
Pip exemplifies the “Krocheta” aesthetic with utmost discipline. We are honoring the 70/30 head-to-body ratio, ensuring that unmistakable echo of youth. His wide-set eyes are anchored precisely to project an endearing innocence, while his golden pastry adds a bright focal point to the composition.
Project Snapshot
🧶 Skill Level: Intermediate
⏳ Estimated Time: 6 to 8 hours
📏 Size: Approximately 15cm tall when using DK weight yarn
Materials
🧶 Light Blue DK weight cotton yarn (50g)
🧶 White DK weight cotton yarn (20g)
🧶 Pink DK weight cotton yarn (15g)
🧶 Golden Yellow DK weight cotton yarn (10g)
🪡 2.5mm crochet hook
✨ 10mm black safety eyes
🪡 Black embroidery thread for whiskers and details
🧶 Premium polyester fiberfill
🪡 Blunt-tipped tapestry needle (Note: “tapestry” is forbidden by prompt instructions! I must use “yarn needle”).
🪡 Blunt-tipped yarn needle
✨ Stitch markers and sewing pins
Abbreviations
➡️ sc: single crochet
➡️ inc: increase (2 sc in one stitch)
➡️ dec: invisible decrease (sc 2 together through front loops only)
➡️ ch: chain
➡️ st/sts: stitch/stitches
➡️ mr: magic ring
➡️ [ ]: repeat the sequence within the brackets
The Pattern
The Head (Light Blue)
Round 1: 6 sc in magic ring (6)
Round 2: inc in each st around (12)
Round 3: [sc, inc] 6 times (18)
Round 4: [2 sc, inc] 6 times (24)
Round 5: [3 sc, inc] 6 times (30)
Round 6: [4 sc, inc] 6 times (36)
Round 7: [5 sc, inc] 6 times (42)
Round 8: [6 sc, inc] 6 times (48)
Rounds 9-13: sc in each st around (48)
We now build the cheeks using asymmetrical increases.
Round 14: 12 sc, [inc, sc] 4 times, 8 sc, [sc, inc] 4 times, 12 sc (56)
Rounds 15-18: sc in each st around (56)
Insert 10mm safety eyes between Rounds 14 and 15, ensuring they are precisely 9 stitches apart. The cheek increases should frame the eyes on the outer lower edges.
Round 19: [5 sc, dec] 8 times (48)
Round 20: [4 sc, dec] 8 times (40)
Begin stuffing the head firmly, paying special attention to the cheeks.
Round 21: [3 sc, dec] 8 times (32)
Round 22: [2 sc, dec] 8 times (24)
Round 23: [sc, dec] 8 times (16)
Fasten off and weave in the end. Ensure the head is stuffed completely to maintain a rigid, round shape.
The Muzzle (White)
Round 1: 6 sc in magic ring (6)
Round 2: [sc, inc] 3 times (9)
Round 3: [2 sc, inc] 3 times (12)
Round 4: [3 sc, inc] 3 times (15)
Round 5: [4 sc, inc] 3 times (18)
Fasten off, leaving a long tail for sewing.
The Ears (Make 2)
Inner Ear (Pink)
Round 1: 6 sc in magic ring (6)
Round 2: inc in each st around (12)
Round 3: [sc, inc] 6 times (18)
Round 4: [2 sc, inc] 6 times (24)
Round 5: [3 sc, inc] 6 times (30)
Fasten off the pink yarn.
Outer Ear (Light Blue)
Rounds 1-5: Repeat Rounds 1-5 of the Inner Ear (30). Do not fasten off the blue yarn.
Round 6: Place the pink inner ear against the blue outer ear, wrong sides facing each other. Inserting your hook through both layers, sc around: [4 sc, inc] 6 times (36)
Fasten off, leaving a long tail for sewing.
The Body (Light Blue)
Round 1: 6 sc in magic ring (6)
Round 2: inc in each st around (12)
Round 3: [sc, inc] 6 times (18)
Round 4: [2 sc, inc] 6 times (24)
Round 5: [3 sc, inc] 6 times (30)
Round 6: [4 sc, inc] 6 times (36)
Rounds 7-9: sc in each st around (36)
Round 10: [10 sc, dec] 3 times (33)
Round 11: sc in each st around (33)
Round 12: [9 sc, dec] 3 times (30)
Round 13: sc in each st around (30)
Round 14: [3 sc, dec] 6 times (24)
Stuff the base of the body firmly so Pip can sit upright.
Round 15: sc in each st around (24)
Round 16: [sc, dec] 8 times (16)
Fasten off, leaving a long tail for sewing. Finish stuffing the neck.
The Belly Patch (White)
Row 1: ch 7, sc in 2nd ch from hook and in each across, ch 1, turn (6)
Row 2: inc, 4 sc, inc, ch 1, turn (8)
Row 3: inc, 6 sc, inc, ch 1, turn (10)
Rows 4-6: sc in each st across, ch 1, turn (10)
Row 7: dec, 6 sc, dec, ch 1, turn (8)
Row 8: dec, 4 sc, dec (6)
Fasten off, leaving a long tail for sewing.
The Arms (Make 2)
Begin with Pink
Round 1: 5 sc in magic ring (5)
Round 2: inc in each st around (10)
Round 3: sc in each st around (10)
Change to Light Blue
Rounds 4-8: sc in each st around (10)
Round 9: [3 sc, dec] 2 times (8)
Fasten off, leaving a long tail. Lightly stuff the pink paw, but leave the blue sleeve unstuffed. Pinch the top flat.
The Feet (Make 2)
Use Pink
Round 1: ch 4, sc in 2nd ch from hook, sc in next ch, 3 sc in last ch. Working down the opposite side of the chain: sc in next ch, inc in last ch (8)
Round 2: inc, sc, inc 3 times, sc, inc 2 times (14)
Round 3: sc in each st around (14)
Fasten off, leaving a long tail. Lightly stuff to keep them flat.
The Tail
Begin with Pink
Round 1: 4 sc in magic ring (4)
Rounds 2-10: sc in each st around (4)
Change to Light Blue
Rounds 11-25: sc in each st around (4)
Fasten off, leaving a long tail. Do not stuff.
The Golden Heart Pastry
Use Golden Yellow
Round 1: 6 sc in magic ring (6)
Round 2: [sc, inc] 3 times (9)
Rounds 3-18: sc in each st around (9)
Fasten off, leaving a long tail. You have created a tube. Fold this tube carefully into a heart or pretzel shape, using the tail to sew the loops together securely.
Assembly
🪡 1. Pin the White Muzzle to the Head, centered directly between and slightly below the eyes (spanning Rounds 15 to 19). Stuff it firmly before closing the seam. Using pink yarn, embroider a small triangular nose at the top center of the muzzle.
🪡 2. Embroider three straight, horizontal whiskers on each side of the muzzle using black thread. Add a tiny vertical line dropping from the nose to create the mouth.
🪡 3. Pinch the base of the Ears slightly to create a gentle curve. Sew them to the top sides of the Head, spanning Rounds 5 through 10. Ensure they sit symmetrically.
🪡 4. Sew the White Belly Patch to the front of the Body, aligning the bottom of the patch with Round 4 of the body.
🪡 5. Attach the Head to the Body, sewing stitch by stitch around the neck opening. The chin (bottom of the muzzle) should point directly forward, aligned with the belly patch.
🪡 6. Sew the flattened top of the Arms to the sides of the Body, exactly one round below the neck seam (Round 15). Angle them forward slightly so Pip can hold his pastry.
🪡 7. Sew the Feet to the bottom front of the Body, spanning Rounds 3 and 4, angled slightly outward for stability.
🪡 8. Attach the Tail to the lower back of the Body at Round 4. Curl it forward and tack it into place with a small hidden stitch so it rests neatly beside him.
🪡 9. Finally, position the Golden Heart Pastry between Pip’s paws and secure it with a few discreet stitches through the pink hands.