Welcome back to the atelier. I am so pleased we are proceeding with this vision. There is a profound satisfaction in turning a single strand of yarn into a character with genuine soul. We are creating a piece that balances classic anatomy with an unmistakable, endearing softness.
This is not a project to be rushed. We will shape the yarn purposefully, paying careful attention to the architecture of the cheeks, the slope of the neck, and the precise placement of the eyes to capture that signature innocence.
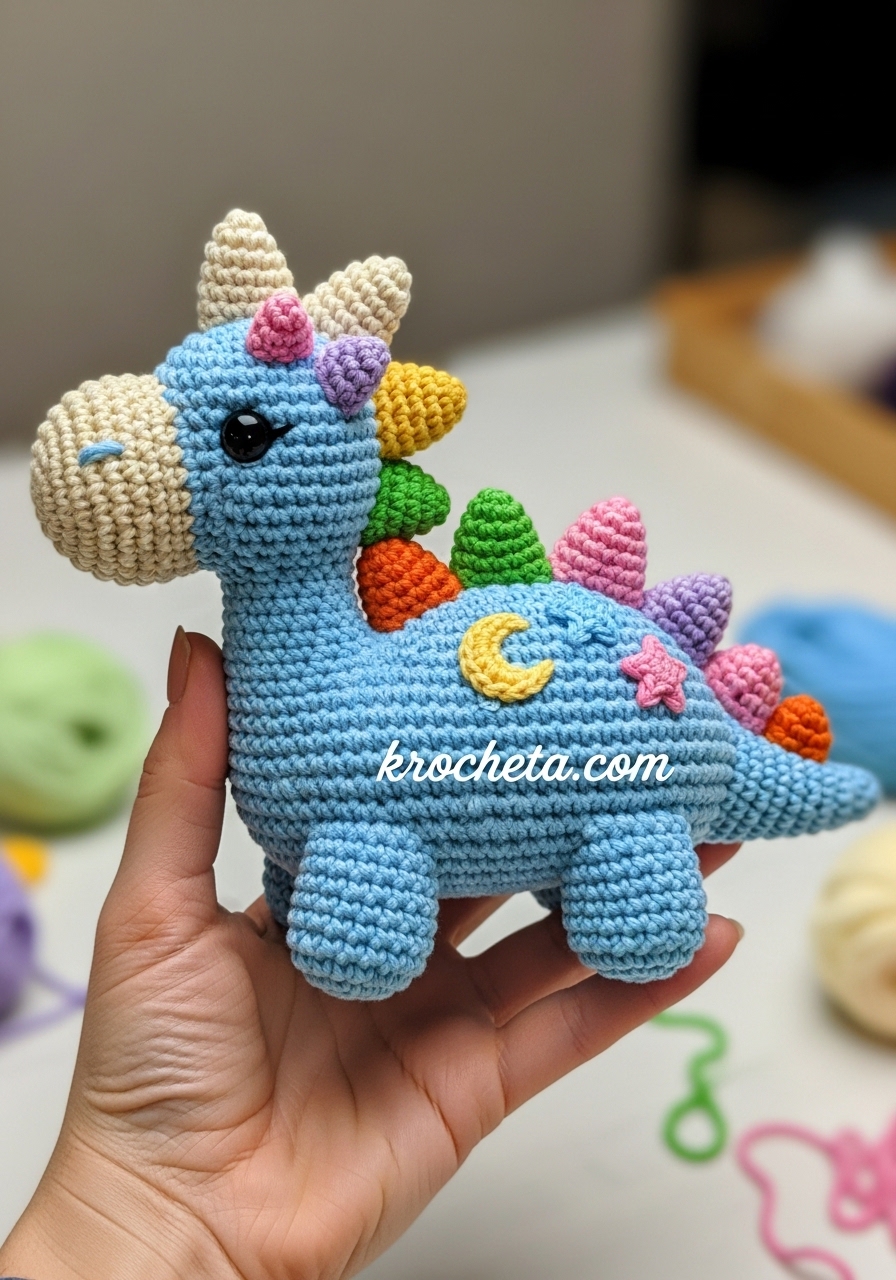
About This Creation
This dinosaur represents the pinnacle of structural amigurumi design. We are moving beyond simple spheres and tubes. By clustering our increases and decreases, we sculpt a face with true volume and legs that possess a natural, sturdy bend. The low, wide-set eyes are calculated to project a gentle, youthful gaze. It is a meticulous process, but the result is a creature of undeniable charm.
Project Snapshot
✨ Height: Approximately 14cm tall, creating a perfect, substantial desk companion.
✨ Difficulty: Advanced Beginner to Intermediate. Comfort with asymmetrical shaping is required.
✨ Construction: The head, neck, and body are worked in one continuous piece for superior structural integrity.
Materials
🧶 Main Yarn: Worsted weight cotton blend in Light Blue, Cream, Soft Pink, Mint Green, Peach Orange, and Pastel Lavender.
🧶 Hook: 2.5mm crochet hook to ensure a dense, gapless fabric.
🧶 Eyes: 10mm black safety eyes.
🧶 Filling: High-quality polyester fiberfill.
🧶 Tools: Yarn needle, stitch markers, embroidery scissors.
Abbreviations
🪡 mr: magic ring
🪡 sc: single crochet
🪡 inc: increase (2 sc in one stitch)
🪡 dec: invisible decrease (sc 2 together)
🪡 ch: chain
🪡 sl st: slip stitch
🪡 hdc: half double crochet
🪡 dc: double crochet
🪡 BLO: back loops only
The Pattern
Head, Neck, and Body Unit
Begin with Light Blue yarn. We start at the crown of the head.
Round 1: 6 sc in mr (6)
Round 2: 6 inc (12)
Round 3: (sc, inc) x 6 (18)
Round 4: (2 sc, inc) x 6 (24)
Round 5: (3 sc, inc) x 6 (30)
Rounds 6-9: 30 sc (30)
Round 10: 10 sc, 10 inc, 10 sc. This creates the essential cheek and snout volume. (40)
Rounds 11-13: 40 sc (40)
Place safety eyes between Rounds 14 and 15, spacing them exactly 9 stitches apart.
Round 14: 40 sc (40)
Round 15: 10 sc, 10 dec, 10 sc. This tucks the chin inward beneath the cheeks. (30)
Round 16: (3 sc, dec) x 6 (24)
Round 17: (2 sc, dec) x 6 (18)
Rounds 18-30: 18 sc. This establishes the long, elegant neck. Stuff the head firmly now. (18)
Round 31: (2 sc, inc) x 6. We now begin sloping outward for the body. (24)
Round 32: (3 sc, inc) x 6 (30)
Round 33: (4 sc, inc) x 6 (36)
Round 34: (5 sc, inc) x 6 (42)
Round 35: (6 sc, inc) x 6 (48)
Rounds 36-45: 48 sc (48)
Round 46: (6 sc, dec) x 6 (42)
Round 47: (5 sc, dec) x 6 (36)
Round 48: (4 sc, dec) x 6 (30)
Round 49: (3 sc, dec) x 6. Stuff the neck and body firmly. (24)
Round 50: (2 sc, dec) x 6 (18)
Round 51: (sc, dec) x 6 (12)
Round 52: 6 dec (6)
Fasten off, weave the tail through the front loops of the remaining 6 stitches, and pull tight to close.
Belly Patch
Using Cream yarn.
Round 1: ch 12.
Round 2: sc in 2nd ch from hook, 9 sc, 3 sc in the last ch. Rotate to work on the opposite side of the foundation chain: 9 sc, 2 sc in the last ch. (24)
Round 3: inc, 9 sc, 3 inc, 9 sc, 2 inc (30)
Round 4: sc, inc, 9 sc, (sc, inc) x 3, 9 sc, (sc, inc) x 2 (36)
Round 5: 2 sc, inc, 9 sc, (2 sc, inc) x 3, 9 sc, (2 sc, inc) x 2 (42)
Fasten off, leaving a long tail for sewing.
Muzzle Tip
Using Cream yarn.
Round 1: 6 sc in mr (6)
Round 2: 6 inc (12)
Round 3: (sc, inc) x 6 (18)
Rounds 4-5: 18 sc (18)
Fasten off, leaving a long tail for sewing.
Cheek Patches (Make 2)
Using Soft Pink yarn.
Round 1: 6 sc in mr (6)
Fasten off, leaving a long tail for sewing.
Legs (Make 4)
Using Light Blue yarn.
Round 1: 6 sc in mr (6)
Round 2: 6 inc (12)
Round 3: (sc, inc) x 6 (18)
Round 4: (2 sc, inc) x 6 (24)
Round 5: In BLO, 24 sc to create a flat foot base. (24)
Rounds 6-8: 24 sc (24)
Round 9: 6 sc, 6 dec, 6 sc. This clusters the decreases to form a subtle knee bend. (18)
Rounds 10-12: 18 sc (18)
Fasten off, leaving a long tail for sewing. Stuff firmly, keeping the flat base intact.
Tail
Using Light Blue yarn.
Round 1: 4 sc in mr (4)
Round 2: (sc, inc) x 2 (6)
Round 3: (2 sc, inc) x 2 (8)
Round 4: 8 sc (8)
Round 5: (3 sc, inc) x 2 (10)
Round 6: 10 sc (10)
Round 7: (4 sc, inc) x 2 (12)
Round 8: 12 sc (12)
Round 9: (5 sc, inc) x 2 (14)
Round 10: 14 sc (14)
Round 11: (6 sc, inc) x 2 (16)
Round 12: 16 sc (16)
Round 13: (7 sc, inc) x 2 (18)
Round 14: 18 sc (18)
Round 15: (8 sc, inc) x 2 (20)
Round 16: 20 sc (20)
Round 17: (9 sc, inc) x 2 (22)
Round 18: 22 sc (22)
Round 19: (10 sc, inc) x 2 (24)
Fasten off, leaving a long tail for sewing. Stuff moderately, allowing it to curve.
Spine Spikes (Make 7)
Make one in Cream, three in Peach Orange, one in Mint Green, one in Pastel Lavender, and one in Soft Pink.
Round 1: 4 sc in mr (4)
Round 2: (sc, inc) x 2 (6)
Round 3: (sc, inc) x 3 (9)
Round 4: (2 sc, inc) x 3 (12)
Round 5: 12 sc (12)
Fasten off, leaving a long tail for sewing. Do not stuff.
Moon Applique
Using Cream yarn.
Row 1: ch 8.
Row 2: sc in 2nd ch from hook, hdc, dc, dc, hdc, sc, sl st. (7)
Fasten off, leaving a long tail for sewing.
Star Applique
Using Cream yarn.
Round 1: In mr, (sc, ch 2, sl st in 2nd ch from hook, sc) x 5.
Fasten off, pull the ring tight, and leave a long tail for sewing.
Assembly
➡️ Sew the Muzzle Tip over Rounds 11-14 of the head, centering it between the eyes. Add a small smile with orange yarn.
➡️ Sew the Cheek Patches directly outside and slightly below the outer edge of each eye.
➡️ Sew the Belly Patch to the front of the body, starting just below the neckline.
➡️ Position the four Legs at the base of the body (Rounds 40-48). Ensure the clustered decreases (the “knees”) are facing forward. Sew securely.
➡️ Attach the Tail to the back of the body over Rounds 38-46, ensuring it rests flush against the ground to provide balance.
➡️ Flatten the Spine Spikes and sew them in a straight line down the back, beginning at Round 6 of the head and ending halfway down the tail.
➡️ Sew the Moon and Star appliques to the side of the body, just above the back leg