Greetings once again, my dedicated artisan. It is Patricia.
The time has come to bring our vision into reality. This project demands patience. The heavy texture requires a rhythmic, deliberate hand. We are not merely making a toy; we are sculpting character through yarn. I have formulated the math to give this chick those irresistible, chubby cheeks and that distinct, youthful proportion. Let us begin.
About This Creation
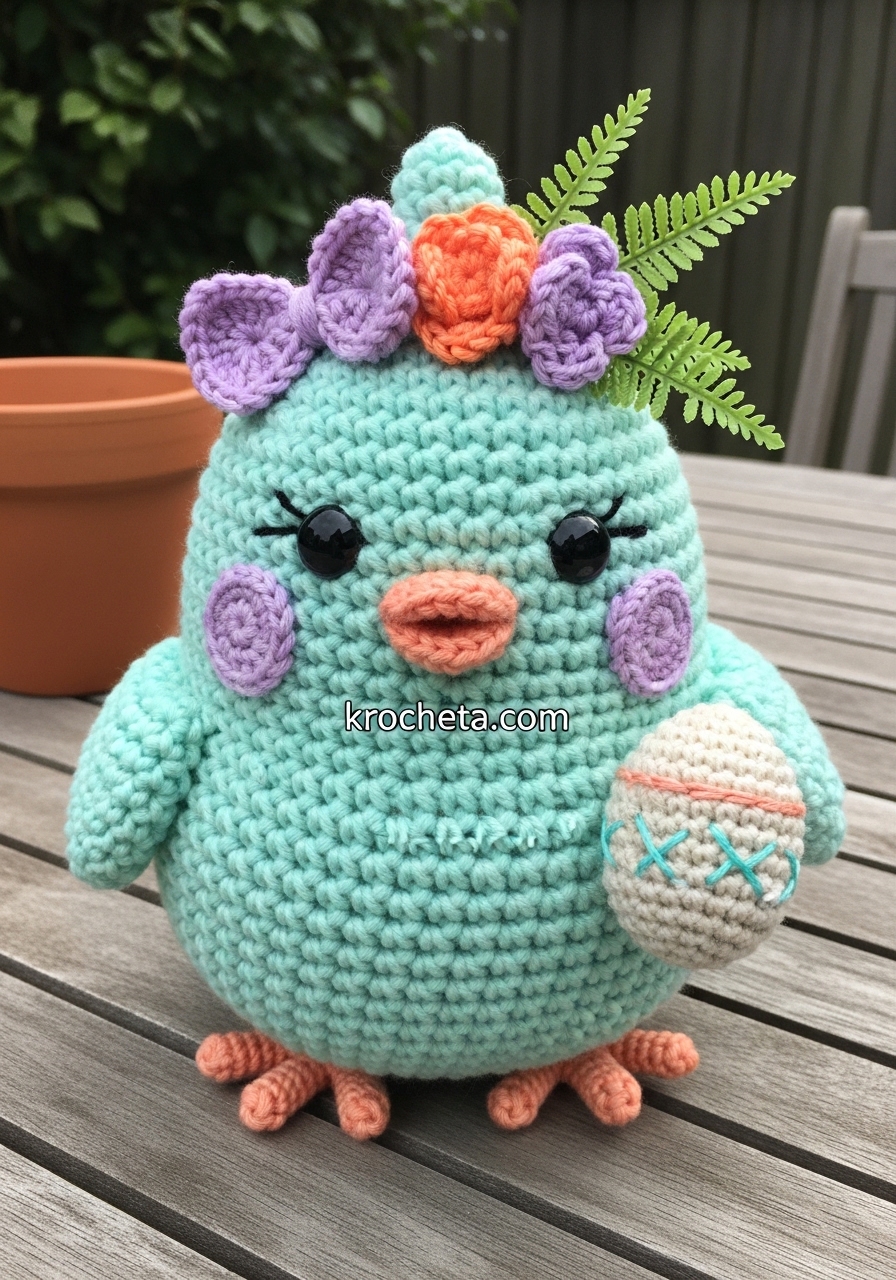
This pattern is a masterclass in tactile crochet. The defining feature is the glorious, bumpy surface. To achieve this, you will alternate standard single crochet stitches with dense bobble stitches. The head is intentionally oversized, precisely calculated to evoke an immediate sense of innocence.
Project Snapshot
✨ Skill Level: Advanced Intermediate
✨ Estimated Time: 12-14 hours
✨ Final Size: Approximately 14cm tall
Materials
🧶 Premium Worsted Weight Cotton Yarn in Mint Green, Peach, Lavender, Cream, Orange, and Fern Green
🧶 2.5mm Crochet Hook (for tight, professional tension)
🧶 16mm Safety Eyes
🧶 High-quality polyester fiberfill
🪡 Tapestry needle for precise assembly
🪡 Stitch markers
Abbreviations (US Terms)
➡️ sc: single crochet
➡️ inc: single crochet increase (two stitches in one)
➡️ dec: invisible single crochet decrease
➡️ hdc: half double crochet
➡️ dc: double crochet
➡️ bo: 5-dc bobble stitch
➡️ sl st: slip stitch
➡️ ch: chain
➡️ MR: Magic Ring
➡️ st/sts: stitch/stitches
The Pattern
The Head and Body Shell
Artisan Note: Work in continuous spirals. For the textured effect, substitute every other ‘sc’ with a ‘bo’ stitch on even-numbered rounds, but follow the mathematical foundation below for precise shaping.
Round 1: 6 sc in MR (6)
Round 2: [inc] x 6 (12)
Round 3: [sc, inc] x 6 (18)
Round 4: [2 sc, inc] x 6 (24)
Round 5: [3 sc, inc] x 6 (30)
Round 6: [4 sc, inc] x 6 (36)
Round 7: [5 sc, inc] x 6 (42)
Round 8: [6 sc, inc] x 6 (48)
Round 9: [7 sc, inc] x 6 (54)
Round 10: [8 sc, inc] x 6 (60)
Round 11 (Cheek Expansion): 20 sc, [inc] x 10, 10 sc, [inc] x 10, 10 sc (80)
Round 12 to 16: sc in each st around (80)
Round 17 (Cheek Reduction): 20 sc, [dec] x 10, 10 sc, [dec] x 10, 10 sc (60)
Round 18: [8 sc, dec] x 6 (54)
Round 19: [7 sc, dec] x 6 (48)
Round 20 (Neck Indent): [2 sc, dec] x 12 (36) Stuff the head firmly now. Ensure the cheeks bulge outward symmetrically.
Round 21 (Body Expansion): [5 sc, inc] x 6 (42)
Round 22: [6 sc, inc] x 6 (48)
Round 23: [7 sc, inc] x 6 (54)
Round 24 to 28: sc in each st around (54)
Round 29: [7 sc, dec] x 6 (48)
Round 30: [6 sc, dec] x 6 (42)
Round 31: [5 sc, dec] x 6 (36)
Round 32: [4 sc, dec] x 6 (30)
Round 33: [3 sc, dec] x 6 (24) Stuff the body firmly.
Round 34: [2 sc, dec] x 6 (18)
Round 35: [sc, dec] x 6 (12)
Round 36: [dec] x 6 (6) Fasten off, weave the tail through the front loops of the remaining 6 stitches, and pull tight to close.
The Beak (Peach)
Upper Beak:
Row 1: Ch 6, starting in 2nd ch from hook work: sc, hdc, dc, hdc, sc (5) Fasten off, leaving a long tail for sewing.
Lower Beak:
Row 1: Ch 5, starting in 2nd ch from hook work: sc, 2 hdc in next st, 2 hdc in next st, sc (6) Fasten off, leaving a long tail for sewing.
Cheek Patches (Lavender, Make 2)
Round 1: 6 sc in MR (6)
Round 2: [bo, inc in next st] x 3 (9)
Round 3: [2 sc, inc] x 3 (12) Fasten off, leaving a tail for sewing.
Small Wings (Mint Green, Make 2)
Round 1: 6 sc in MR (6)
Round 2: [inc] x 6 (12)
Round 3: [sc, inc] x 6 (18)
Round 4 to 6: sc in each st around (18)
Round 7: [sc, dec] x 6 (12)
Round 8 to 9: sc in each st around (12) Do not stuff. Fold the opening flat and crochet 6 sc across both layers to close. Fasten off with a tail.
The Legs (Peach, Make 2)
Toes (Make 3 per leg):
Row 1: Ch 5, sl st in 2nd ch from hook and next 3 chs (4) Do not fasten off the third toe. Sl st across the tops of all three toes to join them.
Ankle:
Round 1: Work 6 sc evenly around the joined tops of the toes (6)
Round 2 to 4: sc in each st around (6) Fasten off, leaving a tail for sewing.
Top Feathers (Mint Green)
Row 1: Ch 12, sl st in 2nd ch from hook and next 10 chs. Ch 10, sl st in 2nd ch and next 8 chs. Ch 8, sl st in 2nd ch and next 6 chs. (30) Gather the bottom bases of the three strands together with a tight knot. Fasten off with a tail.
Bow Accessory (Lavender)
Round 1: Ch 20, join with a sl st to form a ring. (20)
Round 2 to 4: sc in each st around (20) Fasten off. Flatten the cylinder. Wrap a long strand of lavender yarn tightly around the exact center to pinch it into a bow shape. Secure with a knot.
Floral Cluster
Large Orange Flower:
Round 1: In a MR work [ch 2, 2 dc, ch 2, sl st into ring] x 5. (20) Fasten off and pull ring tight.
Small Lavender Flower:
Round 1: In a MR work [ch 1, hdc, ch 1, sl st into ring] x 5. (15) Fasten off and pull ring tight.
Fern Sprigs (Green, Make 2):
Row 1: Ch 8, sl st in 2nd ch and next ch. [Ch 3, sl st in 2nd ch and next ch, sl st back into main chain] x 3. Sl st to end of main chain. (17) Fasten off.
The Decorated Easter Egg (Cream)
Round 1: 6 sc in MR (6)
Round 2: [inc] x 6 (12)
Round 3: [sc, inc] x 6 (18)
Round 4: [2 sc, inc] x 6 (24)
Round 5: [3 sc, inc] x 6 (30)
Round 6 to 10: sc in each st around (30)
Round 11: [3 sc, dec] x 6 (24)
Round 12: sc in each st around (24)
Round 13: [2 sc, dec] x 6 (18) Stuff the egg firmly.
Round 14: [sc, dec] x 6 (12)
Round 15: [dec] x 6 (6) Fasten off and close the hole. Use your tapestry needle and mint green/lavender yarn to embroider zig-zags and French knots around the center.
Assembly
Precision is paramount, my friend. A millimeter off can ruin the expression.
➡️ Insert the 16mm safety eyes between Rounds 13 and 14 of the head. Space them exactly 9 stitches apart.
➡️ Sew the Upper Beak directly between the eyes, spanning Rounds 13 and 14.
➡️ Sew the Lower Beak immediately beneath it on Round 15, curving it slightly upward to create an open mouth.
➡️ Pin the Lavender Cheek Patches over the expanded cheek sections on Rounds 14 to 16. Sew them flat.
➡️ Attach the Top Feathers to the absolute center of Round 1 on the head.
➡️ Sew the Bow Accessory to the upper left side of the head, spanning Rounds 3 to 6.
➡️ Cluster the Large Orange Flower, Small Lavender Flower, and Fern Sprigs closely around the base of the Bow. Secure them firmly.
➡️ Sew the Wings to the sides of the body at Round 22.
➡️ Pin the Decorated Easter Egg to the center of the belly. Stitch the ends of both Wings to the sides of the Egg to secure it in place.
➡️ Sew the Legs to the bottom of the body, spanning Rounds 32 and 33. Ensure the chick can balance upright.

