There is a profound magic in crafting a character that holds so many memories for us. This project is not merely about stitches; it is about capturing a spirit of loyalty and adventure. We are building a friend who looks as though he has just stepped out of a toy chest, ready to keep watch over your home. Breathe deeply, trust your hands, and let us shape this story together.
About This Creation & The Art of Detail
This project focuses on “The Architectural Stitch.” Unlike simple spheres, our Sheriff relies on distinct, modified shapes to achieve his stylized, expressive look. We are moving beyond basic rounds into the territory of sculpted chins, defined boot heels, and layered clothing. This is a study in texture—from the matte finish of the denim legs to the structured brim of his signature hat. It is designed for those who wish to elevate their finishing techniques.
Project Snapshot
📊 Difficulty: Intermediate to Advanced (Requires embroidery & color work)
⏰ Est. Time: 18–22 Hours
📏 Size: Approx. 12 inches (30cm) tall
“We do not rush the stitch; we respect the stitch.” — Patricia
Materials & Tools Needed
🧶 Yarn: 100% Mercerized Cotton (DK or Sport Weight). Colors: Sand/Beige (Skin), Sunshine Yellow (Shirt), Indigo Blue (Jeans), Saddle Brown (Boots/Hat), Dark Brown (Hair).
🪡 Hook: 2.25mm (B-1) or 2.5mm (to ensure a stiff, hole-free fabric)
✨ Other Materials: 12mm Safety Eyes (Black) Polyester fiberfill (high loft) Yellow felt (for the badge) Red fabric or felt (for the handkerchief) Gold embroidery thread Black embroidery floss Fabric glue Tapestry needle (bent tip preferred)
Abbreviations & Stitches Used
ch: chain
sl st: slip stitch
sc: single crochet
hdc: half double crochet
inc: increase (2 sc in one st)
dec: invisible decrease
BLO: back loop only
FLO: front loop only
The Complete Frontier Sheriff Pattern
Component 1: The Sheriff’s Boots & Legs (Make 2)
We begin at the foundation. A hero must have steady footing.
The Boot (Start with Saddle Brown)
🧶 R1: Ch 6. Start in 2nd ch from hook. Sc 4, 3 sc in last ch. Rotate to other side. Sc 3, inc in last st. (12)
🧶 R2: Inc, sc 3, inc x3, sc 3, inc x2. (18)
🧶 R3: (Sc 1, inc), sc 3, (sc 1, inc) x3, sc 3, (sc 1, inc) x2. (24)
🧶 R4: BLO sc around. (24) Creates the sole edge.
🧶 R5–R6: Sc around. (24)
🧶 R7: Sc 6, dec x6, sc 6. (18) Shaping the toe.
🧶 R8: Sc 6, dec x3, sc 6. (15)
🧶 R9: Sc around. (15)
🧶 R10: (Front of boot detail) Sc 4, hdc 7, sc 4. (15) Creates the curve of the boot shaft.
🧶 R11: Sc around. (15)
The Leg (Switch to Indigo Blue)
Stuff the boot firmly here.
🧶 R12: BLO sc around. (15)
🧶 R13–R25: Sc around. (15) Continue until leg measures approx. 4 inches.
🧶 R26: (Knee Shaping) Sc 5, dec, sc 1, inc x2 (kneecap), sc 1, dec, sc 2. (15)
🧶 R27–R35: Sc around. (15)
🧶 Fasten off first leg. Do not fasten off second leg.
Component 2: Joining & Torso
From the legs, we rise to the heart.
🧶 R36: Hold legs together. Sc 3 on second leg, ch 3, join to first leg with sc. Sc around first leg (15), sc across ch 3 (3), sc around second leg (15), sc across back of ch 3 (3). (36)
🧶 R37–R40: Sc around. (36)
🧶 R41: (Switch to Black for Belt) Sc around. (36)
🧶 R42: BLO sc around. (36)
🧶 R43: (Switch to Sunshine Yellow) Sc around. (36)
🧶 R44–R50: Sc around. (36)
🧶 R51: (Sc 4, dec) around. (30)
🧶 R52–R55: Sc around. (30)
🧶 R56: (Sc 3, dec) around. (24)
🧶 R57: (Sc 2, dec) around. (18)
🧶 R58: (Switch to Beige/Skin) BLO sc around. (18) This defines the neck collar.
🧶 R59–R60: Sc around. (18) Fasten off, leaving a long tail for the head.
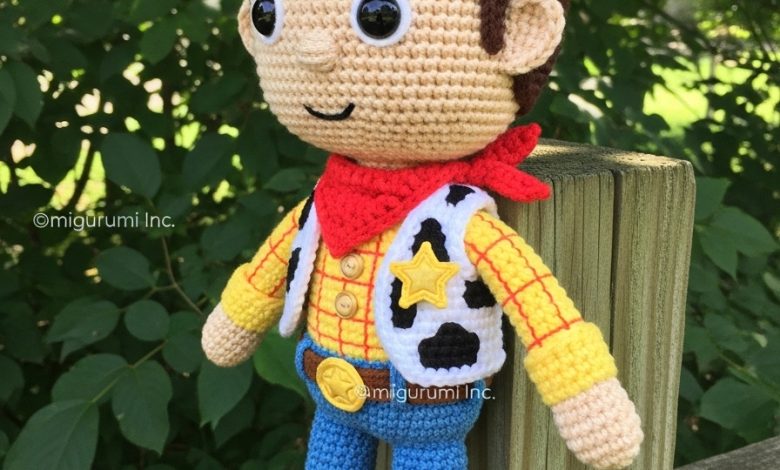
Artisan’s Note: Before attaching the head, use red embroidery floss to stitch a grid/windowpane pattern onto the yellow shirt section.
Component 3: The Head
The seat of expression. We want a “pop” style shape—wider than it is tall.
🧶 R1: (In Beige) 6 sc in Magic Ring.
🧶 R2: Inc x6. (12)
🧶 R3: (Sc 1, inc) x6. (18)
🧶 R4: (Sc 2, inc) x6. (24)
🧶 R5: (Sc 3, inc) x6. (30)
🧶 R6: (Sc 4, inc) x6. (36)
🧶 R7: (Sc 5, inc) x6. (42)
🧶 R8: (Sc 6, inc) x6. (48)
🧶 R9: (Sc 7, inc) x6. (54)
🧶 R10: (Sc 8, inc) x6. (60)
🧶 R11–R24: Sc around. (60) This extended section creates the large, innocent forehead.
Insert safety eyes between R19 and R20, approx. 11 stitches apart.
🧶 R25: (Sc 8, dec) x6. (54)
🧶 R26: (Sc 7, dec) x6. (48)
🧶 R27: (Sc 6, dec) x6. (42)
🧶 R28: (Sc 5, dec) x6. (36)
🧶 R29: (Sc 4, dec) x6. (30)
🧶 R30: (Sc 3, dec) x6. (24)
🧶 R31: (Sc 2, dec) x6. (18)
🧶 Fasten off and weave in ends.
Component 4: The Arms (Make 2)
🧶 R1: (In Beige) 6 sc in Magic Ring.
🧶 R2: (Sc 2, inc) x2. (8)
🧶 R3–R4: Sc around. (8)
🧶 R5: (Thumb) Sc 3, ch 3, sl st in same st, sc 4. (8)
🧶 R6: (Switch to Sunshine Yellow) Sc around (skip the ch-3 loop, push it out). (8)
🧶 R7–R18: Sc around. (8)
🧶 Fasten off, leave tail for sewing.
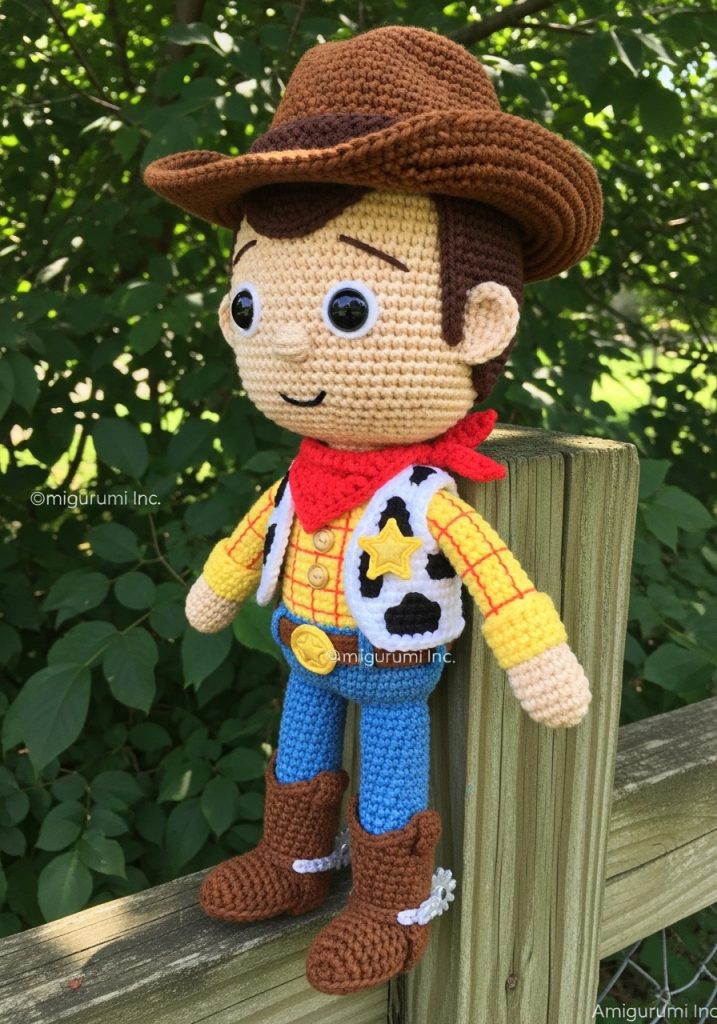
Component 5: The Cowboy Hat
The crown of the West.
🧶 R1: (In Saddle Brown) 6 sc in Magic Ring.
🧶 R2: Inc x6. (12)
🧶 R3: (Sc 1, inc) x6. (18)
🧶 R4: (Sc 2, inc) x6. (24)
🧶 R5: (Sc 3, inc) x6. (30)
🧶 R6: BLO sc around. (30) Creates the top ridge.
🧶 R7–R10: Sc around. (30)
🧶 R11: FLO (Sc 4, inc) x6. (36) Brim starts.
🧶 R12: (Sc 5, inc) x6. (42)
🧶 R13: (Sc 6, inc) x6. (48)
🧶 R14: (Sc 7, inc) x6. (54)
🧶 R15: Sc around. (54)
🧶 R16: (Detailing) Sl st loosely around the edge with a darker brown yarn for the “whipped” look.
Assembly & Final Touches
➡️ The Vest: Cut a simple waistcoat shape from white felt. Paint or draw irregular black cow spots. Glue or stitch onto the torso.
➡️ The Face: Embroider thick, slanted eyebrows in dark brown 2 rows above the eyes for that confident look. Blush the cheeks lightly with pink chalk or rouge.
➡️ The Hair: Create a wig cap in Dark Brown (follow Head R1-R9), then sew onto the head. Embroider sideburns directly onto the face skin.
➡️ The Hardware: Cut an oval from yellow felt for the belt buckle (stitch a spiral for gold detail). Cut a star shape for the badge and attach to the vest.
➡️ The Scarf: Fold a small triangle of red fabric, roll it, and tie it loosely around the neck.
Tips & FAQs
Q: How do I keep the head from wobbling? A: Because the head is large (“Echo of Youth”), insert a supportive dowel or a tightly rolled tube of felt into the neck before sewing the head to the body.
Q: Can I crochet the vest instead of felt? A: Absolutely. Crochet a flat panel in white sc, decreasing at the top for armholes, and use black yarn to carry along spots—though felt yields a cleaner “cartoon” aesthetic.
A Final Word
You have stitched more than a doll; you have crafted a guardian. Look at him—imperfect, perhaps, but filled with the energy of your own hands. May he bring joy to the shelf he occupies. Until we meet again at the drafting table.
Yours in creativity,
Patricia