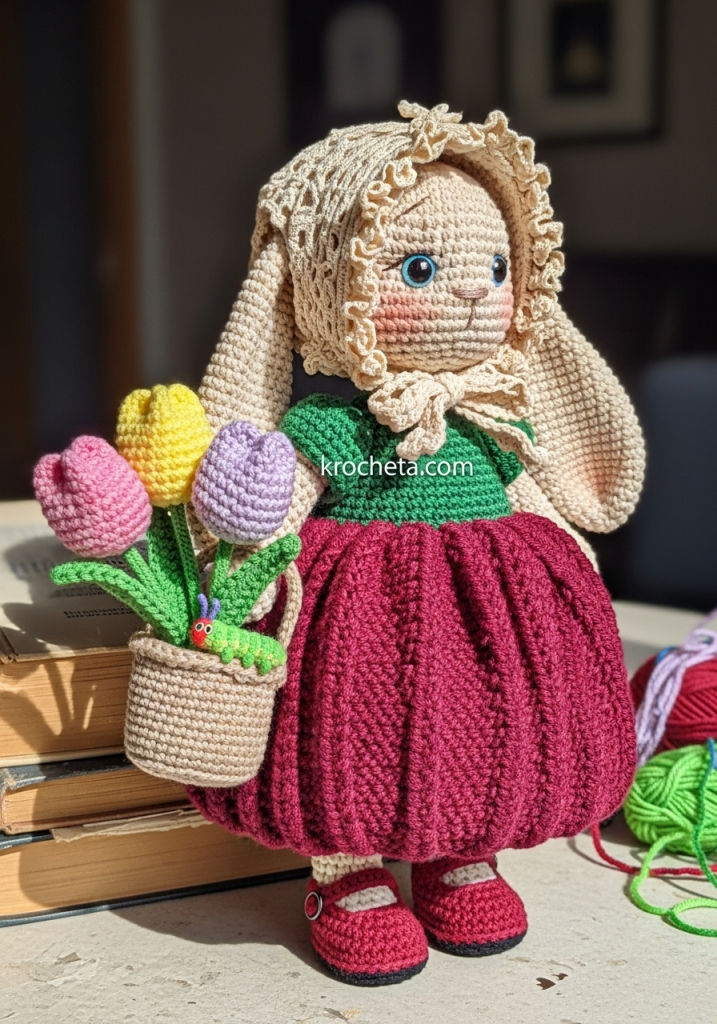
Today, we honor the quiet beauty of the garden. Elara is not merely a toy; she is a keeper of secrets and a tender of blooms. In designing her, I sought to capture the feeling of a sun-drenched afternoon in a cottage garden. We shall focus heavily on tension and texture today—specifically, the architectural “puff” of her dress and the delicate lace of her bonnet. Take your time. Perfection is a journey, not a race.
About This Creation & The Structural Angle
We are moving beyond basic spheres. The soul of this project lies in the “Pumpkin Silhouette” of the skirt. Many patterns rely on simple increases to create volume, but we will utilize Front Post Double Crochet (FPdc) stitches to build vertical rigidities. This creates deep, shadow-casting grooves that mimic the segments of a pumpkin or a vintage parachute skirt. Furthermore, we are employing the “Baby Schema” ratio—a slightly oversized head with low-set eyes—to trigger an immediate, biological nurturing response.
Project Snapshot
📊 Difficulty: Intermediate (Requires comfort with post stitches and color changes)
⏰ Est. Time: 8–10 Hours of mindful crafting
📏 Size: Approximately 15cm tall (excluding ears)
“The difference between a doll and a treasure is the soul you stitch into the eyes.” — Patricia Poltera
Materials & Tools Needed
🧶 Yarn: High-quality 100% Cotton DK weight (e.g., Ricorumi or Hobbii Rainbow).
- Cream (Skin/Fur)
- Forest Green (Bodice)
- Deep Burgundy/Maroon (Skirt)
- Ruby Red (Shoes)
- Scraps: Lemon Yellow, Soft Pink, Lavender, Lime Green, Emerald Green.
🪡 Hook: 2.5mm (B-1) for a tight gauge.
✨ Other Materials:
- 9mm Safety Eyes (Black)
- Fiberfill (high loft)
- Tapestry needle (sharp tip preferred)
- Blush yarn or fabric pastel for cheeks
- Plastic canvas circle (for basket base)
- 2 tiny gold beads (shoe buttons)
Abbreviations & Stitches Used
ch: chain sl st: slip stitch sc: single crochet inc: increase (2 sc in one st) dec: decrease (invisible decrease preferred) hdc: half double crochet dc: double crochet FPdc: Front Post double crochet (yarn over, insert hook around the post of the stitch from front to back to front, complete dc) BLO: Back Loop Only FLO: Front Loop Only
The Complete Elara Pattern
Component 1: The Soulful Head (Cream)
We aim for a “flattened sphere” look to widen the face.
➡️ Round 1: Start 6 sc in a magic ring. (6)
➡️ Round 2: Inc in every st. (12)
➡️ Round 3: Sc 1, inc repeat 6 times. (18)
➡️ Round 4: Sc 2, inc repeat 6 times. (24)
➡️ Round 5: Sc 3, inc repeat 6 times. (30)
➡️ Round 6: Sc 4, inc repeat 6 times. (36)
➡️ Round 7: Sc 5, inc repeat 6 times. (42)
➡️ Round 8: Sc 6, inc repeat 6 times. (48)
➡️ Round 9: Sc 7, inc repeat 6 times. (54)
➡️ Round 10–22: Sc in each st around. (54) [13 rounds of height]
➡️ Round 23: Sc 7, dec repeat 6 times. (48)
➡️ Round 24: Sc 6, dec repeat 6 times. (42)
Artisan’s Note: Insert safety eyes between Rounds 17 and 18, roughly 10 stitches apart. Ensure they are low on the face.
➡️ Round 25: Sc 5, dec repeat 6 times. (36)
➡️ Round 26: Sc 4, dec repeat 6 times. (30)
➡️ Round 27: Sc 3, dec repeat 6 times. (24)
➡️ Round 28: Sc 2, dec repeat 6 times. (18)
➡️ Fasten off, leaving a long tail for sewing. Stuff very firmly, focusing on the cheeks.
Component 2: The Spoon Ears (Make 2 – Cream)
These should be stiff enough to stand but soft enough to curve.
➡️ Round 1: Start 6 sc in a magic ring. (6)
➡️ Round 2: Sc 2, inc repeat 2 times. (8)
➡️ Round 3: Sc 3, inc repeat 2 times. (10)
➡️ Round 4: Sc 4, inc repeat 2 times. (12)
➡️ Round 5: Sc 5, inc repeat 2 times. (14)
➡️ Round 6: Sc 6, inc repeat 2 times. (16)
➡️ Round 7–14: Sc in each st around. (16) [8 rounds]
➡️ Round 15: Sc 6, dec repeat 2 times. (14)
➡️ Round 16: Sc in each st around. (14)
➡️ Round 17: Sc 5, dec repeat 2 times. (12)
➡️ Fasten off. Do not stuff. Flatten the ear and fold the bottom in half; sew the fold to create a curved shape.
Component 3: Legs & Body (Red, Cream, Forest Green)
We begin with the shoes.
➡️ Round 1 (Red): Start 6 sc in a magic ring. (6)
➡️ Round 2: Inc in every st. (12)
➡️ Round 3: Sc 3, inc repeat 3 times. (15)
➡️ Round 4–5: Sc in each st around. (15)
➡️ Round 6: Sc 4, dec 3 times (creates toe), sc 5. (12)
➡️ Round 7 (Change to Cream): BLO sc in each st around. (12)
➡️ Round 8–14: Sc in each st around. (12) [Make 2 legs. Do not cut yarn on second leg.]
➡️ Round 15 (Join): Sc 6 on second leg, ch 3, sc 12 on first leg, sc 3 on ch, sc 6 on second leg. (30)
➡️ Round 16–18: Sc in each st around. (30)
➡️ Round 19 (Change to Forest Green): Sc in each st around. (30)
➡️ Round 20 (The Waist): BLO sc in each st around. (30) [This leaves front loops for the skirt later]
➡️ Round 21–25: Sc in each st around. (30)
➡️ Round 26: Sc 3, dec repeat 6 times. (24)
➡️ Round 27: Sc 2, dec repeat 6 times. (18)
➡️ Round 28: Sc in each st around. (18)
➡️ Fasten off. Stuff body firmly.
Component 4: The Pumpkin Skirt (Burgundy)
Attach yarn to the Front Loops of Round 20 of the body. Hold the doll upside down.
➡️ Round 1: Ch 2 (counts as dc), dc in same st, 2 dc in each st around. Join. (60)
➡️ Round 2: Ch 2, FPdc around next st, dc in next 2 sts repeat around. Join. (60) Artisan’s Note: This sets the rhythm. The FPdc creates the vertical ridge.
➡️ Round 3–8: Ch 2, FPdc around the FPdc of previous row, dc in next 2 sts repeat around. Join. (60)
➡️ Round 9 (Hem): Ch 1, sc in next 2 sts, inc repeat around. (80) creates a slight ruffle at the bottom.
➡️ Fasten off and weave in ends.
Component 5: The Vintage Bonnet (Ecru/Cream)
Worked in rows initially, then joined.
➡️ Row 1: Ch 40. Starting 2nd ch from hook, sc across. (39)
➡️ Row 2: Ch 2 (counts as hdc), turn. Skip 1, (1 hdc, ch 1, 1 hdc) in next st, skip 1 repeat across. End with hdc in last st.
➡️ Row 3–5: Repeat Row 2, working the V-stitch (hdc, ch 1, hdc) into the ch-1 space of the previous row.
➡️ Row 6 (Back of Head): Work sc across the bottom edge to gather it slightly.
➡️ Ties: Attach yarn to corners and ch 30 for ties.
Component 6: Arms (Make 2 – Cream & Green)
➡️ Round 1 (Cream): Start 6 sc in a magic ring. (6)
➡️ Round 2: Sc 2, inc repeat 2 times. (8)
➡️ Round 3–10: Sc in each st around. (8)
➡️ Round 11 (Change to Green): Sc in each st around. (8)
➡️ Round 12: Sc in each st around. (8)
➡️ Fasten off. Lightly stuff only the bottom half.
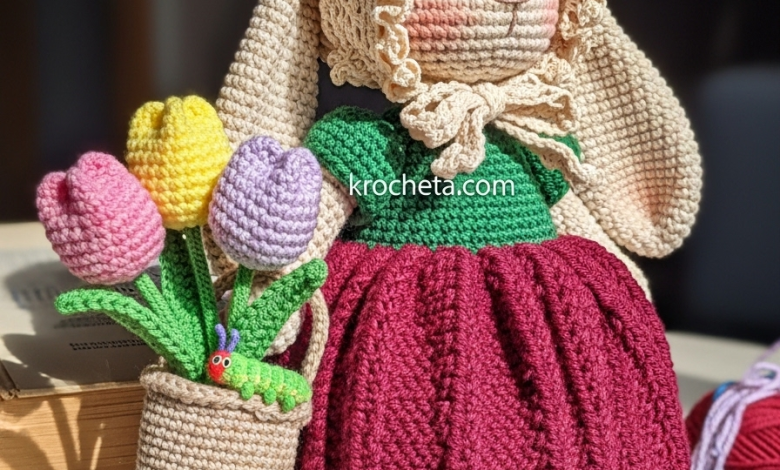
Component 7: The Harvest Basket & Tulips
Basket (Beige): ➡️ Round 1: 6 sc in magic ring. ➡️ Round 2: Inc around (12). ➡️ Round 3: Sc 1, inc (18). ➡️ Round 4: BLO sc around (18). ➡️ Round 5–8: Sc around. Fasten off. Add a pipe cleaner or wire for the handle, wrapped in yarn.
Tulips (Pink, Yellow, Lavender): ➡️ Row 1: Ch 4, join to ring. ➡️ Row 2: Work 5 puff stitches into the ring. Close tightly. ➡️ Stem: Chain 6 in green attached to bottom of puff.
Pip the Caterpillar (Lime & Emerald): ➡️ Chain 10. In 2nd ch from hook, make a bobble stitch. Sl st in next. Bobble in next. Repeat until end. Use black thread to make tiny eyes.
Assembly & Final Touches
- Head to Body: Pin the head securely. Ensure the nose aligns with the center of the bodice. Sew using the whip stitch for a seamless neck.
- Arms: Attach arms at Round 27 of the body, slightly angled forward so she can hold her basket.
- The Face: Embroider a “Y” shape for the nose using brown thread. Use a real makeup brush or blush yarn to pink the cheeks.
- The Collar: Surface crochet a collar directly onto the neck in Green: Ch 2, dc in next 3, sl st repeat around.
- Shoes: Sew the gold beads onto the outer side of the red shoe section to simulate a strap button.
Tips & FAQs
Q: My skirt isn’t puffing out enough. A: The structure relies on the FPdc ridges, but also on the yarn. Cotton holds the shape best. If it’s flat, try blocking it gently with steam, pushing the fabric outwards from the inside.
Q: Can I use acrylic yarn? A: You may, but acrylic often fuzzes and loses stitch definition over time. For a true heirloom finish, mercerized cotton is superior.
A Final Word
Elara is now complete, ready to tend her tulips. Remember, the imperfections in your tension are simply the handwriting of your spirit. May she bring a touch of eternal spring to your home.
Yours in creativity, Patricia Poltera