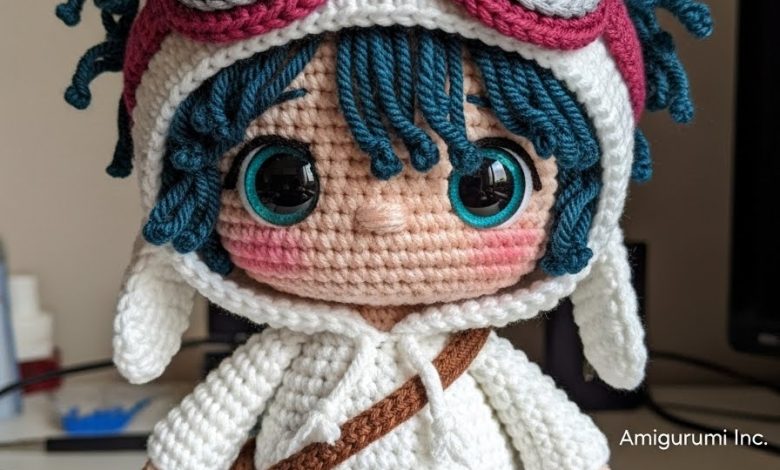
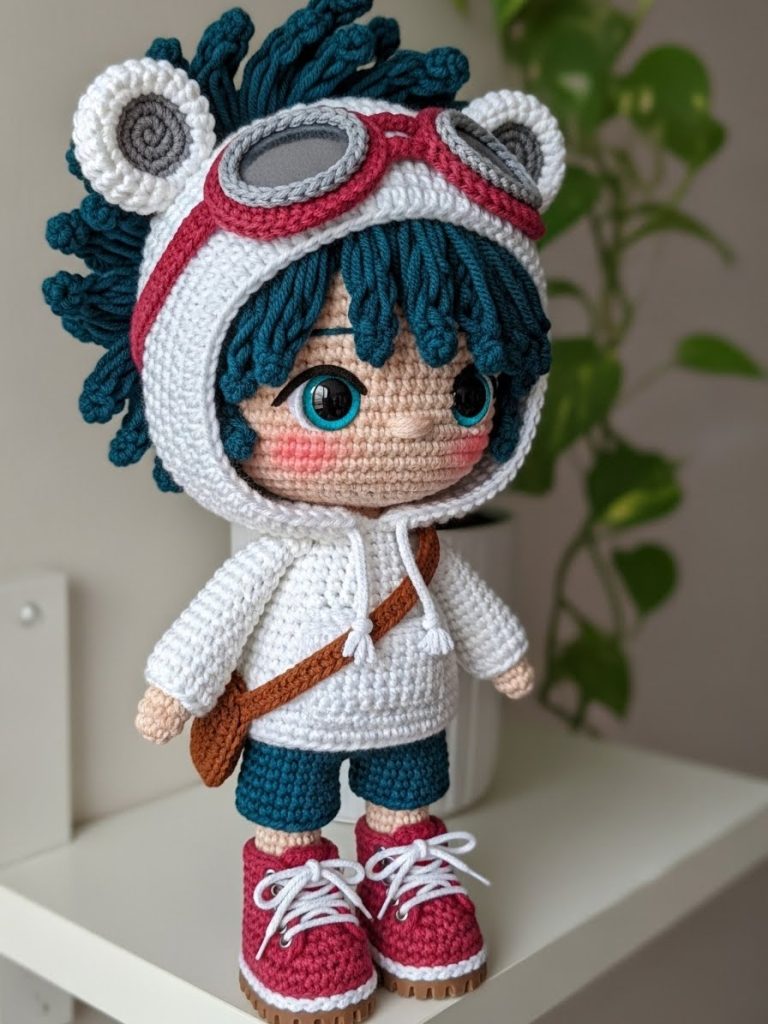
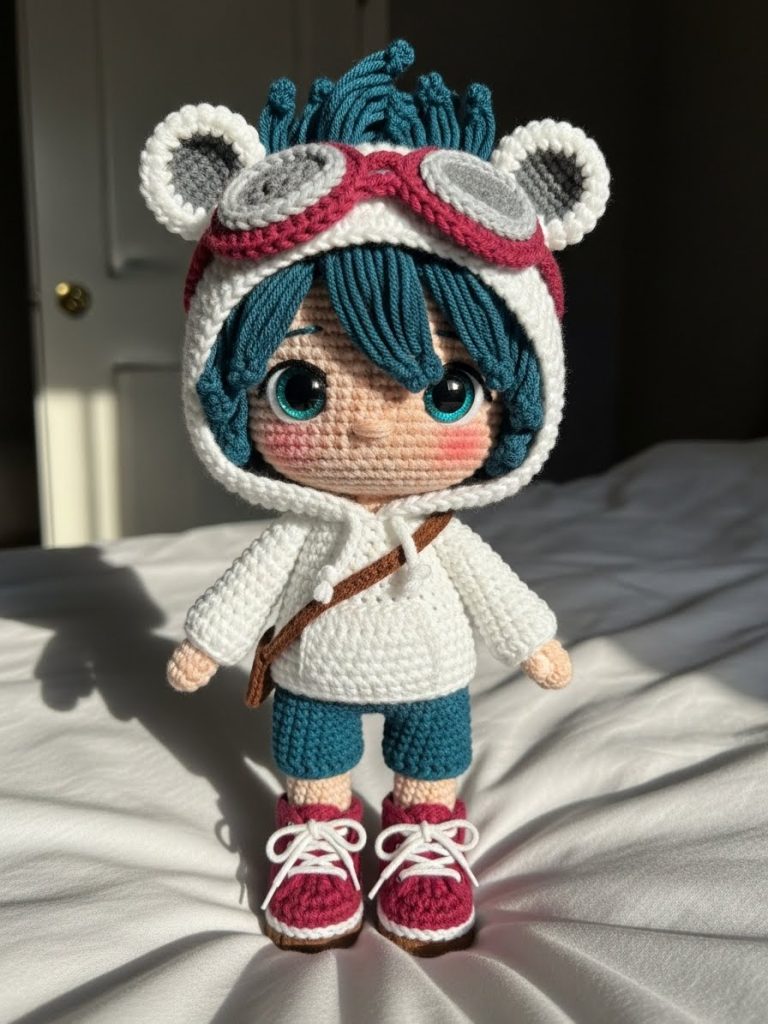
There is a particular joy in stitching a character who looks ready to leap off the shelf and into a grand story. Oliver is one such spirit. With his wind-swept hair and trusty goggles, he represents the curiosity in all of us. I have designed this project to be a satisfying journey—balancing simple shaping with engaging textures. Take your time with his hair; it is the crown of his personality. Let us begin.
About This Creation & The “Texture” Angle
In the world of amigurumi, flat surfaces can sometimes feel lackluster. Oliver is designed to break that mold. We focus heavily here on “layering”—creating a sense of depth by crocheting a separate hood, using front-post stitches for boot cuffs, and constructing a multi-layered wig for that authentic anime aesthetic. This project is not just a toy; it is a lesson in bringing 2D character designs into a 3D space without losing their charm.
Project Snapshot
📊 Difficulty: Intermediate (Requires patience with hair assembly and color changes)
⏰ Est. Time: 10–12 Hours
📏 Size: Approx. 20cm (8 inches) tall using DK weight yarn
“The soul of the doll is in the placement of the eyes. Do not rush that moment.” — Patricia
Materials & Tools Needed
🧶 Yarn: DK or Sport weight cotton.
- Skin Tone: Cream or Light Beige
- Hair: Dark Teal or Azure Blue
- Outfit: White (Hoodie), Dark Blue (Shorts), Muted Red/Pink (Boots/Cuffs/Goggles), Brown (Straps)
🪡 Hook: 2.5mm (or size needed to obtain tight tension)
✨ Other Materials:
- 10mm or 12mm Safety Eyes (Blue or Black)
- Polyester Fiberfill stuffing
- Yarn needle (bent tip preferred)
- Stitch markers
- Optional: Fabric glue for hair placement
- Blush powder for cheeks
Abbreviations & Stitches Used
ch: chain sl st: slip stitch sc: single crochet inc: increase (2 sc in one st) dec: invisible decrease (sc 2 together through front loops) BLO: back loops only FLO: front loops only hdc: half double crochet
The Complete Oliver the Sky Scout Pattern
I. The Boots & Legs (Make 2) Start with Muted Red/Pink yarn.
Rnd 1: ch 6. Starting in 2nd ch from hook, sc 4, 3 sc in last ch. Turn to work along the other side: sc 3, inc in last st. (12)
Rnd 2: inc, sc 3, inc x 3, sc 3, inc x 2. (18)
Rnd 3: BLO sc around. (18) Creates the sole definition.
Rnd 4–5: sc around. (18)
Rnd 6: sc 5, dec x 4, sc 5. (14) Shaping the toe.
Rnd 7: sc 5, dec x 2, sc 5. (12)
Rnd 8: sc around. (12) Stuff the foot firmly.
Rnd 9: Change to Skin Tone. BLO sc around. (12) Note: We will come back to the front loops of Rnd 9 later to add the boot cuff.
Rnd 10–14: sc around. (12) Fasten off the first leg. Do not fasten off the second leg. Ch 2 to join legs.
II. The Body Continue from second leg.
Rnd 15: Join to first leg with a sc. sc 11 around first leg, sc 2 along the chain, sc 12 around second leg, sc 2 along other side of chain. (28)
Rnd 16: Change to Dark Blue (Shorts). sc around. (28)
Rnd 17: (sc 6, inc) x 4. (32)
Rnd 18–20: sc around. (32)
Rnd 21: Change to White (Hoodie). BLO sc around. (32) Creates the hem of the sweater.
Rnd 22–24: sc around. (32)
Rnd 25: (sc 6, dec) x 4. (28)
Rnd 26: sc around. (28)
Rnd 27: (sc 5, dec) x 4. (24)
Rnd 28: sc around. (24)
Rnd 29: (sc 2, dec) x 6. (18)
Rnd 30: Change to Skin Tone. BLO sc around. (18) Neck definition.
Rnd 31: sc around. (18) Stuff body firmly. Do not fasten off; continue to Head.
III. The Head Continuing from Neck (Rnd 31).
Rnd 32: (sc 2, inc) x 6. (24)
Rnd 33: (sc 3, inc) x 6. (30)
Rnd 34: (sc 4, inc) x 6. (36)
Rnd 35: (sc 5, inc) x 6. (42)
Rnd 36: (sc 6, inc) x 6. (48)
Rnd 37–47: sc around (11 rounds). (48) Insert Safety Eyes between Rnds 41 and 42, approximately 9 stitches apart.
Rnd 48: (sc 6, dec) x 6. (42)
Rnd 49: (sc 5, dec) x 6. (36)
Rnd 50: (sc 4, dec) x 6. (30)
Rnd 51: (sc 3, dec) x 6. (24) Stuff head firmly.
Rnd 52: (sc 2, dec) x 6. (18)
Rnd 53: (sc 1, dec) x 6. (12)
Rnd 54: dec x 6. (6) Fasten off and close hole.
IV. The Arms (Make 2) Start with Skin Tone.
Rnd 1: Magic ring, 6 sc. (6)
Rnd 2: (sc 2, inc) x 2. (8)
Rnd 3: sc around. (8)
Rnd 4: Change to Red/Pink. sc around. (8)
Rnd 5: Change to White. BLO sc around. (8)
Rnd 6–11: sc around. (8)
Rnd 12: Fold flat and sc through both sides to close. Leave a tail for sewing.
V. The Aviator Hood Use White yarn.
Rnd 1: Magic ring, 6 sc. (6)
Rnd 2: inc x 6. (12)
Rnd 3: (sc 1, inc) x 6. (18)
Rnd 4: (sc 2, inc) x 6. (24)
Rnd 5: (sc 3, inc) x 6. (30)
Rnd 6: (sc 4, inc) x 6. (36)
Rnd 7: (sc 5, inc) x 6. (42)
Rnd 8: (sc 6, inc) x 6. (48)
Rnd 9–14: sc around. (48)
Rnd 15: BLO sc around (creates the rim). (48)
Rnd 16–17: sc around. (48) Fasten off. This hood is designed to fit snugly over the back of the head. You may need to adjust increases based on your tension.
VI. The Hair (Wig Cap & Spikes) Use Dark Teal/Azure yarn.
Base Cap: Follow Head instructions Rnds 1–37 (until you have 48 sts and worked a few even rounds). Test fit on head. It should cover the top and back.
The Spikes (Crocheted directly onto the wig cap edge): Instead of fastening off the cap, ch 1 and turn. Spike A (Small): ch 5, start in 2nd ch from hook, sl st, sc, hdc, hdc. Skip 1 st on cap, sl st in next. Spike B (Medium): ch 7, start in 2nd ch from hook, sl st, sc, hdc, hdc, dc, dc. Skip 1 st on cap, sl st in next. Repeat alternating spikes around the front hairline to create the bangs. Make more spikes for the top of the head by attaching yarn specifically where you want volume.
VII. Accessories
Bear Ears (on Hood): Rnd 1: Magic ring, 6 sc. (6) Rnd 2: inc x 6. (12) Rnd 3–4: sc around. (12) Make 2. Sew to top of hood.
Goggles: Lens (Make 2): In Grey/Blue, Magic ring, 6 sc, inc x 6 (12). Fasten off. Frames (Make 2): In Red/Pink, ch 14, join to make a circle. sc around. Sew lenses inside frames. Connect frames with a small chain (ch 2). Strap: Chain a length long enough to wrap around the hood.
Assembly & Final Touches
➡️ Boot Detail: Attach Red/Pink yarn to the front loops left at Rnd 9 of the legs. sc around to create the boot cuff. Use white yarn to embroider small “X” laces on the front.
➡️ Hood Placement: Place the hood on the head before attaching the hair if you want a “hood up” look, or attach the hair first and have the hood resting on the shoulders. For Oliver’s look, sew the hood to the back of the neck/shoulders so it stays in place.
➡️ Hair Styling: Sew or glue the wig cap to the head. Pin the spikes down in a messy, wind-blown arrangement before securing.
➡️ Blush: Apply a soft pink blush under the eyes using real makeup or diluted acrylic paint.
Tips & FAQs
Q: My hood is too tight! A: Tension varies greatly with cotton yarn. If it feels tight, add one more round of increases (to 54 stitches) before working the even rounds.
Q: Can I make the goggles removable? A: Absolutely. Simply crochet the strap slightly looser so it can slide over the ears.
A Final Word
Oliver is now ready for his expedition. There is something truly special about the moment you embroider the final detail—the spark of life enters the eyes, and he becomes more than just yarn. I hope this project brings a sense of wonder to your atelier.
Yours in creativity, Patricia