My dear friend, the hooks are ready and the yarn is waiting. Today, we bring the garden indoors by crafting our magnificent Petal Sprite. Let your hands work their magic as we shape these chubby little companions.
About This Creation & Angle
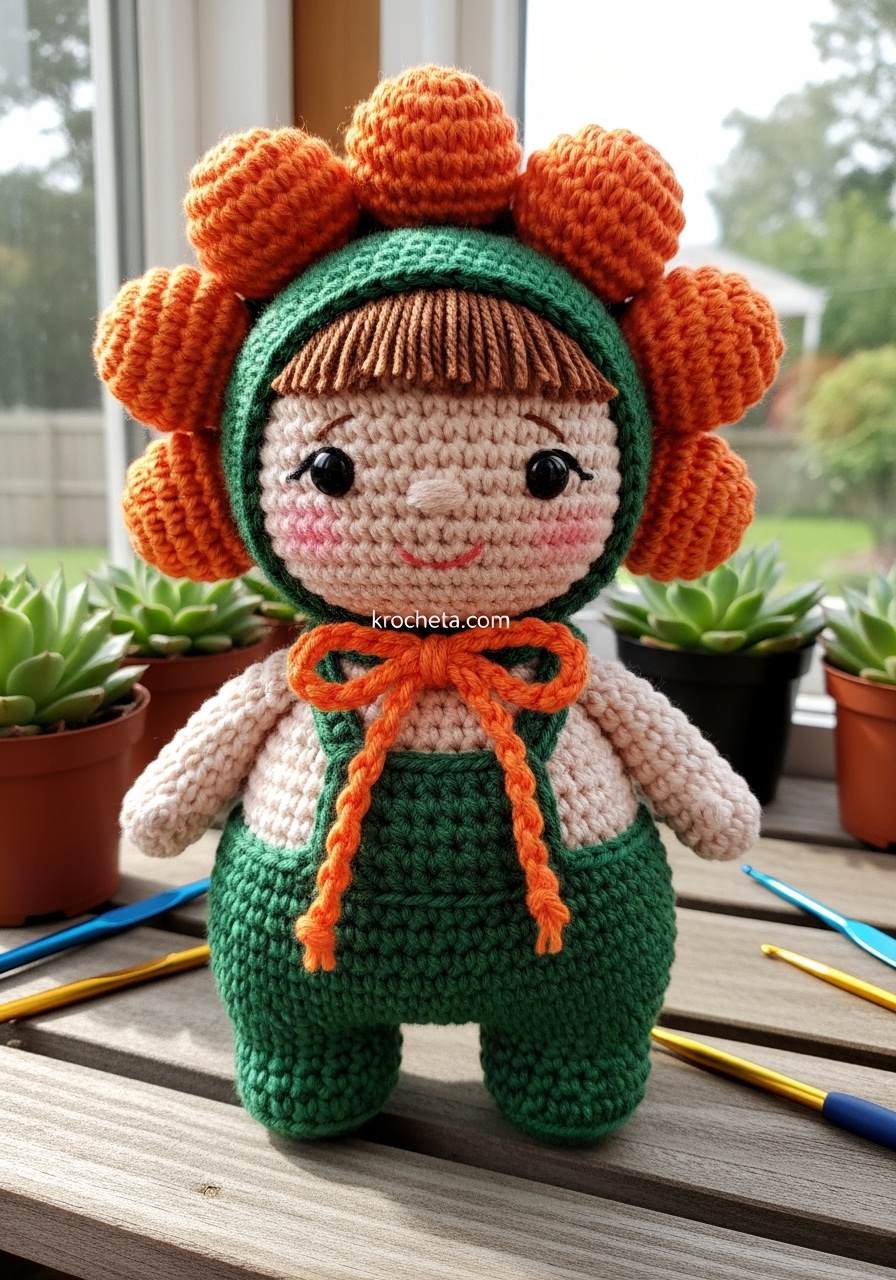
These charming little blossoms capture the pure essence of spring. Notice the gaze of innocence in those wide-set eyes. Feel the embrace of softness in their rounded, huggable forms. We are utilizing a wonderful cotton-acrylic blend yarn today, which is the absolute best yarn for amigurumi when you need stitch definition that truly pops. It holds the shape of the oversized flower petals perfectly while maintaining a gentle touch for little hands.
Project Snapshot
📊 Difficulty: Intermediate
⏰ Est. Time: 6 to 8 hours
📏 Size: Approximately 15cm (6 inches) tall
“A stitch crafted in joy blooms forever.”
Materials & Tools Needed
🧶 Yarn: Sport weight cotton blend (Skin color, Brown for hair, Green for overalls, Orange for petals and bow)
🪡 Hook: 2.5mm crochet hook
✨ Other Materials: 8mm safety eyes, toy stuffing, tapestry needle, stitch markers, pink blush for cheeks

Abbreviations & Stitches Used
ch: chain
sc: single crochet
inc: increase (2 sc in next stitch)
dec: invisible decrease (sc 2 together)
hdc: half double crochet
dc: double crochet
sl st: slip stitch
st(s): stitch(es)
rnd(s): round(s)
The Complete Petal Sprite Pattern
The Oversized Head (Skin Color)
Rnd 1: 6 sc in magic ring (6)
Rnd 2: 6 inc (12)
Rnd 3: [1 sc, 1 inc] 6 times (18)
Rnd 4: [2 sc, 1 inc] 6 times (24)
Rnd 5: [3 sc, 1 inc] 6 times (30)
Rnd 6: [4 sc, 1 inc] 6 times (36)
Rnd 7: [5 sc, 1 inc] 6 times (42)
Rnd 8: [6 sc, 1 inc] 6 times (48)
Rnd 9: [7 sc, 1 inc] 6 times (54)
Rnd 10-18: 1 sc in each st around (54)
Rnd 19: [8 sc, 1 inc] 6 times (60)
Rnd 20-23: 1 sc in each st around (60)
Artisan’s Note: We increase at round 19 to give those chubby cheeks the volume they deserve. Place safety eyes between rounds 17 and 18, about 10 stitches apart.
Rnd 24: [8 sc, 1 dec] 6 times (54)
Rnd 25: [7 sc, 1 dec] 6 times (48)
Rnd 26: [6 sc, 1 dec] 6 times (42)
Rnd 27: [5 sc, 1 dec] 6 times (36)
Rnd 28: [4 sc, 1 dec] 6 times (30)
Rnd 29: [3 sc, 1 dec] 6 times (24)
Begin stuffing firmly, especially the cheeks.
Rnd 30: [2 sc, 1 dec] 6 times (18)
Rnd 31: [1 sc, 1 dec] 6 times (12)
Rnd 32: 6 dec (6)
Fasten off, weave in end.
The Hair Cap & Fringe (Brown)
Rnd 1-9: Repeat rounds 1-9 of the head (54)
Rnd 10-15: 1 sc in each st around (54)
To create the textured fringe on the front edge:
Rnd 16: [sl st, ch 2, dc in same st, skip 1 st, sl st in next] repeat 6 times for the front bangs. Leave remaining stitches unworked.
Fasten off, leave long tail for sewing.
The Chubby Body & Overalls (Green and Skin Color)
Leg 1 (Skin Color)
Rnd 1: 6 sc in magic ring (6)
Rnd 2: 6 inc (12)
Rnd 3: 1 sc in each st around (12)
Change to Green
Rnd 4-5: 1 sc in each st around (12)
Fasten off.
Leg 2 (Skin Color & Green)
Repeat rounds 1-5 but do not fasten off.
Joining the legs
Rnd 6: Ch 2, join to Leg 1 with a sc. 11 sc around Leg 1, 2 sc along the chain, 12 sc around Leg 2, 2 sc along the other side of the chain (28)
Rnd 7: [13 sc, 1 inc] 2 times (30)
Rnd 8: [4 sc, 1 inc] 6 times (36)
Rnd 9: [5 sc, 1 inc] 6 times (42)
Rnd 10-15: 1 sc in each st around (42)
Rnd 16: [5 sc, 1 dec] 6 times (36)
Rnd 17-18: 1 sc in each st around (36)
Rnd 19: [4 sc, 1 dec] 6 times (30)
Rnd 20: 1 sc in each st around (30)
Rnd 21: [3 sc, 1 dec] 6 times (24)
Change to Skin Color
Rnd 22: Working in back loops only, [2 sc, 1 dec] 6 times (18)
Rnd 23: 1 sc in each st around (18)
Overall straps (Green)
Attach green yarn to front loops of Rnd 21. Ch 10, cross over shoulder to back, sl st to back loops. Repeat for second strap.
Fasten off, leave long tail for sewing body to head.
Two Tiny Arms (Skin Color, Make 2)
Rnd 1: 6 sc in magic ring (6)
Rnd 2: [2 sc, 1 inc] 2 times (8)
Rnd 3-7: 1 sc in each st around (8)
Stuff lightly. Pinch flat and sc 4 across top to close. Fasten off, leave tail.
The Base Hood (Green)
Rnd 1-9: Repeat rounds 1-9 of the head (54)
Rnd 10-20: 1 sc in each st around (54)
Fasten off. This will fit snugly over the hair cap.
Six Puffy Flower Petals (Orange, Make 6)
Rnd 1: 6 sc in magic ring (6)
Rnd 2: 6 inc (12)
Rnd 3: [1 sc, 1 inc] 6 times (18)
Rnd 4: [2 sc, 1 inc] 6 times (24)
Rnd 5: [3 sc, 1 inc] 6 times (30)
Rnd 6-10: 1 sc in each st around (30)
Rnd 11: [3 sc, 1 dec] 6 times (24)
Rnd 12: 1 sc in each st around (24)
Rnd 13: [2 sc, 1 dec] 6 times (18)
Rnd 14: 1 sc in each st around (18)
Rnd 15: [1 sc, 1 dec] 6 times (12)
Rnd 16: 6 dec (6)
Pinch flat, do not stuff. Fasten off, leave long tail.
The Collar Bow (Orange)
Row 1: Ch 60. Sl st into second ch from hook and each ch across (59)
Fasten off.
Assembly & Final Touches
➡️ 1. Sew the hair cap to the head, aligning the fringe with the upper forehead.
➡️ 2. Attach the head securely to the body using the skin-colored tail from the neck.
➡️ 3. Sew the arms to the sides of the body, just below the neck seam.
➡️ 4. Place the green base hood over the hair cap and tack it down with a few hidden stitches.
➡️ 5. Sew the six puffy petals evenly around the edge of the base hood, overlapping them slightly at the base.
➡️ 6. Tie the orange collar bow around the neck.
➡️ 7. Apply a gentle dusting of pink blush just below the eyes to finish the sweet expression.
Tips & FAQs
How do I keep the heavy head from wobbling?
I highly recommend rolling a small piece of felt or using a plastic dowel inside the neck. Insert it halfway into the body and halfway into the head before sewing them closed.
Can I use acrylic yarn instead of cotton?
Absolutely. Acrylic yields a softer, fuzzier finish. Just ensure you adjust your hook size so the stuffing does not peek through the stitches.
A Final Word
You have brought a remarkable piece of art into the world today. Cherish every loop and knot, for they hold the passion of your own two hands. May this little sprite bring endless smiles to whoever holds it next.