
Welcome back to our shared space of creation. Today, we bring a touch of the forest indoors with a little character brimming with innocent charm. Let your hook work its magic as we shape this precious woodland friend.
About This Creation & Angle
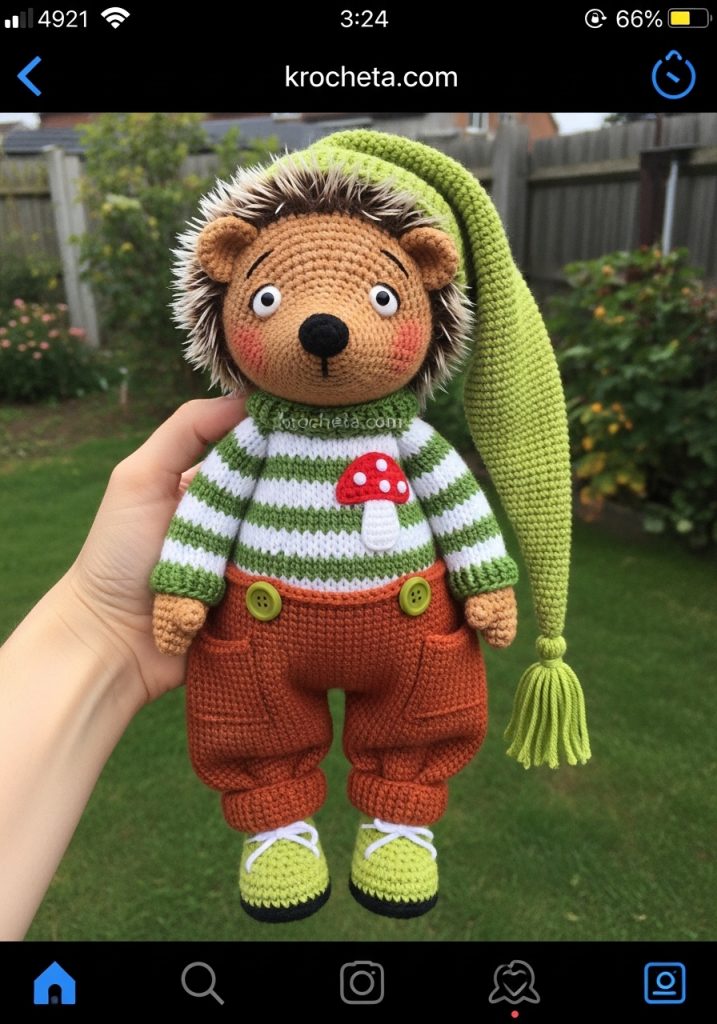
This little hedgehog is the perfect embodiment of youthful softness. His wide-set eyes create an immediate sense of innocence that speaks directly to the heart. We achieve this by placing the facial features low on a slightly oversized head. The rich rust orange of his trousers contrasts beautifully with the soft moss greens, giving him an earthy, grounded presence. Creating his detailed wardrobe is a true joy. You will find immense satisfaction in shaping those tiny pockets and the sturdy little shoes.
Project Snapshot
📊 Difficulty: Intermediate
⏰ Est. Time: 15 to 18 hours
📏 Size: Approximately 25 centimeters tall
“Patience in the small details yields the greatest character.” – Patricia
Materials & Tools Needed
🧶 Yarn: Sport weight cotton in Tan, Moss Green, White, Rust Orange, Chartreuse, and Red. You will also need bulky faux-fur yarn in a soft brown blend.
🪡 Hook: 2.5mm crochet hook for the main body, 4.0mm for the fur cap.
✨ Other Materials: Premium polyester fiberfill, 8mm black safety eyes, small wooden buttons (for pants and shoes), a tapestry needle, stitch markers, and black embroidery floss for the facial details.
Abbreviations & Stitches Used
➡️ ch: chain
➡️ sl st: slip stitch
➡️ sc: single crochet
➡️ hdc: half double crochet
➡️ dc: double crochet
➡️ inc: increase (2 sc in next stitch)
➡️ dec: invisible decrease
➡️ BLO: back loop only
The Complete Woodland Hedgehog Pattern
Head & Face
We begin with the face, establishing that sweet, wide-eyed gaze. Work in continuous rounds.
Rnd 1: 6 sc in a magic ring. (6)
Rnd 2: 6 inc. (12)
Rnd 3: [1 sc, inc] 6 times. (18)
Rnd 4: [2 sc, inc] 6 times. (24)
Rnd 5: [3 sc, inc] 6 times. (30)
Rnds 6-10: sc in all 30 sts. (30)
Rnd 11: [4 sc, inc] 6 times. (36)
Rnd 12: [5 sc, inc] 6 times. (42)
Rnd 13: sc in all 42 sts. (42)
Rnd 14: 12 sc, [inc] 6 times (first cheek), 6 sc, [inc] 6 times (second cheek), 12 sc. (54)
Rnds 15-22: sc in all 54 sts. (54)
Artisan’s Note: Insert 8mm safety eyes between Rnds 12 and 13, spacing them 10 stitches apart. Embroider a small black nose and thin eyebrows using the black floss.
Rnd 23: [7 sc, dec] 6 times. (48)
Rnd 24: [6 sc, dec] 6 times. (42)
Rnd 25: [5 sc, dec] 6 times. (36)
Rnd 26: [4 sc, dec] 6 times. (30)
Rnd 27: [3 sc, dec] 6 times. (24)
Artisan’s Note: Stuff the head firmly, paying special attention to the cheek shaping to maintain a rounded, chubby profile.
Rnd 28: [2 sc, dec] 6 times. (18)
Rnd 29: [1 sc, dec] 6 times. (12)
Rnd 30: 6 dec. (6)
Fasten off, weave the tail through the remaining stitches, and pull tight to close.
Hedgehog Prickles (Wig/Cap)
Switch to the faux-fur yarn and the larger 4.0mm hook. This creates the textured back of the head.
Rnd 1: 8 hdc in a magic ring. (8)
Rnd 2: 8 hdc inc. (16)
Rnd 3: [1 hdc, hdc inc] 8 times. (24)
Rnd 4: [2 hdc, hdc inc] 8 times. (32)
Rnds 5-9: hdc in all 32 sts. (32)
Fasten off, leaving a very long tail for sewing. This cap will be attached to the back of the head later.
Base Body & Legs
Start with the first leg using Tan yarn.
Rnd 1: 6 sc in a magic ring. (6)
Rnd 2: 6 inc. (12)
Rnd 3: [1 sc, inc] 6 times. (18)
Rnds 4-8: sc in all 18 sts. (18)
Fasten off the first leg. Make the second leg identical, but do not fasten off.
Rnd 9: ch 3 from the second leg, join to the first leg with a sc. Place stitch marker here. Work 17 more sc around the first leg, 3 sc along the chain, 18 sc around the second leg, 3 sc along the other side of the chain. (42)
Rnd 10: [6 sc, inc] 6 times. (48)
Rnds 11-18: sc in all 48 sts. (48)
Rnd 19: [6 sc, dec] 6 times. (42)
Rnds 20-25: sc in all 42 sts. (42)
Rnd 26: [5 sc, dec] 6 times. (36)
Rnds 27-32: sc in all 36 sts. (36)
Rnd 33: [4 sc, dec] 6 times. (30)
Rnds 34-36: sc in all 30 sts. (30)
Rnd 37: [3 sc, dec] 6 times. (24)
Rnd 38: [2 sc, dec] 6 times. (18)
Rnds 39-40: sc in all 18 sts. (18)
Fasten off, leaving a long tail for attaching the head. Stuff the body firmly, especially at the base to ensure he sits properly.
Arms & Hands
Make two. Start with Tan yarn.
Rnd 1: 6 sc in a magic ring. (6)
Rnd 2: 6 inc. (12)
Rnds 3-5: sc in all 12 sts. (12)
Rnd 6: [2 sc, dec] 3 times. (9)
Rnds 7-20: sc in all 9 sts. (9)
Artisan’s Note: Stuff only the lower half of the arms so they rest naturally against the body.
Pinch the top flat and crochet 4 sc across both layers to close. Fasten off, leaving a long tail.
Striped Sweater
Work in joined rounds, alternating White and Moss Green every two rounds. Start with White.
Rnd 1: ch 36, join with a sl st to form a ring. ch 1, 36 sc, join. (36)
Rnd 2: ch 1, [5 sc, inc] 6 times, join. (42)
Rnd 3: (Switch to Green) ch 1, 6 sc, ch 6 (skip 9 sts for armhole), 12 sc, ch 6 (skip 9 sts for armhole), 6 sc, join.
Rnds 4-12: Continue alternating colors, placing 1 sc in every stitch and chain. Join at the end of each round. (36)
Fasten off and weave in ends.
Mushroom Appliqué
Use Red for the cap.
Row 1: 4 sc in a magic ring, ch 1, turn. (4)
Row 2: 4 inc, ch 1, turn. (8)
Row 3: [1 sc, inc] 4 times. (12)
Fasten off. Embroider small French knots with White yarn for the spots. Attach White yarn to the bottom center of the cap and crochet a small block of 3 sc for 3 rows to form the stem. Fasten off and leave a tail for sewing to the sweater.
Baggy Trousers
Use Rust Orange. These are worked from the top down.
Rnd 1: ch 48, join with a sl st to form a ring. ch 1, 48 sc, join. (48)
Rnds 2-8: ch 1, sc in all 48 sts, join. (48)
Divide for the legs:
Rnd 9: ch 1, 24 sc, join to the first st of this round to form the first leg.
Rnds 10-18: ch 1, sc in all 24 sts, join. (24)
Rnd 19: ch 1, [2 sc, dec] 6 times, join. (18)
Rnd 20: (Rolled cuff) ch 1, BLO sc in all 18 sts, join. Fasten off.
Attach yarn to the unworked 24 sts of Rnd 8 and repeat Rnds 9-20 for the second leg. Add small square patches for pockets using simple rows of sc, and sew them to the front thighs. Sew a small wooden button near the top center for decoration.
Sturdy Shoes
Make two. Start with White yarn for the sole.
Rnd 1: ch 7, start in second ch from hook: 5 sc, 3 sc in last ch. Working down the opposite side: 4 sc, inc. (14)
Rnd 2: inc, 4 sc, 3 inc, 4 sc, 2 inc. (20)
Rnd 3: 1 sc, inc, 4 sc, [1 sc, inc] 3 times, 4 sc, [1 sc, inc] 2 times. (26)
Rnd 4: Switch to Chartreuse yarn. BLO sc in all 26 sts. (26)
Rnds 5-6: sc in all 26 sts. (26)
Rnd 7: 8 sc, 5 dec, 8 sc. (21)
Rnd 8: Switch to Moss Green. 7 sc, 3 dec, 8 sc. (18)
Fasten off. Add a small strap across the front using 8 chs and secure with a tiny button on the outer side.
Slouchy Pointed Hat
Use Moss Green. This long nightcap tapers gradually.
Rnd 1: ch 42, join with a sl st to form a ring. ch 2 (does not count as st), 42 dc, join. (42)
Rnd 2: ch 2, front post dc around first st, back post dc around next st. Repeat around to create a ribbed brim. Join. (42)
Rnd 3: ch 1, sc in all 42 sts. (42)
Rnd 4: [5 sc, dec] 6 times. (36)
Rnds 5-10: sc in all 36 sts. (36)
Rnd 11: [4 sc, dec] 6 times. (30)
Rnds 12-18: sc in all 30 sts. (30)
Rnd 19: [3 sc, dec] 6 times. (24)
Rnds 20-28: sc in all 24 sts. (24)
Rnd 29: [2 sc, dec] 6 times. (18)
Rnds 30-38: sc in all 18 sts. (18)
Rnd 39: [1 sc, dec] 6 times. (12)
Rnds 40-45: sc in all 12 sts. (12)
Rnd 46: 6 dec. (6)
Fasten off and pull tight. Create a thick tassel from the Moss Green yarn and securely attach it to the tip of the hat.
Assembly & Final Touches
➡️ Pin the fur cap to the back of the head. Sew securely around the edges, ensuring it frames the face perfectly.
➡️ Align the head onto the body. Using the long tail from the body, stitch firmly through all layers of the neck to prevent wobbling.
➡️ Sew the arms to the sides of the body at round 38.
➡️ Dress the hedgehog in his striped sweater, then pull up the rust orange trousers.
➡️ Carefully position the mushroom appliqué on the center of the sweater and stitch it into place.
➡️ Slide the shoes onto his feet. Adjust the slouchy hat over his fur prickles.
Tips & FAQs
➡️ How do I ensure the head does not flop? Always stuff the neck area densely. You can also insert a rolled piece of felt or a plastic crafting tube into the neck cavity before sewing the head onto the body.
➡️ Can I brush the faux-fur yarn? Yes. Use a small wire pet brush and gently tease the fibers outward to give the prickles a softer, fuller appearance.
A Final Word
You have breathed life into mere threads, transforming them into a creature of comfort and joy. Cherish the quiet moments spent shaping these tiny features. May this woodland friend bring boundless warmth to your home and to your heart.p