My dear artisan, the time has come to bring our vision to life. This retro-inspired beauty requires patience, but the shaping techniques you will practice here will elevate your craft forever. Let us begin this beautiful work.
About This Creation & Mastering Amigurumi Shaping
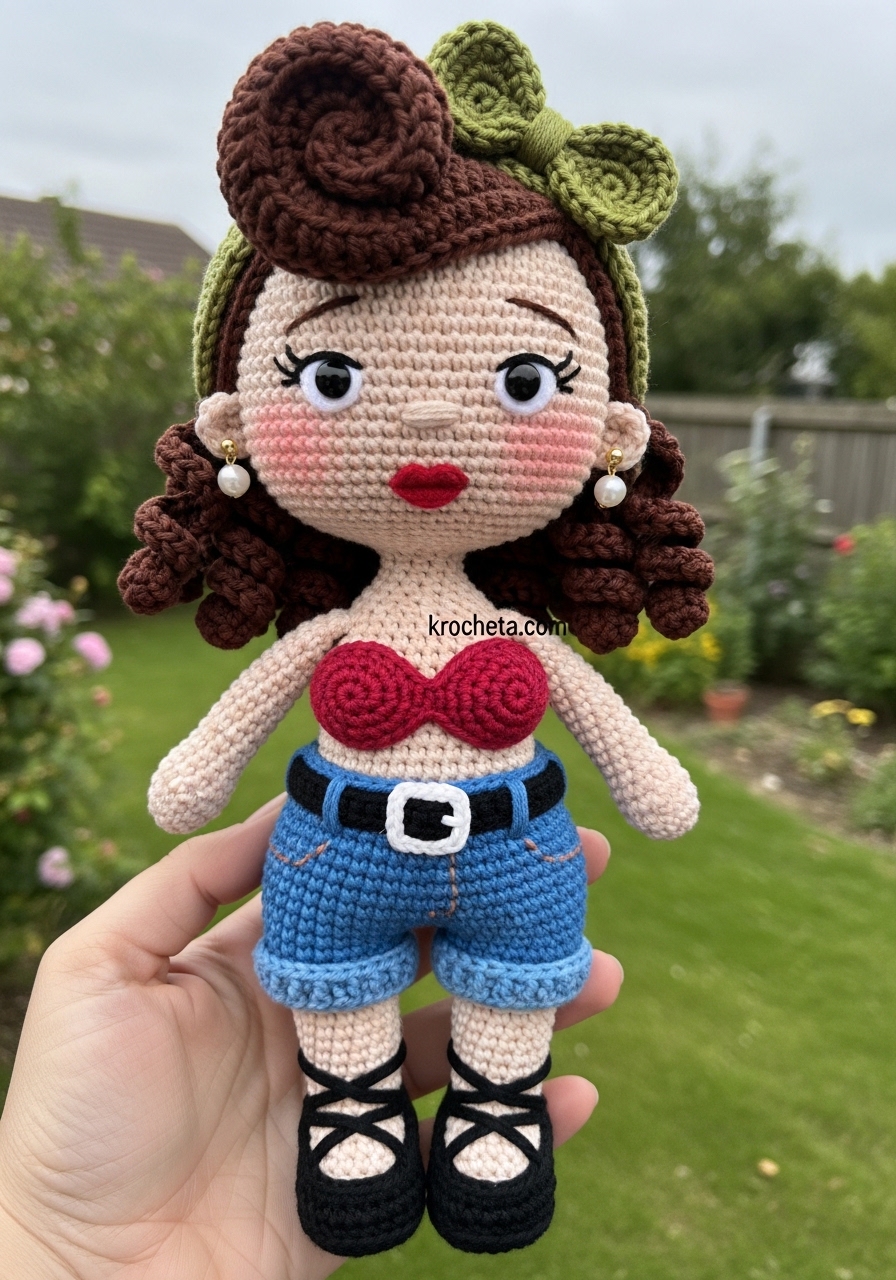
Ruby is a masterclass in structural design. Her charm lies entirely in the subtle curves of her form. We do not rely on basic tubes for this project. Instead, we use calculated increases and decreases to sculpt a true silhouette. You will learn to form delicate elbows and rounded knees.
This tutorial serves as a premium guide for advanced amigurumi shaping. Mastering these curves will allow you to design characters with genuine personality. Her dark, voluminous curls contrast beautifully with the sweet, innocent proportions of her face. We maintain the aesthetic rule of youth here. A large head pairs with a petite, soft body to capture that irresistible charm.
Project Snapshot
📊 Difficulty: Advanced Intermediate
⏰ Est. Time: 16 to 20 hours
📏 Size: Approximately 15cm tall
“Patience in the small details yields the most breathtaking results.” — Patricia Poltera
Materials & Tools Needed
🧶 Yarn: Fingering weight cotton in Light Peach, Crimson Red, Denim Blue, Dark Brown, Olive Green, White, and Black.
🪡 Hook: 2.00mm crochet hook for tight, seamless fabric.
✨ Other Materials: Premium fiberfill stuffing.
✨ Other Materials: Black and red embroidery thread for facial details.
✨ Other Materials: Two small pearl-headed sewing pins (or small pearl beads) for earrings.
✨ Other Materials: Soft pink makeup blush and a small brush.
✨ Other Materials: Yarn needle for assembly.

Abbreviations & Stitches Used
ch: chain
sl st: slip stitch
sc: single crochet
inc: single crochet increase
dec: invisible single crochet decrease
BLO: back loop only
FLO: front loop only
The Complete Ruby Retro Pattern
The Head
We begin with the face. Notice how we place the increases specifically in Round 19. This is crucial. It builds the chubby, innocent cheeks that give her so much character.
Round 1: 6 sc in a magic ring using Light Peach (6)
Round 2: inc in each st around (12)
Round 3: (sc in next st, inc in next st) repeat 6 times (18)
Round 4: (sc in next 2 sts, inc in next st) repeat 6 times (24)
Round 5: (sc in next 3 sts, inc in next st) repeat 6 times (30)
Round 6: (sc in next 4 sts, inc in next st) repeat 6 times (36)
Round 7: (sc in next 5 sts, inc in next st) repeat 6 times (42)
Round 8: (sc in next 6 sts, inc in next st) repeat 6 times (48)
Round 9: (sc in next 7 sts, inc in next st) repeat 6 times (54)
Round 10 to Round 18: sc in each st around (54)
Round 19 (Cheek Shaping): sc in next 12 sts, (inc in next st, sc in next st) repeat 5 times, sc in next 10 sts, (sc in next st, inc in next st) repeat 5 times, sc in next 12 sts (64)
Round 20 to Round 24: sc in each st around (64)
Round 25: sc in next 12 sts, (dec, sc in next st) repeat 5 times, sc in next 10 sts, (sc in next st, dec) repeat 5 times, sc in next 12 sts (54)
Round 26: (sc in next 7 sts, dec) repeat 6 times (48)
Round 27: (sc in next 6 sts, dec) repeat 6 times (42)
Round 28: (sc in next 5 sts, dec) repeat 6 times (36)
Round 29: (sc in next 4 sts, dec) repeat 6 times (30)
Round 30: (sc in next 3 sts, dec) repeat 6 times (24)
Round 31: (sc in next 2 sts, dec) repeat 6 times (18)
Round 32: (sc in next st, dec) repeat 6 times (12)
Fasten off, leaving a long tail. Stuff the head firmly, paying special attention to pushing fiberfill into the cheeks to maintain that rounded, soft embrace.
The Legs (Make 2)
We build the legs from the shoes upward, incorporating shaping for the calves and knees. The first leg will be fastened off, but do not cut the yarn on the second leg.
Round 1: With Black yarn, ch 6. Starting in the 2nd ch from hook, sc 4, 3 sc in last ch. Working down the other side of the ch, sc 3, inc in last ch (12)
Round 2 to Round 4: sc in each st around (12)
Round 5: Change to Light Peach yarn. sc in each st around (12)
Round 6: sc in each st around (12)
Round 7 (Calf Shaping): inc in next 2 sts, sc in next 10 sts (14)
Round 8 to Round 10: sc in each st around (14)
Round 11 (Knee Shaping): dec 2 times, sc in next 10 sts (12)
Round 12 to Round 18: sc in each st around (12)
Round 19: Change to Denim Blue yarn. sc in each st around (12)
Fasten off the first leg. Repeat Rounds 1 through 19 for the second leg, but do not fasten off.
Black Strappy Shoes (Embroidered Detail)
Using a needle and a strand of Black yarn, embroider an “X” shape over the top of the Light Peach foot (Rounds 5 and 6) to mimic the crossover straps of her vintage shoes. Tie the threads securely inside the leg before stuffing.
The Body
We now join the legs to begin the torso.
Round 20: Ch 3 from the second leg. Join to the first leg with a sc. sc in remaining 11 sts of first leg, sc in next 3 chs, sc in 12 sts of second leg, sc in opposite side of next 3 chs (30)
Round 21 to Round 24: sc in each st around (30)
Round 25 (Waist Shaping): (sc in next 3 sts, dec) repeat 6 times (24)
Round 26: Change to Crimson Red yarn. sc in each st around (24)
Round 27: Working in BLO, sc in each st around (24)
Round 28 to Round 31: sc in each st around (24)
Round 32 (Bust Shaping): sc in next 8 sts, inc in next 8 sts, sc in next 8 sts (32)
Round 33: sc in each st around (32)
Round 34: sc in next 8 sts, dec 8 times, sc in next 8 sts (24)
Round 35: Change to Light Peach yarn. Working in BLO, (sc in next 2 sts, dec) repeat 6 times (18)
Round 36 (Neck Shaping): (sc in next st, dec) repeat 6 times (12)
Fasten off. Stuff the body firmly, emphasizing the chest and hips.
Shorts Cuffs (Make 2)
Join Denim Blue yarn to the front loops left unworked on Round 19 of each leg.
Round 1: ch 1, sc in each FLO around the leg opening. Sl st to first sc and fasten off. Weave in ends.
Black Belt & Buckle
Using Black yarn, surface slip stitch around the waist line where the Denim Blue meets the Crimson Red.
Using White embroidery thread, stitch a tiny rectangle over the center front of the black belt to serve as the buckle.
The Arms (Make 2)
Round 1: 5 sc in a magic ring using Light Peach (5)
Round 2 to Round 9: sc in each st around (5)
Round 10 (Elbow Shaping): inc in next st, dec, sc in next 2 sts (5)
Round 11 to Round 17: sc in each st around (5)
Fasten off, leaving a tail for sewing. Do not stuff the arms to ensure they sit flat against her torso.
Hair Base (Wig Cap)
Round 1: 6 sc in a magic ring using Dark Brown (6)
Round 2: inc in each st around (12)
Round 3: (sc in next st, inc in next st) repeat 6 times (18)
Round 4: (sc in next 2 sts, inc in next st) repeat 6 times (24)
Round 5: (sc in next 3 sts, inc in next st) repeat 6 times (30)
Round 6: (sc in next 4 sts, inc in next st) repeat 6 times (36)
Round 7: (sc in next 5 sts, inc in next st) repeat 6 times (42)
Round 8: (sc in next 6 sts, inc in next st) repeat 6 times (48)
Round 9: (sc in next 7 sts, inc in next st) repeat 6 times (54)
Round 10 to Round 15: sc in each st around (54)
Fasten off, leaving a long tail for sewing the cap to the head.
Corkscrew Curls
Join Dark Brown yarn to the edge of the Wig Cap.
Curl Pattern: ch 40. Starting in the 2nd ch from hook, complete 2 sc in each ch all the way back up to the cap. Sl st into the next stitch on the cap edge.
Repeat the Curl Pattern around the entire circumference of the wig cap. For extra volume, you may slip stitch into the next row up and create a second layer of curls across the back of the head.
Victory Roll
Round 1: With Dark Brown yarn, ch 15. Starting in the 2nd ch from hook, sc in each ch across (14)
Round 2 to Round 6: ch 1, turn. sc in each st across (14)
Fasten off, leaving a long tail. Roll the resulting rectangle tightly into a cylinder. Sew it securely closed, then sew this cylinder to the front top of the wig cap to form her retro bang roll.
Green Headband with Bow Tie
Row 1: With Olive Green yarn, ch 45.
Row 2: Starting in the 2nd ch from hook, sl st in next 2 chs, sc in next 40 chs, sl st in last 2 chs. Fasten off.
The Bow: ch 12. Join to form a ring. ch 1, sc 12 around. Sl st to join. Fasten off. Wrap a strand of green yarn tightly around the center of the ring several times to pinch it into a bow shape. Sew the bow to the headband.
Facial Elements
Eyes: Using black embroidery thread, stitch wide-set eyes extremely low on the face (around Round 18). Add dramatic, sweeping eyelashes at the outer corners to capture the gaze of innocence.
Nose: Using a single strand of Light Peach, wrap horizontally over two stitches directly between the eyes.
Mouth: Using red thread, stitch a tiny, delicate “V” shape just below the nose.
Blush: Apply a small amount of real makeup blush to her cheeks using a dry brush.
Pearl Earrings
Carefully insert one pearl-headed sewing pin into the side of the head on each side, just outside the eyelash line. Add a tiny dot of craft glue to the pin tip before inserting for security.
Assembly & Final Touches
Position the Wig Cap on the head, tilted slightly back to leave the forehead open. Sew securely into place.
Attach the head to the body, ensuring the chin aligns perfectly with the center of the chest. Take your time adding extra stuffing to the neck right before closing to prevent wobbling.
Sew the arms to the sides of the body at Round 35.
Tie the Green Headband around the head, securing it just behind the Victory Roll.
Tips & FAQs
Question: My head is wobbling. How do I fix this?
Answer: This is common with the aesthetic of youth, where the head is wonderfully large. Before you finish sewing the head to the body, push a dowel, a rolled piece of felt, or very dense fiberfill directly down the center of the neck.
Question: Can I use acrylic yarn instead of cotton?
Answer: You may, but cotton provides the beautiful, rigid stitch definition required to hold those intricate shaping curves in the cheeks and knees.
A Final Word
You have brought a breathtaking character into the world today. I urge you to look closely at the beautiful curves you have sculpted with just a hook and string. Your dedication to the craft is truly inspiring. I am so proud to share this journey with you.
Would you like to move on to Step 4 and prepare the visual media prompts to capture her beauty? Please describe the scene or context you envision for her photographs.