
My dear friend, the hooks are ready and the yarn is waiting. Today, we bring forth a sweet little sprite wearing the crown of summer’s favorite berry. Let us begin this beautiful project.
About This Creation & Angle
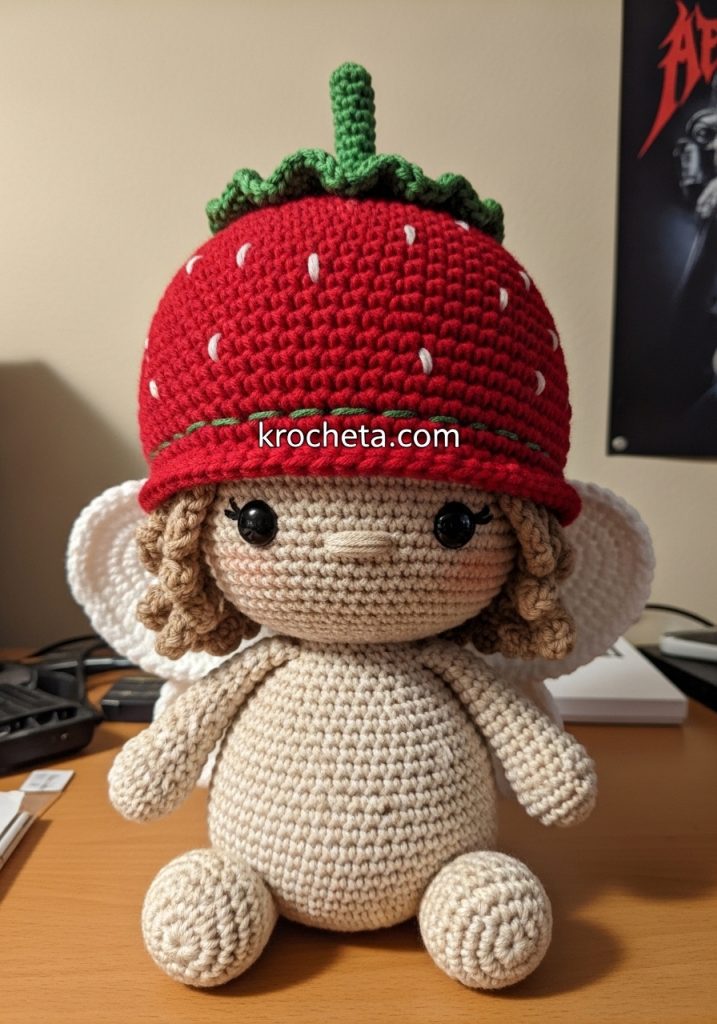
This petite strawberry fairy captures the softest aspects of our craft. She wears a magnificent, oversized berry hat, carefully embroidered with tiny white seeds. Her round, chubby figure and wide-set eyes give her an innocent, gentle expression. Crafting her requires a balance of texture and proportion, ensuring she sits perfectly on a vanity or shelf. This project provides a wonderful opportunity to practice structural shaping and simple facial embroidery.
Project Snapshot
📊 Difficulty: Intermediate
⏰ Est. Time: 8 – 10 Hours
📏 Size: Approximately 15cm (6 inches) tall with hat
“Patience in the small stitches yields the greatest character.” – Patricia
Materials & Tools Needed
🧶 Yarn: Light worsted weight cotton yarn in Beige, Red, Green, White, and Light Brown
🪡 Hook: 2.5mm crochet hook
✨ Other Materials: Fiberfill stuffing, 6mm safety eyes, black and white embroidery thread, yarn needle, stitch marker
Abbreviations & Stitches Used
➡️ ch: chain
➡️ sl st: slip stitch
➡️ sc: single crochet
➡️ inc: increase (2 sc in one stitch)
➡️ dec: decrease (sc 2 together)
➡️ hdc: half double crochet
➡️ dc: double crochet
➡️ FLO: front loops only
➡️ rnd: round
The Complete Strawberry Fairy Pattern
The Head
➡️ Rnd 1: 6 sc in a magic ring (6)
➡️ Rnd 2: 6 inc (12)
➡️ Rnd 3: (sc, inc) repeat 6 times (18)
➡️ Rnd 4: (2 sc, inc) repeat 6 times (24)
➡️ Rnd 5: (3 sc, inc) repeat 6 times (30)
➡️ Rnd 6: (4 sc, inc) repeat 6 times (36)
➡️ Rnd 7: (5 sc, inc) repeat 6 times (42)
➡️ Rnd 8: (6 sc, inc) repeat 6 times (48)
➡️ Rnd 9: (7 sc, inc) repeat 6 times (54)
➡️ Rnds 10-19: sc in each stitch around for 10 rounds (54)
Artisan’s Note: Place your 6mm safety eyes between rounds 14 and 15, leaving 9 stitches of space between them. Embroider a tiny horizontal nose one round below, centered perfectly between the eyes.
➡️ Rnd 20: (7 sc, dec) repeat 6 times (48)
➡️ Rnd 21: (6 sc, dec) repeat 6 times (42)
➡️ Rnd 22: (5 sc, dec) repeat 6 times (36)
➡️ Rnd 23: (4 sc, dec) repeat 6 times (30)
➡️ Rnd 24: (3 sc, dec) repeat 6 times (24)
➡️ Rnd 25: (2 sc, dec) repeat 6 times (18)
Stuff the head firmly, ensuring the cheeks remain plump and wide.
➡️ Rnd 26: (sc, dec) repeat 6 times (12)
Fasten off and leave a long tail for sewing.
The Hair
➡️ Rnd 1: 6 sc in a magic ring (6)
➡️ Rnd 2: 6 inc (12)
➡️ Rnd 3: (sc, inc) repeat 6 times (18)
➡️ Hair strands: chain 10, start in the 2nd chain from your hook, make 9 sc down the chain, sl st into the next stitch on your base round. Repeat this 17 times to create a cluster of front bangs and side framing pieces.
Leave a long tail to sew onto the head.
The Body
➡️ Rnd 1: 6 sc in a magic ring (6)
➡️ Rnd 2: 6 inc (12)
➡️ Rnd 3: (sc, inc) repeat 6 times (18)
➡️ Rnd 4: (2 sc, inc) repeat 6 times (24)
➡️ Rnd 5: (3 sc, inc) repeat 6 times (30)
➡️ Rnd 6: (4 sc, inc) repeat 6 times (36)
➡️ Rnd 7: (5 sc, inc) repeat 6 times (42)
➡️ Rnds 8-12: sc in each stitch around for 5 rounds (42)
➡️ Rnd 13: (5 sc, dec) repeat 6 times (36)
➡️ Rnds 14-16: sc in each stitch around for 3 rounds (36)
➡️ Rnd 17: (4 sc, dec) repeat 6 times (30)
➡️ Rnds 18-20: sc in each stitch around for 3 rounds (30)
➡️ Rnd 21: (3 sc, dec) repeat 6 times (24)
➡️ Rnds 22-24: sc in each stitch around for 3 rounds (24)
➡️ Rnd 25: (2 sc, dec) repeat 6 times (18)
➡️ Rnd 26: sc in each stitch around (18)
Stuff the body firmly, but ensure the bottom is heavy and flat so she will sit nicely.
➡️ Rnd 27: (sc, dec) repeat 6 times (12)
Fasten off, leaving a long tail.
The Arms
➡️ Rnd 1: 5 sc in a magic ring (5)
➡️ Rnd 2: 5 inc (10)
➡️ Rnds 3-14: sc in each stitch around for 12 rounds (10)
Stuff the bottom of the arms lightly, leaving the top half empty. Pinch the top flat and make 4 sc across both sides to close. Leave a long tail.
The Legs
➡️ Rnd 1: 6 sc in a magic ring (6)
➡️ Rnd 2: 6 inc (12)
➡️ Rnd 3: (3 sc, inc) repeat 3 times (15)
➡️ Rnds 4-6: sc in each stitch around for 3 rounds (15)
➡️ Rnd 7: (3 sc, dec) repeat 3 times (12)
➡️ Rnds 8-10: sc in each stitch around for 3 rounds (12)
Stuff firmly. Pinch the opening flat, making 5 sc across to close. Leave a long tail.
The Wings
➡️ Rnd 1: 6 sc in a magic ring (6)
➡️ Rnd 2: 6 inc (12)
➡️ Rnd 3: (sc, inc) repeat 6 times (18)
➡️ Rnd 4: (2 sc, inc) repeat 6 times (24)
➡️ Rnd 5: (3 sc, inc) repeat 6 times (30)
Fold the white circle in half. Working through both layers, make 14 sc across the curve to create a beautiful semi-circle shape. Fasten off, leaving a long tail. Make two of these.
The Strawberry Hat
➡️ Rnd 1: 6 sc in a magic ring (6)
➡️ Rnd 2: 6 inc (12)
➡️ Rnd 3: (sc, inc) repeat 6 times (18)
➡️ Rnd 4: (2 sc, inc) repeat 6 times (24)
➡️ Rnd 5: (3 sc, inc) repeat 6 times (30)
➡️ Rnd 6: (4 sc, inc) repeat 6 times (36)
➡️ Rnd 7: (5 sc, inc) repeat 6 times (42)
➡️ Rnd 8: (6 sc, inc) repeat 6 times (48)
➡️ Rnd 9: (7 sc, inc) repeat 6 times (54)
➡️ Rnd 10: (8 sc, inc) repeat 6 times (60)
➡️ Rnd 11: (9 sc, inc) repeat 6 times (66)
➡️ Rnds 12-22: sc in each stitch around for 11 rounds (66)
➡️ Rnd 23: FLO, (10 sc, inc) repeat 6 times (72)
➡️ Rnd 24: (5 sc, inc, 6 sc) repeat 6 times (78)
➡️ Rnd 25: (12 sc, inc) repeat 6 times (84)
➡️ Rnd 26: sc in each stitch around (84)
Fasten off and weave in the ends.
Artisan’s Note: Take your white embroidery thread and stitch tiny vertical lines randomly around the red hat to mimic strawberry seeds.
The Hat Foliage
➡️ Rnd 1: 6 sc in a magic ring (6)
➡️ Rnd 2: 6 inc (12)
➡️ Rnd 3: Chain 5, start in the 2nd chain from your hook, make 1 sc, 1 hdc, 2 dc down the chain. Skip 1 stitch on the circular base, sl st into the next stitch. Repeat this process 5 more times to create 6 full leaves.
For the stem: Join your yarn to the center of the leaves, chain 7, make a sc in each chain back down, and sl st to the center. Fasten off and leave a long tail.
Assembly & Final Touches
➡️ Pin the head directly to the body, ensuring she looks straight ahead. Sew securely around the neck.
➡️ Attach the hair cap to the top of the head, letting the small strands frame her sweet face.
➡️ Sew the arms to the sides of the body, placed neatly just below the neck line.
➡️ Attach the legs to the bottom front of the body, positioning them so she sits balanced on her own.
➡️ Sew the two white wings to the center of her upper back.
➡️ Attach the green leafy foliage to the very top center of the red strawberry hat. The hat itself rests loosely on her head.
➡️ Add a soft touch of pink blush to her cheeks for warmth.
Tips & FAQs
➡️ Q: My hat feels too tight. What should I do?
➡️ A: Tension often varies between makers. Try going up half a hook size for the hat portion to ensure a comfortable, easy fit over her hair.
➡️ Q: How do I keep the bottom completely flat?
➡️ A: Do not overstuff the very bottom base of the torso. Press it gently against a hard table while you shape the body.
A Final Word
Creating this little friend has been an absolute joy. May your stitches remain even, and may her charming face bring a true smile to your heart.