
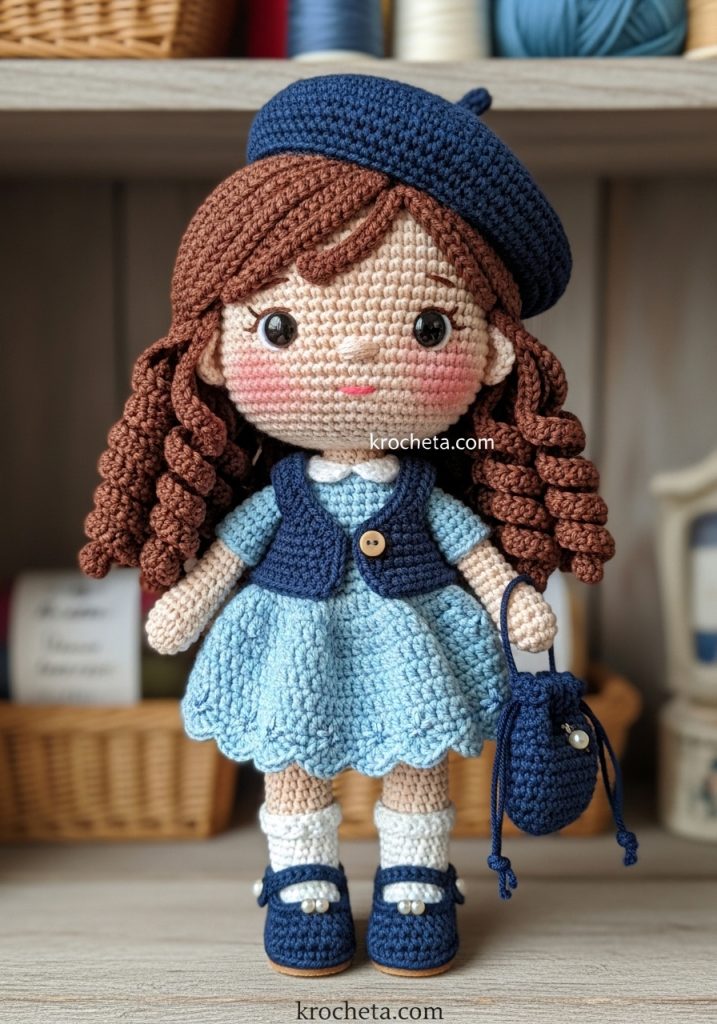
My dear creator, it fills my heart with joy to bring Luna into your hands today right here at krocheta.com. She is a vision of youthful innocence, wrapped in the softest shades of sky and ocean blue. Let us take our time with her beautiful curls and delicate stitches, crafting a piece of art to cherish forever.
About This Creation & Angle
Luna is more than just a crochet project; she is a gentle character with a story waiting to be told through your hands. Her wide, sweet eyes and softly rounded cheeks evoke a feeling of pure wonder, capturing that perfect, endearing innocence. We have chosen a palette that mirrors a clear summer sky, contrasting perfectly with her rich, chocolate-brown hair. The beautiful layers of her clothing, from the scalloped dress to the structured little vest, offer a wonderful opportunity to practice different crochet techniques while building a premium, heirloom-quality doll.
Project Snapshot
📊 Difficulty: Intermediate to Advanced
⏰ Est. Time: 15 to 18 Hours
📏 Size: Approximately 28cm (11 inches) tall
“In every stitch of her cascading curls, you weave a little piece of magic and memory.” – Patricia Poltera
Materials & Tools Needed
🧶 Yarn: Sport weight cotton yarn in Fair Skin, Light Blue, Dark Blue, Chocolate Brown, and White.
🪡 Hook: 2.5mm crochet hook for the doll, 3.0mm for the dress and accessories.
✨ Other Materials: 7mm safety eyes, high-quality fiberfill stuffing, a sharp yarn needle, stitch markers, one small button (for the vest), tiny pearl beads (for the shoes), and soft pink blush for her cheeks.
Abbreviations & Stitches Used
➡️ ch: chain
➡️ sc: single crochet
➡️ inc: single crochet increase (two stitches in one)
➡️ dec: single crochet decrease (invisible decrease recommended)
➡️ hdc: half double crochet
➡️ dc: double crochet
➡️ sl st: slip stitch
➡️ BLO: back loops only
➡️ FLO: front loops only
The Complete Luna Pattern
The Head
Begin with Fair Skin yarn and the 2.5mm hook.
Round 1: 6 sc in a magic ring (6)
Round 2: 6 inc (12)
Round 3: (1 sc, inc) x 6 (18)
Round 4: (2 sc, inc) x 6 (24)
Round 5: (3 sc, inc) x 6 (30)
Round 6: (4 sc, inc) x 6 (36)
Round 7: (5 sc, inc) x 6 (42)
Round 8: (6 sc, inc) x 6 (48)
Round 9: (7 sc, inc) x 6 (54)
Round 10 to 17: 1 sc in each stitch around (54)
Artisan’s Note: Now we will shape her soft, chubby cheeks. Watch your stitch count carefully here.
Round 18: 15 sc, (1 sc, inc) x 5, 8 sc, (inc, 1 sc) x 5, 11 sc (64)
Round 19 to 23: 1 sc in each stitch around (64)
Artisan’s Note: Insert the 7mm safety eyes between rounds 17 and 18, leaving 10 stitches between them. Ensure they sit just above the cheek increases for that wide, innocent gaze.
Round 24: 15 sc, (1 sc, dec) x 5, 8 sc, (dec, 1 sc) x 5, 11 sc (54)
Round 25: (7 sc, dec) x 6 (48)
Round 26: (6 sc, dec) x 6 (42)
Round 27: (5 sc, dec) x 6 (36)
Round 28: (4 sc, dec) x 6 (30)
Begin stuffing the head firmly, shaping the cheeks outward as you fill.
Round 29: (3 sc, dec) x 6 (24)
Round 30: (2 sc, dec) x 6 (18)
Round 31: (1 sc, dec) x 6 (12)
Fasten off, leaving a long tail for sewing. Finish stuffing the head completely.
The Legs
Make two. Begin with Dark Blue yarn (the base of her shoe) and the 2.5mm hook.
Round 1: 6 sc in a magic ring (6)
Round 2: 6 inc (12)
Round 3: (1 sc, inc) x 6 (18)
Round 4: (2 sc, inc) x 6 (24)
Round 5: BLO 1 sc in each stitch around (24)
Round 6 to 7: 1 sc in each stitch around (24)
Round 8: 6 sc, 6 dec, 6 sc (18)
Change to White yarn for her socks.
Round 9: BLO 6 sc, 3 dec, 6 sc (15)
Round 10 to 14: 1 sc in each stitch around (15)
Change to Fair Skin yarn.
Round 15: BLO 1 sc in each stitch around (15)
Round 16 to 20: 1 sc in each stitch around (15)
Artisan’s Note: Let us add a gentle shaping for the knee.
Round 21: 2 sc, 3 dec (back of knee), 3 sc, 3 inc (kneecap), 1 sc (15)
Round 22: 1 sc in each stitch around (15)
Round 23 to 34: 1 sc in each stitch around (15)
Stuff the leg firmly, especially at the bottom. Fasten off the first leg. Do not fasten off the second leg; we will continue to the body.
The Body
Continue from the second leg with Fair Skin yarn.
Round 35: Ch 3. Join to the first leg with a sc. Place a stitch marker here; this is the new beginning of the round. Crochet 14 more sc around the first leg, 3 sc along the chain, 15 sc around the second leg, 3 sc along the other side of the chain (36)
Round 36 to 42: 1 sc in each stitch around (36)
Round 43: (4 sc, dec) x 6 (30)
Round 44 to 48: 1 sc in each stitch around (30)
Round 49: (3 sc, dec) x 6 (24)
Round 50 to 53: 1 sc in each stitch around (24)
Round 54: (2 sc, dec) x 6 (18)
Round 55: (1 sc, dec) x 6 (12)
Stuff the body firmly, paying special attention to the neck area so the large head is well supported. Fasten off and weave in the end.
The Arms
Make two. Begin with Fair Skin yarn and the 2.5mm hook.
Round 1: 6 sc in a magic ring (6)
Round 2: (1 sc, inc) x 3 (9)
Round 3 to 5: 1 sc in each stitch around (9)
Round 6: 1 dec, 7 sc (8)
Round 7 to 24: 1 sc in each stitch around (8)
Stuff the bottom half of the arm lightly. Leave the top half unstuffed so the arms lie flat against her sides. Pinch the top flat and crochet 4 sc across both layers to close. Fasten off, leaving a long tail for sewing.
The Hair
Begin with Chocolate Brown yarn and the 2.5mm hook. We will create a base cap, then the curls.
Round 1: 6 sc in a magic ring (6)
Round 2: 6 inc (12)
Round 3: (1 sc, inc) x 6 (18)
Round 4: (2 sc, inc) x 6 (24)
Round 5: (3 sc, inc) x 6 (30)
Round 6: (4 sc, inc) x 6 (36)
Round 7: (5 sc, inc) x 6 (42)
Round 8: (6 sc, inc) x 6 (48)
Round 9: (7 sc, inc) x 6 (54)
Round 10 to 14: 1 sc in each stitch around (54)
Artisan’s Note: Now we create the cascading curls. Do not fasten off.
Curl 1 to 25: Ch 45. Turn, starting in the 3rd chain from the hook, place 2 hdc in each chain all the way down. Sl st into the next sc on the base cap.
Curl 26 to 30 (Bangs): Ch 15. Turn, starting in the 2nd chain from the hook, place 1 sc in each chain down. Sl st into the next sc on the base cap.
Fasten off, leaving a very long tail to sew the cap to the head.
The Light Blue Dress
Begin with Light Blue yarn and the 3.0mm hook. We work in rows for the bodice, then join in the round for the skirt.
Row 1: Ch 25. Starting in the 2nd chain from the hook, crochet 24 sc. Ch 1, turn (24)
Row 2: (3 sc, inc) x 6. Ch 1, turn (30)
Row 3: 4 sc, ch 6, skip 7 stitches (armhole), 8 sc, ch 6, skip 7 stitches (armhole), 4 sc. Ch 1, turn.
Row 4 to 8: 1 sc in each stitch across. Ch 1, turn.
Artisan’s Note: We will now join the edges to work the skirt in the round.
Round 9: Join with a sl st to the first stitch of Row 8. Ch 2. Place 2 dc in every stitch around. Sl st to join (approx 56 dc)
Round 10 to 14: Ch 2. 1 dc in each stitch around. Sl st to join.
Round 15 (Scalloped Hem): Skip 1 stitch, 5 dc in the next stitch, skip 1 stitch, 1 sc in the next stitch. Repeat from * to * all the way around.
Fasten off and weave in ends. Embroider tiny dark blue stars scattered around the lower skirt.
The Dark Blue Vest
Begin with Dark Blue yarn and the 3.0mm hook. Worked in rows.
Row 1: Ch 29. Starting in the 2nd ch, 28 sc. Ch 1, turn (28)
Row 2 to 5: 1 sc in each stitch across. Ch 1, turn (28)
Fasten off the main body.
Straps (Make two): Attach yarn to the top front edge of the vest. Ch 12. Attach with a sl st to the back edge of the vest. Sew a small button to the front center of the vest.
The Beret
Begin with Dark Blue yarn and the 3.0mm hook.
Round 1: 8 hdc in a magic ring (8)
Round 2: 8 hdc inc (16)
Round 3: (1 hdc, hdc inc) x 8 (24)
Round 4: (2 hdc, hdc inc) x 8 (32)
Round 5: (3 hdc, hdc inc) x 8 (40)
Round 6: (4 hdc, hdc inc) x 8 (48)
Round 7: (5 hdc, hdc inc) x 8 (56)
Round 8: (6 hdc, hdc inc) x 8 (64)
Round 9 to 10: 1 hdc in each stitch around (64)
Round 11: (6 hdc, hdc dec) x 8 (56)
Round 12: (5 hdc, hdc dec) x 8 (48)
Round 13: 1 sc in each stitch around (48)
Fasten off and weave in the end.
The Mary Jane Shoes
Make two. Begin with Dark Blue yarn and the 3.0mm hook.
Round 1: 6 sc in a magic ring (6)
Round 2: 6 inc (12)
Round 3: (1 sc, inc) x 6 (18)
Round 4: (2 sc, inc) x 6 (24)
Round 5: BLO 1 sc in each stitch around (24)
Round 6 to 7: 1 sc in each stitch around (24)
Round 8: 8 sc, 4 dec, 8 sc (20)
Strap: Ch 8. Skip the front 8 stitches of the shoe, sl st to the opposite side. Fasten off. Sew a tiny pearl bead to the outer edge of each strap.
The Drawstring Bag
Begin with Dark Blue yarn and the 3.0mm hook.
Round 1: 6 sc in a magic ring (6)
Round 2: 6 inc (12)
Round 3: (1 sc, inc) x 6 (18)
Round 4: BLO 1 sc in each stitch around (18)
Round 5 to 9: 1 sc in each stitch around (18)
Round 10: (Ch 2, skip 1 stitch, 1 sc) x 9 to create eyelets for the string.
Round 11: 1 sc in each stitch and chain space around. Fasten off.
Drawstring: Ch 40. Thread through the eyelets of Round 10. Tie little knots at the ends.
Assembly & Final Touches
➡️ Position the head onto the neck of the body. Sew securely using the long tail from the head, adding a little extra stuffing just before closing to prevent wobble.
➡️ Pin the arms symmetrically to the sides of the body, just below the neck. Sew them firmly in place.
➡️ Position the hair cap on the head. Arrange the shorter front strands as bangs and let the longer curls drape naturally. Sew the cap securely to the head using the long tail.
➡️ Gently dress Luna in her light blue scalloped dress, securing it at the back. Slip her dark blue vest over her shoulders.
➡️ Place the dark blue Mary Jane shoes over her feet.
➡️ Position the beret slightly tilted on top of her curls. You may sew it down or leave it removable.
➡️ Add a touch of soft pink blush to her cheeks just below her eyes to enhance her innocent expression. Tie the little drawstring bag to her wrist.
Tips & FAQs
How do I prevent the neck from wobbling? The secret is firm stuffing! When you are joining the head to the body, pause when you have about an inch left to sew. Use the back of your hook or a stuffing tool to pack extra fiberfill directly into the neck joint until it feels solid.
My doll’s dress is too tight, what happened?
Tension can change when we switch from working in the round (the body) to working in rows (the top of the dress). If you naturally crochet tightly, go up to a 3.5mm hook for the clothing to ensure a lovely, flowing fit.
A Final Word
Bringing a character to life from a simple skein of yarn is an extraordinary process. As you complete your Luna doll, take a moment to admire the gentle personality you have created through your own patience and skill. May she bring light and joy to your home or to the lucky person who receives her.