My dearest creator, the time has come to breathe life into our woodland companions. Gather your softest yarns and steady your hands, for we are about to sculpt pure joy. Let us begin this beautiful project together.
About This Creation & Angle
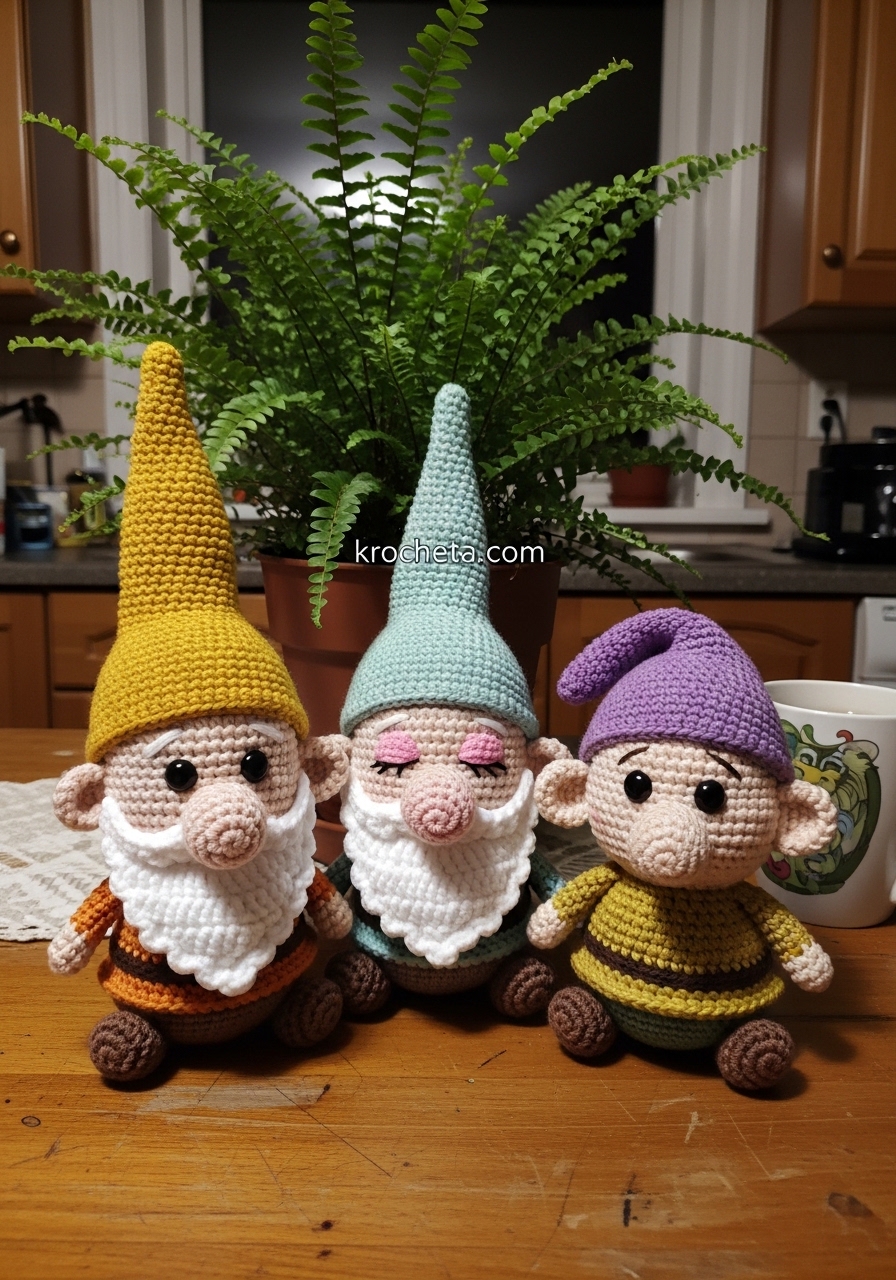
We are crafting pure storybook charm today. These little brothers are designed with the perfect baby schema in mind to maximize their emotional appeal. Notice their oversized heads and deeply set, expressive eyes that look up at you with absolute innocence. Every stitch is placed to ensure zero sharp angles, creating a perfectly rounded, huggable silhouette. We are focusing heavily on facial structure in this guide. You will learn to sculpt chubby cheeks and bulbous noses that give each dwarf his distinct personality, from the sleepy brother to the cheerful one. This project is a wonderful journey for artisans looking to elevate their shaping techniques and create heirloom-quality companions.
Project Snapshot:
📊 Difficulty: Intermediate
⏰ Est. Time: 8 to 10 Hours per Dwarf
📏 Size: 15 cm (6 inches) tall
“Patience in shaping is the secret language of love spoken by our hands.” – Patricia Poltera
Materials & Tools Needed
🧶 Yarn: Fine sport weight cotton yarn in Soft Peach, Mustard Yellow, Mint Green, Lavender Purple, Chocolate Brown, Burnt Orange, Moss Green, Crisp White, and Black
🪡 Hook: 2.0mm crochet hook for tight, clean stitches
✨ Yarn needle for sewing parts together
✨ Premium fiberfill stuffing
✨ 8mm black safety eyes
✨ Pink embroidery thread for facial details
✨ Stitch markers

Abbreviations & Stitches Used
➡️ ch: chain
➡️ sl st: slip stitch
➡️ sc: single crochet
➡️ inc: single crochet increase
➡️ dec: single crochet decrease
➡️ BLO: back loop only
The Complete Woodland Dwarfs Pattern
The Universal Master Head (Make 3 in Soft Peach)
Artisan’s Notes: Stuff the head firmly as you go, paying special attention to pushing the stuffing outward into the cheek increases. This is vital for the baby schema aesthetic.
➡️ Round 1: 6 sc in a magic ring (6)
➡️ Round 2: 6 inc (12)
➡️ Round 3: (1 sc, inc) 6 times (18)
➡️ Round 4: (2 sc, inc) 6 times (24)
➡️ Round 5: (3 sc, inc) 6 times (30)
➡️ Round 6: (4 sc, inc) 6 times (36)
➡️ Round 7: (5 sc, inc) 6 times (42)
➡️ Round 8: (6 sc, inc) 6 times (48)
➡️ Round 9: (7 sc, inc) 6 times (54)
➡️ Round 10: (8 sc, inc) 6 times (60)
➡️ Rounds 11-20: 1 sc in each st around (60)
➡️ Round 21 (Cheek Shaping): 15 sc, (inc) 10 times, 10 sc, (inc) 10 times, 15 sc (80)
➡️ Rounds 22-28: 1 sc in each st around (80)
➡️ Round 29: 15 sc, (dec) 10 times, 10 sc, (dec) 10 times, 15 sc (60)
➡️ Round 30: (8 sc, dec) 6 times (54)
➡️ Round 31: (7 sc, dec) 6 times (48)
➡️ Round 32: (6 sc, dec) 6 times (42)
➡️ Round 33: (5 sc, dec) 6 times (36)
➡️ Round 34: (4 sc, dec) 6 times (30)
➡️ Round 35: (3 sc, dec) 6 times (24)
➡️ Round 36: (2 sc, dec) 6 times (18)
➡️ Fasten off, leaving a long tail for sewing. Insert safety eyes between Rounds 19 and 20, spaced 6 stitches apart, right above the cheek increases.
The Bulbous Nose (Make 3 in Soft Peach)
➡️ Round 1: 6 sc in a magic ring (6)
➡️ Round 2: 6 inc (12)
➡️ Round 3: (1 sc, inc) 6 times (18)
➡️ Rounds 4-6: 1 sc in each st around (18)
➡️ Round 7: (1 sc, dec) 6 times (12)
➡️ Fasten off, leaving a tail for sewing. Stuff very lightly.
Small Ears (Make 2 pairs for the Mustard and Mint Dwarfs)
➡️ Round 1: 5 sc in a magic ring, do not join, ch 1, turn (5)
➡️ Round 2: 5 inc (10)
➡️ Fasten off, leaving a tail for sewing.
Oversized Ears (Make 1 pair for the Purple Dwarf)
➡️ Round 1: 6 sc in a magic ring, do not join, ch 1, turn (6)
➡️ Round 2: 6 inc (12)
➡️ Round 3: (1 sc, inc) 6 times (18)
➡️ Fasten off, leaving a long tail. Gently fold the edges inward while sewing to cup the ear.
Sleepy Eyelids (Make 2 pieces for the Mint Dwarf in Soft Peach)
➡️ Row 1: ch 5, starting in second ch from hook, 4 sc (4)
➡️ Fasten off, leaving a tail. Curve gently over the top of the safety eyes during assembly.
The Scalloped Beard (Make 2 for the Mustard and Mint Dwarfs in Crisp White)
➡️ Row 1: ch 25, starting in second ch from hook, 24 sc, ch 1, turn (24)
➡️ Row 2: (Skip 1 st, 5 dc in next st, skip 1 st, sl st in next st) 6 times across.
➡️ Fasten off, leaving a tail for sewing.
The Universal Master Body (Make 3: One with Chocolate Tunic, One with Orange, One with Yellow-Green)
Artisan’s Notes: We begin at the legs in the Tunic color, join them, and work our way up to the neck.
➡️ Round 1 (Leg 1): 6 sc in a magic ring (6)
➡️ Round 2: 6 inc (12)
➡️ Rounds 3-8: 1 sc in each st around (12). Fasten off Leg 1.
➡️ Rounds 1-8 (Leg 2): Repeat as for Leg 1, but do not fasten off.
➡️ Round 9 (Joining): ch 3 from Leg 2, sc into Leg 1, 11 sc around Leg 1, 3 sc along the chain, 12 sc around Leg 2, 3 sc along the other side of the chain (30)
➡️ Round 10: (4 sc, inc) 6 times (36)
➡️ Round 11: (5 sc, inc) 6 times (42)
➡️ Round 12: (6 sc, inc) 6 times (48)
➡️ Rounds 13-20: 1 sc in each st around (48)
➡️ Round 21: BLO 1 sc in each st around (48) – This creates the tunic ridge.
➡️ Round 22: (6 sc, dec) 6 times (42)
➡️ Rounds 23-25: 1 sc in each st around (42)
➡️ Round 26: (5 sc, dec) 6 times (36)
➡️ Rounds 27-29: 1 sc in each st around (36)
➡️ Round 30: (4 sc, dec) 6 times (30)
➡️ Rounds 31-33: 1 sc in each st around (30)
➡️ Round 34: (3 sc, dec) 6 times (24)
➡️ Round 35: (2 sc, dec) 6 times (18)
➡️ Fasten off. Stuff the body firmly, shaping a gentle, rounded belly.
The Arms (Make 6 in corresponding Tunic colors)
➡️ Round 1: In Soft Peach, 6 sc in a magic ring (6)
➡️ Round 2: (1 sc, inc) 3 times (9)
➡️ Rounds 3-4: 1 sc in each st around (9)
➡️ Round 5: Change to Tunic Color. BLO 1 sc in each st around (9)
➡️ Rounds 6-16: 1 sc in each st around (9)
➡️ Fasten off, leaving a tail. Stuff lightly only in the hands; leave the upper arms empty so they rest flat against the body.
The Mustard & Mint Tall Hats (Make 1 in Mustard, 1 in Mint)
➡️ Round 1: 4 sc in a magic ring (4)
➡️ Round 2: (1 sc, inc) 2 times (6)
➡️ Round 3: (2 sc, inc) 2 times (8)
➡️ Round 4: (3 sc, inc) 2 times (10)
➡️ Continue increasing by 2 stitches evenly each round until you reach 48 stitches (Round 23).
➡️ Rounds 24-34: 1 sc in each st around (48)
➡️ Fasten off, leaving a very long tail for sewing.
The Purple Slouched Hat
➡️ Round 1: 6 sc in a magic ring (6)
➡️ Round 2: 6 inc (12)
➡️ Round 3: (1 sc, inc) 6 times (18)
➡️ Round 4: (2 sc, inc) 6 times (24)
➡️ Continue increasing by 6 stitches evenly each round until you reach 48 stitches (Round 8).
➡️ Rounds 9-28: 1 sc in each st around (48)
➡️ Fasten off, leaving a tail. Fold the back down gently to create the slouch.
The Belts (Make 3 in Black)
➡️ Row 1: ch 45, starting in second ch from hook, 44 sc (44)
➡️ Fasten off. Wrap around the body over Round 21 (the BLO ridge) and sew in place. Embroider a small yellow square for the buckle.
Assembly & Final Touches
➡️ Position the bulbous nose exactly between the eyes, overlapping the inner corners slightly. Sew firmly.
➡️ For the Mustard and Mint dwarfs, wrap the scalloped beard directly beneath the nose and sew the edges up toward the ears.
➡️ Attach the small ears to the Mustard and Mint dwarfs four stitches away from the eyes. Attach the oversized, cupped ears to the Purple dwarf in the same position.
➡️ Sew the sleepy eyelids over the Mint dwarf’s eyes, angling them downward to create a drowsy expression.
➡️ Attach the head to the body, adding extra stuffing to the neck joint to prevent wobbling.
➡️ Pin the arms to the sides of the body just below the neck line and sew securely.
➡️ Pull the hats firmly down over the back of the heads, resting just above the ears and eyebrows. Sew all the way around the brim.
➡️ Using pink embroidery thread, add a small, soft horizontal line for the smiling mouths.
Tips & FAQs
➡️ Question: My dwarf’s head is flopping backward. What did I do wrong? Answer: This is a common hurdle! It simply means the neck requires more fiberfill. Right before closing the gap between the head and body, push small, dense amounts of stuffing into the center using the back of your hook.
➡️ Question: How do I get the cheeks to look so round? Answer: The secret is in the targeted increases and decreases, combined with how you stuff. Manually push the fiberfill outward into those specific cheek pockets as you work.
A Final Word
Your hands have created something truly special today. These little brothers carry the warmth of your dedication in every single stitch. Continue to refine your shaping, trust your artistic instincts, and above all, enjoy the quiet rhythm of your hook. I am so proud of your work.