Welcome back to the workbench, my friend. Our hands are about to bring forth a creature of profound comfort and gentle melancholy. This little blue donkey is a testament to the power of soft shapes and quiet expressions.
About This Creation & Angle
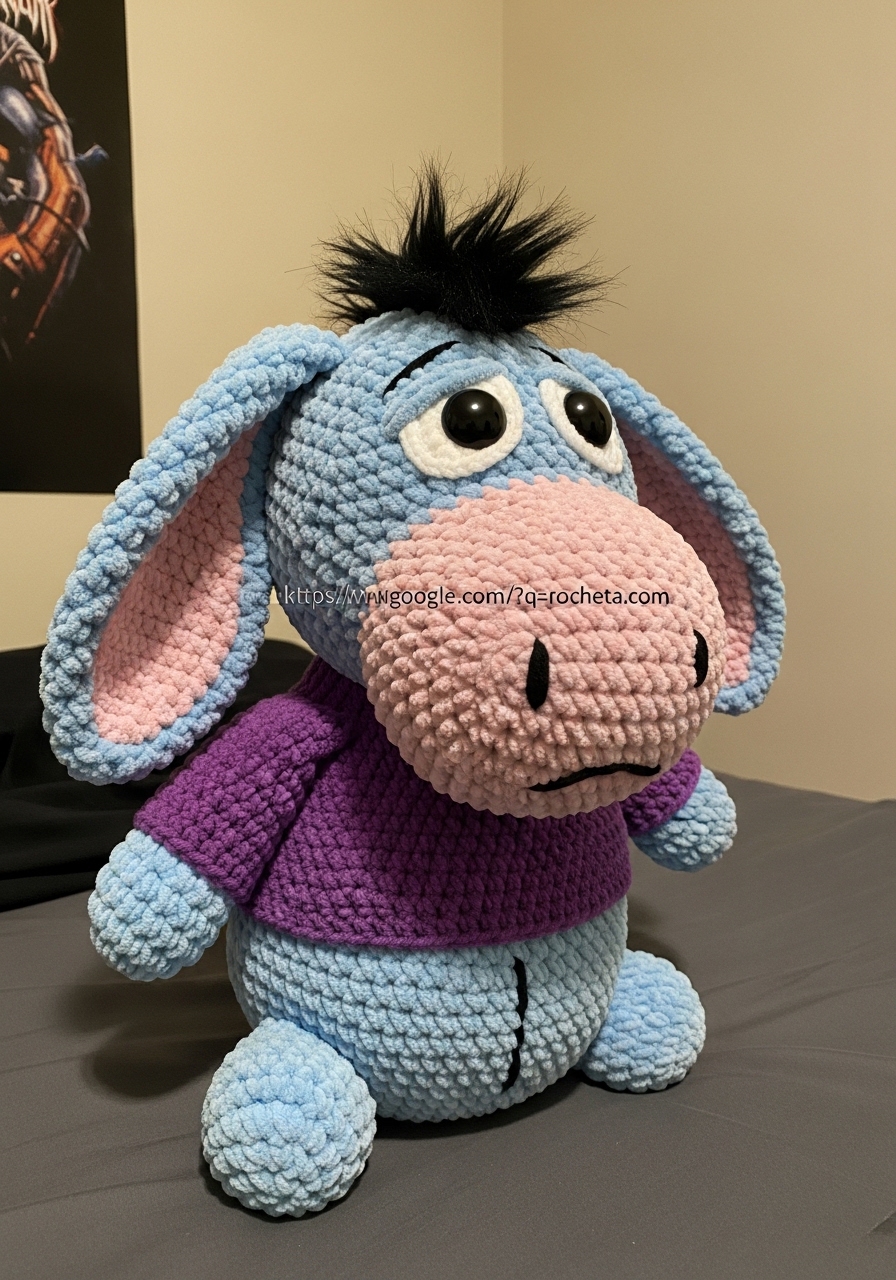
This darling little donkey is designed with the aesthetic of ultimate comfort in mind. We are working with thick, velvety chenille yarn, which transforms every stitch into a cloud. The commercial appeal of plush amigurumi is undeniable right now. Makers and buyers alike are drawn to the tactile joy of velvet and blanket yarns.
By combining a slightly oversized, heavy-lidded head with a plump, rounded body, we create a silhouette that triggers an immediate instinct to cuddle. The addition of the textured purple sweater offers a brilliant contrast, elevating the entire piece from a simple toy to an artisanal keepsake.
Project Snapshot
📊 Difficulty: Intermediate
⏰ Est. Time: 6–8 Hours
📏 Size: Approximately 25cm (10 inches) tall when seated
“A heavy stitch holds a heavy heart; let the yarn absorb the worries of the day.” – Patricia
Materials & Tools Needed
🧶 Yarn: Super Bulky (Weight 6) Chenille/Plush Yarn in Light Blue, Light Pink, and Purple. Small amount of fluffy black yarn for the mane.
🪡 Hook: 5.0mm crochet hook (or size appropriate for your tension to ensure no gaps).
✨ Other Materials: 16mm black safety eyes, black cotton embroidery thread, polyester fiberfill stuffing, stitch markers, long tapestry needle.

Abbreviations & Stitches Used
ch: chain
sc: single crochet
inc: increase (2 sc in one stitch)
dec: invisible decrease (sc 2 together)
sl st: slip stitch
BLO: back loop only
rnd: round
The Complete Sweet Blue Donkey Pattern
The Oversized Head
We begin at the crown, working in continuous spirals.
Rnd 1: 6 sc in a magic ring (6)
Rnd 2: inc in each st around (12)
Rnd 3: [sc in next st, inc in next st] 6 times (18)
Rnd 4: [sc in next 2 st, inc in next st] 6 times (24)
Rnd 5: [sc in next 3 st, inc in next st] 6 times (30)
Rnd 6: [sc in next 4 st, inc in next st] 6 times (36)
Rnd 7: [sc in next 5 st, inc in next st] 6 times (42)
Rnd 8: [sc in next 6 st, inc in next st] 6 times (48)
Rnd 9-16: sc in each st around (48)
Artisan’s Note: This is where the width of the upper head is established. Keep your tension even.
Rnd 17: [sc in next 6 st, dec] 6 times (42)
Rnd 18: sc in each st around (42)
Rnd 19: [sc in next 5 st, dec] 6 times (36)
Rnd 20: sc in each st around (36)
Rnd 21: [sc in next 4 st, dec] 6 times (30)
Rnd 22: [sc in next 3 st, dec] 6 times (24)
Artisan’s Note: Insert 16mm safety eyes between rounds 15 and 16, spaced about 8 stitches apart. Begin stuffing the head firmly.
Rnd 23: [sc in next 2 st, dec] 6 times (18)
Rnd 24: [sc in next st, dec] 6 times (12)
Rnd 25: dec 6 times (6)
Fasten off, leaving a long tail for sewing. Weave the tail through the front loops of the remaining 6 stitches and pull tight to close.
The Plump Snout
Using pink plush yarn.
Rnd 1: ch 8. Starting in the 2nd ch from hook: 6 sc, 3 sc in the last ch. Working down the opposite side of the chain: 5 sc, 2 sc in the last ch (16)
Rnd 2: inc, 5 sc, 3 inc, 5 sc, 2 inc (22)
Rnd 3: 1 sc, inc, 5 sc, [1 sc, inc] 3 times, 5 sc, [1 sc, inc] 2 times (28)
Rnd 4: 2 sc, inc, 5 sc, [2 sc, inc] 3 times, 5 sc, [2 sc, inc] 2 times (34)
Rnd 5-7: sc in each st around (34)
Fasten off, leaving a very long tail. Stuff the snout lightly before attaching it to the lower half of the head.
The Floppy Ears (Make 2)
We construct these with two panels (pink inner, blue outer) crocheted together.
Inner Ear (Pink)
Row 1: ch 15. sc in 2nd ch from hook and next 12 ch, 3 sc in last ch. Turn to work down the other side: sc in 13 ch. (29)
Fasten off.
Outer Ear (Blue)
Row 1: ch 15. sc in 2nd ch from hook and next 12 ch, 3 sc in last ch. Turn to work down the other side: sc in 13 ch. (29)
Do not fasten off.
Assembly of Ear
Place the pink panel against the blue panel, wrong sides facing each other. Using the working blue yarn, sc through both panels around the entire edge to join them. Fasten off, leaving a tail for sewing.
The Huggable Body & Purple Sweater
Starting at the bottom with light blue yarn.
Rnd 1: 6 sc in a magic ring (6)
Rnd 2: inc in each st around (12)
Rnd 3: [sc in next st, inc in next st] 6 times (18)
Rnd 4: [sc in next 2 st, inc in next st] 6 times (24)
Rnd 5: [sc in next 3 st, inc in next st] 6 times (30)
Rnd 6: [sc in next 4 st, inc in next st] 6 times (36)
Rnd 7: [sc in next 5 st, inc in next st] 6 times (42)
Rnd 8: [sc in next 6 st, inc in next st] 6 times (48)
Rnd 9-13: sc in each st around (48)
Rnd 14: [sc in next 6 st, dec] 6 times (42)
Change to purple yarn to begin the sweater.
Rnd 15: In BLO, sc in each st around (42)
Artisan’s Note: Working in the back loop only creates the bottom hem of the sweater.
Rnd 16-18: sc in each st around (42)
Rnd 19: [sc in next 5 st, dec] 6 times (36)
Rnd 20-22: sc in each st around (36)
Rnd 23: [sc in next 4 st, dec] 6 times (30)
Rnd 24-25: sc in each st around (30)
Rnd 26: [sc in next 3 st, dec] 6 times (24)
Rnd 27: sc in each st around (24)
Fasten off, leaving a long tail for sewing. Stuff the body firmly, ensuring the bottom remains rounded and plump.
The Gentle Arms (Make 2)
Using light blue yarn.
Rnd 1: 6 sc in a magic ring (6)
Rnd 2: [sc in next st, inc in next st] 3 times (9)
Rnd 3: [sc in next 2 st, inc in next st] 3 times (12)
Rnd 4-6: sc in each st around (12)
Change to purple yarn for the sweater sleeve.
Rnd 7: In BLO, sc in each st around (12)
Rnd 8-15: sc in each st around (12)
Stuff the bottom of the arm lightly, leaving the top unstuffed so it rests flat against the body. Pinch the top closed and sc across the opening to seal it. Fasten off, leaving a tail.
The Sturdy Legs (Make 2)
Start with pink yarn for the footpads.
Rnd 1: 6 sc in a magic ring (6)
Rnd 2: inc in each st around (12)
Rnd 3: [sc in next st, inc in next st] 6 times (18)
Change to light blue yarn.
Rnd 4: In BLO, sc in each st around (18)
Artisan’s Note: This creates the crisp, flat bottom edge of the foot.
Rnd 5-6: sc in each st around (18)
Rnd 7: [sc in next 4 st, dec] 3 times (15)
Rnd 8-10: sc in each st around (15)
Rnd 11: [sc in next 3 st, dec] 3 times (12)
Rnd 12-14: sc in each st around (12)
Stuff firmly at the base and lightly near the top. Pinch the top flat and sc across to close. Fasten off with a long tail.
The Tail
Using light blue yarn.
Row 1: ch 11. sc in 2nd ch from hook and each ch across (10)
Fasten off, leaving a tail for attaching. Tie a small bundle of black fluffy yarn to the tip of the tail to create a tuft.
The Tufted Mane
Cut 10 to 15 short strands of black fluffy yarn, about 3 inches long. Fold each strand in half and loop them through the stitches at the very top of the head, pulling the ends tightly through the loop to secure them. Trim the mane to your desired length so it stands perfectly upright.
Assembly & Final Touches
Pin the snout to the lower front of the head and sew securely.
Sew the head to the body, ensuring the face looks slightly downward for that sweet, shy expression.
Attach the ears to the sides of the head, around round 7, allowing them to flop downward heavily.
Sew the arms to the sides of the body, just below the neck seam.
Sew the legs to the lower sides of the body so he sits in a balanced, resting position.
Attach the tail to the lower back.
Finally, thread your tapestry needle with black embroidery floss. Stitch the bold vertical line down the center of the snout and the belly. Add horizontal cross-stitches across these lines to create the signature patchwork effect. Embroider small, sad eyebrows above the eyes, and a single vertical line across the top of each foot.
Tips & FAQs
Q: How do I prevent my chenille yarn from shedding while I work?
A: When you cut the yarn, immediately melt the very tip with a lighter for a fraction of a second, or tie a tight knot at the end. This seals the fibers and stops the shedding dead in its tracks.
Q: My safety eyes are sinking into the plush yarn. What can I do?
A: Before attaching the washer inside, place a small square of stiff felt behind the eye post. This creates a wider anchor and stops the eye from pulling through the loose fibers of the bulky yarn.
A Final Word
You have brought immense comfort into the world with this creation. Hold him close, admire the meticulous shaping of his gentle features, and know that your artisan hands have crafted genuine magic today.