Hello again, my fellow creators. Today, our hooks will bring forth a creature of pure, unquestioning loyalty and endless charm for Krocheta. This little puppy, with its snowy coat and bright eyes, is waiting patiently for you to breathe life into every stitch.
About This Creation & Angle
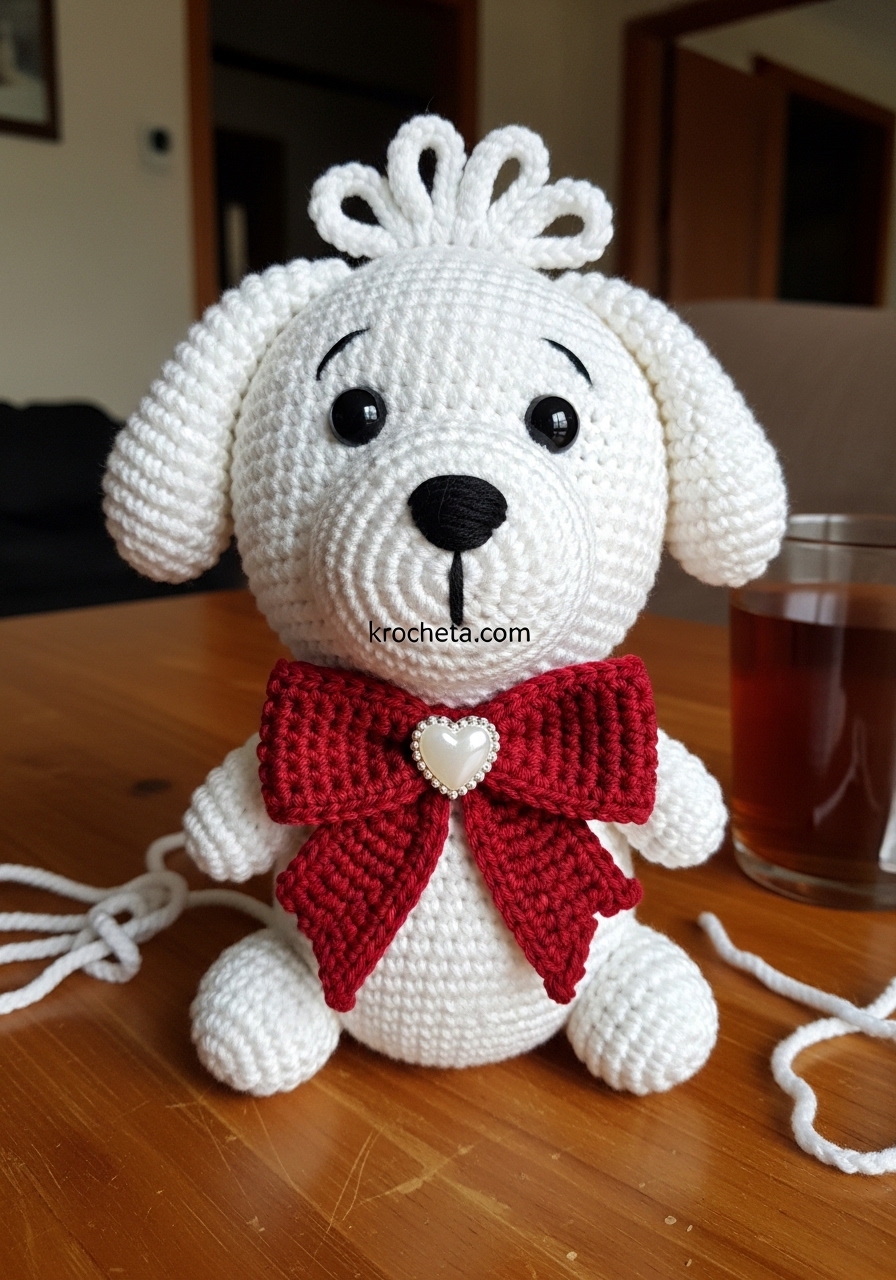
This project captures the exact moment a small dog looks up at you with complete trust. We are focusing on soft, rounded shaping to mimic the natural curve of a puppy’s silhouette. The use of a bright white palette emphasizes that newborn innocence. To add texture without overwhelming the design, we incorporate a gentle loop stitch crown for the fur. This creates a tactile experience that begs to be held. The rich red bow acts as the perfect storytelling accessory, giving our little friend a touch of classic, timeless elegance.
Project Snapshot
📊 Difficulty: Intermediate
⏰ Est. Time: 4 to 5 hours
📏 Size: Approximately 15cm tall
“A handmade companion carries a piece of your heart within its cotton stuffing.” — Patricia Poltera
Materials & Tools Needed
🧶 Yarn: Light worsted weight cotton yarn in Bright White, Deep Red, and a scrap of Black for the nose.
🪡 Hook: 2.5mm crochet hook to ensure tight stitches.
✨ Other Materials: 8mm safety eyes, toy stuffing, stitch markers, a yarn needle, and a small white heart charm.

Abbreviations & Stitches Used
ch: chain
sc: single crochet
inc: increase (2 sc in one stitch)
dec: invisible decrease (sc 2 together)
sl st: slip stitch
st(s): stitch(es)
rnd(s): round(s)
loop st: loop stitch
The Complete Little Puppy Pattern
The Head
Rnd 1: 6 sc in magic ring (6)
Rnd 2: 6 inc (12)
Rnd 3: (1 sc, inc) x 6 (18)
Rnd 4: (2 sc, inc) x 6 (24)
Rnd 5: (3 sc, inc) x 6 (30)
Rnd 6: (4 sc, inc) x 6 (36)
Rnd 7: (5 sc, inc) x 6 (42)
Rnd 8: (6 sc, inc) x 6 (48)
Rnd 9: (7 sc, inc) x 6 (54)
Rnds 10-18: sc in each st around (54)
Rnd 19: (7 sc, dec) x 6 (48)
Rnd 20: (6 sc, dec) x 6 (42)
Rnd 21: (5 sc, dec) x 6 (36)
Artisan’s Note: Place safety eyes between Rnds 14 and 15, leaving 10 stitches between them. This wide placement creates that perfect gaze of innocence.
Rnd 22: (4 sc, dec) x 6 (30)
Rnd 23: (3 sc, dec) x 6 (24)
Rnd 24: (2 sc, dec) x 6 (18)
Fasten off, leaving a long tail for sewing. Stuff firmly, focusing on rounding out the cheeks to ensure a chubby profile.
The Snout/Muzzle
Rnd 1: 6 sc in magic ring (6)
Rnd 2: 6 inc (12)
Rnd 3: (1 sc, inc) x 6 (18)
Rnds 4-6: sc in each st around (18)
Fasten off, leaving a long tail. Embroider a delicate, small black nose over the first two rounds.
The Fluffy Crown (Hair/Fur)
Rnd 1: 6 loop st in magic ring (6)
Rnd 2: 6 loop st inc (12)
Rnd 3: (1 loop st, loop st inc) x 6 (18)
Rnd 4: (2 loop st, loop st inc) x 6 (24)
Rnd 5: (3 loop st, loop st inc) x 6 (30)
Rnd 6: (4 loop st, loop st inc) x 6 (36)
Rnds 7-10: loop st in each st around (36)
Fasten off, leaving a long tail to attach to the top of the head.
The Body
Rnd 1: 6 sc in magic ring (6)
Rnd 2: 6 inc (12)
Rnd 3: (1 sc, inc) x 6 (18)
Rnd 4: (2 sc, inc) x 6 (24)
Rnd 5: (3 sc, inc) x 6 (30)
Rnd 6: (4 sc, inc) x 6 (36)
Rnd 7: (5 sc, inc) x 6 (42)
Rnds 8-15: sc in each st around (42)
Rnd 16: (5 sc, dec) x 6 (36)
Rnds 17-18: sc in each st around (36)
Rnd 19: (4 sc, dec) x 6 (30)
Rnds 20-21: sc in each st around (30)
Rnd 22: (3 sc, dec) x 6 (24)
Rnds 23-24: sc in each st around (24)
Rnd 25: (2 sc, dec) x 6 (18)
Fasten off. Stuff firmly, ensuring the base is wide and stable.
The Front Legs (Make 2)
Rnd 1: 6 sc in magic ring (6)
Rnd 2: 6 inc (12)
Rnd 3: (1 sc, inc) x 6 (18)
Rnds 4-6: sc in each st around (18)
Rnd 7: 3 dec, 12 sc (15)
Artisan’s Note: These front decreases naturally create the gentle bend of a puppy’s paw.
Rnds 8-14: sc in each st around (15)
Fasten off, leaving a tail. Stuff the paw firmly, but lightly stuff the top so it sits flush against the body.
The Back Legs (Make 2)
Rnd 1: 6 sc in magic ring (6)
Rnd 2: 6 inc (12)
Rnd 3: (1 sc, inc) x 6 (18)
Rnd 4: (2 sc, inc) x 6 (24)
Rnds 5-7: sc in each st around (24)
Rnd 8: 4 dec, 16 sc (20)
Rnds 9-12: sc in each st around (20)
Fasten off, leaving a tail. Stuff firmly.
The Ears (Make 2)
Rnd 1: 6 sc in magic ring (6)
Rnd 2: 6 inc (12)
Rnd 3: (1 sc, inc) x 6 (18)
Rnd 4: (2 sc, inc) x 6 (24)
Rnds 5-9: sc in each st around (24)
Rnd 10: (2 sc, dec) x 6 (18)
Rnds 11-13: sc in each st around (18)
Rnd 14: (1 sc, dec) x 6 (12)
Rnds 15-16: sc in each st around (12)
Do not stuff. Fold flat and sc across the opening to close. Leave a tail for sewing.
The Tail
Rnd 1: 4 sc in magic ring (4)
Rnd 2: (1 sc, inc) x 2 (6)
Rnd 3: (2 sc, inc) x 2 (8)
Rnds 4-7: sc in each st around (8)
Fasten off. Lightly stuff.
The Accessory: Red Bow
Row 1: Using Deep Red yarn, ch 21. Starting in 2nd ch from hook, 20 sc. Turn.
Rows 2-6: Ch 1, 20 sc. Turn.
Fasten off. Fold the ends to the center and sew them together. Wrap a separate strand of yarn tightly around the middle to cinch it into a distinct bow shape. Attach the white heart charm securely to the center. To make the neckband, ch 25 (or enough to fit comfortably around the neck), sc across, and attach the ends to the back of the bow.
Assembly & Final Touches
➡️ Sew the muzzle to the lower center of the face, aligning it perfectly between the eyes.
➡️ Attach the fluffy crown slightly tilted back on the head.
➡️ Sew the ears to the sides of the head, allowing them to flop naturally just below the crown.
➡️ Anchor the head securely to the body.
➡️ Position the front legs close together at the front of the body and stitch them firmly.
➡️ Attach the back legs to the sides so the puppy stands securely.
➡️ Sew the tail to the lower back, angled upward in a joyful curve.
➡️ Fasten the red bow gently around the neck.
Tips & FAQs
Q: My loop stitches look uneven. What should I do?
A: Keep your tension consistent on the finger holding the loop. Practice a few stitches on a scrap piece of yarn first until your hands learn the rhythm.
Q: Can I use acrylic yarn instead of cotton?
A: Yes, though cotton provides superior stitch definition and a cleaner, structured shape for high-quality amigurumi projects.
A Final Word
Your little companion is now complete and ready to bring joy to its new home. May your hands always find comfort in the craft, and may your beautiful creations continue to tell wonderful stories.