Greetings, my fellow maker. It brings me immense joy to share Clementine’s latest seasonal ensemble with you. This adorable carrot pod design celebrates the gentle beauty of spring, offering a richly textured challenge that is incredibly rewarding to crochet.
About This Creation & Angle
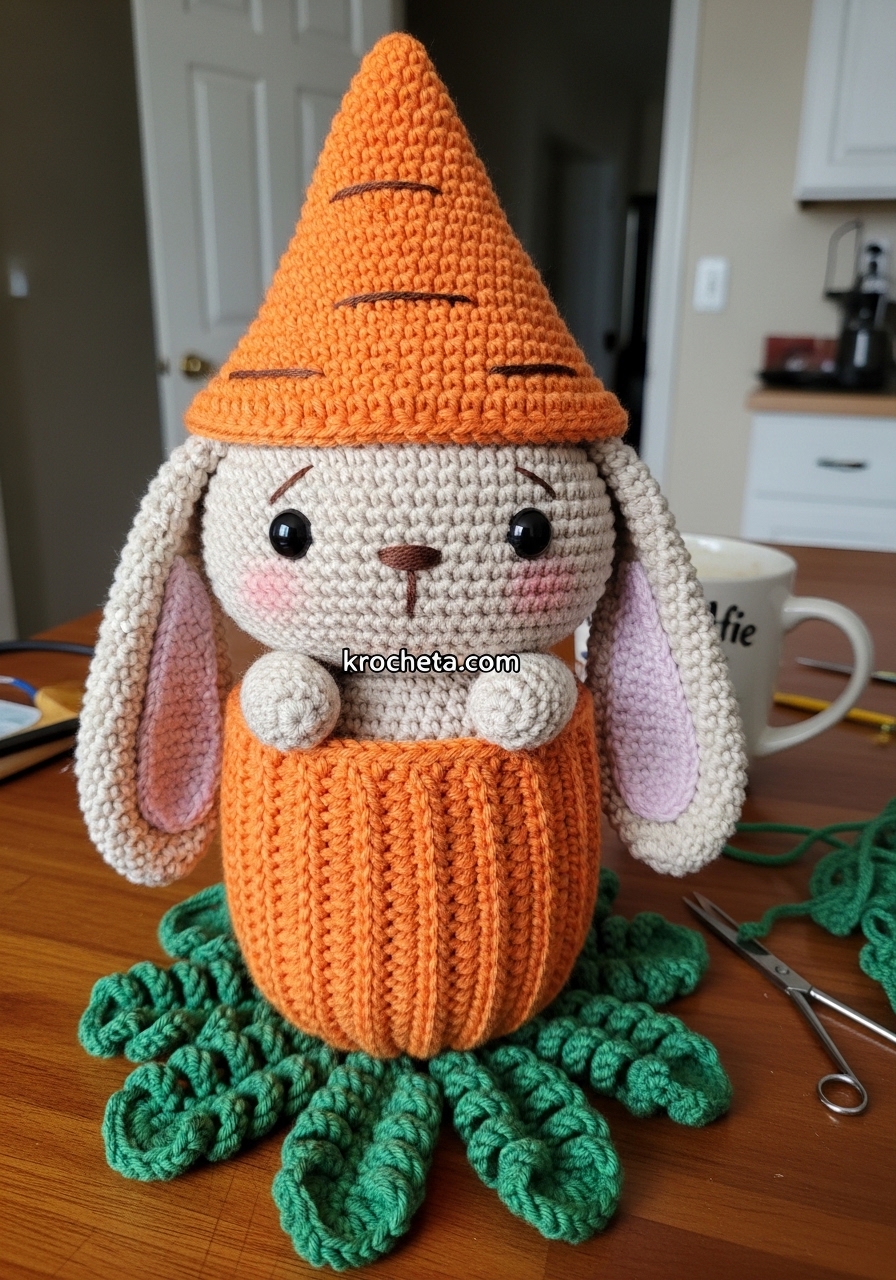
Spring breathes fresh life into our crochet hooks. I wanted to design an Easter project that goes beyond the standard egg shapes. Clementine, our beloved beige bunny, required a cozy spot to celebrate the season. This carrot hideaway provides exactly that. The combination of the ribbed orange pod and the soft, rounded features of our bunny creates a striking visual contrast. We focus on the baby schema aesthetic here. Her eyes sit low and wide on a beautifully oversized head, radiating absolute innocence. This project is a wonderful way to practice color transitions and structural shaping, making it a stellar addition to your spring market inventory or a cherished heirloom gift.
Project Snapshot:
📊 Difficulty: Intermediate
⏰ Est. Time: 6 to 8 hours
📏 Size: Approximately 15cm tall
“True beauty lies in the tension of your stitches and the patience in your heart.”
Materials & Tools Needed
🧶 Yarn: Fine sport weight cotton yarn in Soft Beige, Vibrant Orange, Earthy Brown, Forest Green, and Pastel Pink
🪡 Hook: 2.25mm crochet hook
✨ Other Materials: 6mm safety eyes, dark brown embroidery thread for the nose, soft polyester fiberfill, yarn needle, stitch marker, and cosmetic blush for the cheeks

Abbreviations & Stitches Used
ch: chain
sl st: slip stitch
sc: single crochet
inc: increase (2 sc in one stitch)
dec: invisible decrease (sc 2 together through front loops)
hdc: half double crochet
dc: double crochet
BLO: back loops only
FLO: front loops only
The Complete Clementine’s Easter Carrot Hideaway Pattern
The Plump Bunny Body (Soft Beige)
Rnd 1: 6 sc in a magic ring (6)
Rnd 2: 6 inc (12)
Rnd 3: [1 sc, inc] 6 times (18)
Rnd 4: [2 sc, inc] 6 times (24)
Rnd 5: [3 sc, inc] 6 times (30)
Rnd 6: [4 sc, inc] 6 times (36)
Rnd 7: [5 sc, inc] 6 times (42)
Rnd 8: [6 sc, inc] 6 times (48)
Rnd 9: [7 sc, inc] 6 times (54)
Rnd 10: [8 sc, inc] 6 times (60)
Rnds 11-20: 1 sc in each st around (60)
Rnd 21: [8 sc, dec] 6 times (54)
Rnd 22: 1 sc in each st around (54)
Rnd 23: [7 sc, dec] 6 times (48)
Rnd 24: 1 sc in each st around (48)
Artisan’s Note: Place the 6mm safety eyes between rounds 16 and 17, spacing them 10 stitches apart to achieve that wide-set, innocent gaze. Embroider a tiny, low-set brown triangle nose directly between the eyes.
Rnd 25: [6 sc, dec] 6 times (42)
Rnd 26: [5 sc, dec] 6 times (36)
Rnd 27: [4 sc, dec] 6 times (30)
Rnd 28: [3 sc, dec] 6 times (24)
Artisan’s Note: Begin stuffing the body firmly. Ensure the base remains perfectly rounded and chubby, pushing the fiberfill outward against the sides.
Rnd 29: [2 sc, dec] 6 times (18)
Rnd 30: [1 sc, dec] 6 times (12)
Rnd 31: 6 dec (6)
Fasten off. Weave the yarn tail through the front loops of the remaining 6 stitches and pull tight to close.
The Carrot Cap (Vibrant Orange)
Rnd 1: 4 sc in a magic ring (4)
Rnd 2: [1 sc, inc] 2 times (6)
Rnd 3: [2 sc, inc] 2 times (8)
Rnd 4: [3 sc, inc] 2 times (10)
Rnd 5: 1 sc in each st around (10)
Rnd 6: [4 sc, inc] 2 times (12)
Rnd 7: [5 sc, inc] 2 times (14)
Rnd 8: 1 sc in each st around (14)
Rnd 9: [6 sc, inc] 2 times (16)
Rnd 10: [7 sc, inc] 2 times (18)
Rnd 11: 1 sc in each st around (18)
Rnd 12: [2 sc, inc] 6 times (24)
Rnd 13: 1 sc in each st around (24)
Rnd 14: [3 sc, inc] 6 times (30)
Rnd 15: 1 sc in each st around (30)
Rnd 16: [4 sc, inc] 6 times (36)
Rnd 17: 1 sc in each st around (36)
Rnd 18: [5 sc, inc] 6 times (42)
Rnd 19: 1 sc in each st around (42)
Rnd 20: [6 sc, inc] 6 times (48)
Rnd 21: [7 sc, inc] 6 times (54)
Rnd 22: [8 sc, inc] 6 times (60)
Rnd 23: 1 sc in each st around (60)
Rnd 24: In FLO, [4 sc, inc] 12 times (72)
Fasten off, leaving a long tail for sewing. Use Earthy Brown yarn to embroider small horizontal lines across the cap to mimic carrot grooves.
The Floppy Bunny Ears (Soft Beige, Make 2)
Rnd 1: 6 sc in a magic ring (6)
Rnd 2: [1 sc, inc] 3 times (9)
Rnd 3: [2 sc, inc] 3 times (12)
Rnd 4: [3 sc, inc] 3 times (15)
Rnd 5: [4 sc, inc] 3 times (18)
Rnds 6-12: 1 sc in each st around (18)
Rnd 13: [4 sc, dec] 3 times (15)
Rnds 14-16: 1 sc in each st around (15)
Rnd 17: [3 sc, dec] 3 times (12)
Rnds 18-20: 1 sc in each st around (12)
Fasten off, leaving a long tail. Do not stuff. Fold the ear flat. Use Pastel Pink yarn to embroider a soft inner ear line down the center.
The Tiny Paws (Soft Beige, Make 2)
Rnd 1: 5 sc in a magic ring (5)
Rnd 2: 5 inc (10)
Rnds 3-5: 1 sc in each st around (10)
Rnd 6: [3 sc, dec] 2 times (8)
Rnds 7-9: 1 sc in each st around (8)
Fasten off, leaving a tail. Lightly stuff the tips only.
The Carrot Pod Base (Vibrant Orange)
Rnd 1: 6 sc in a magic ring (6)
Rnd 2: 6 inc (12)
Rnd 3: [1 sc, inc] 6 times (18)
Rnd 4: [2 sc, inc] 6 times (24)
Rnd 5: [3 sc, inc] 6 times (30)
Rnd 6: [4 sc, inc] 6 times (36)
Rnd 7: [5 sc, inc] 6 times (42)
Rnd 8: [6 sc, inc] 6 times (48)
Rnd 9: [7 sc, inc] 6 times (54)
Rnd 10: [8 sc, inc] 6 times (60)
Rnd 11: In BLO, 1 sc in each st around (60)
Rnds 12-22: 1 sc in each st around (60)
Rnd 23: In FLO, [sl st in next st, skip 1 st, 5 dc in next st, skip 1 st] repeat around.
Fasten off. Embroider brown horizontal lines across the pod to match the cap.
The Leafy Green Frills (Forest Green)
Artisan’s Note: This piece forms a starlike base for the pod to rest upon.
Rnd 1: 6 sc in a magic ring (6)
Rnd 2: 6 inc (12)
Rnd 3: [1 sc, inc] 6 times (18)
Rnd 4: Ch 12. Sc in the second ch from hook. 1 hdc in next 2 ch, 1 dc in next 5 ch, 1 hdc in next 2 ch, 1 sc in last ch. Skip 2 st on the base round, sl st into the 3rd st. Repeat 5 more times to create 6 leaves.
Fasten off, leaving a tail to attach to the bottom of the pod.
Assembly & Final Touches
➡️ Position the Carrot Cap onto Clementine’s head, tilting it slightly backward to reveal her wide-set eyes. Sew it securely into place.
➡️ Attach the Floppy Bunny Ears to the sides of the head, just beneath the brim of the Carrot Cap. Pin them so they drape softly downward.
➡️ Sew the Leafy Green Frills to the very bottom center of the Carrot Pod Base.
➡️ Place Clementine snugly inside the Carrot Pod.
➡️ Attach the Tiny Paws to the sides of her body, resting them over the ruffled edge of the Carrot Pod.
➡️ Add a soft dusting of cosmetic blush beneath her eyes to complete her sweet expression.
Tips & FAQs
Q: My carrot cap feels a bit floppy. How do I fix this?
A: You can stuff the very tip of the carrot cap with a tiny bit of fiberfill before attaching it to the head. This keeps the point standing tall.
Q: The bunny doesn’t sit flat inside the pod. Any advice?
A: Make sure you do not overstuff the very bottom of the plump bunny body. A slightly flatter base helps her sit securely within the ribbed pod.
A Final Word
You have brought an absolute vision of spring to life. Your hands have shaped yarn into joy, and Clementine looks absolutely perfect in her new seasonal home. I cannot wait to see the beautiful variations you create.