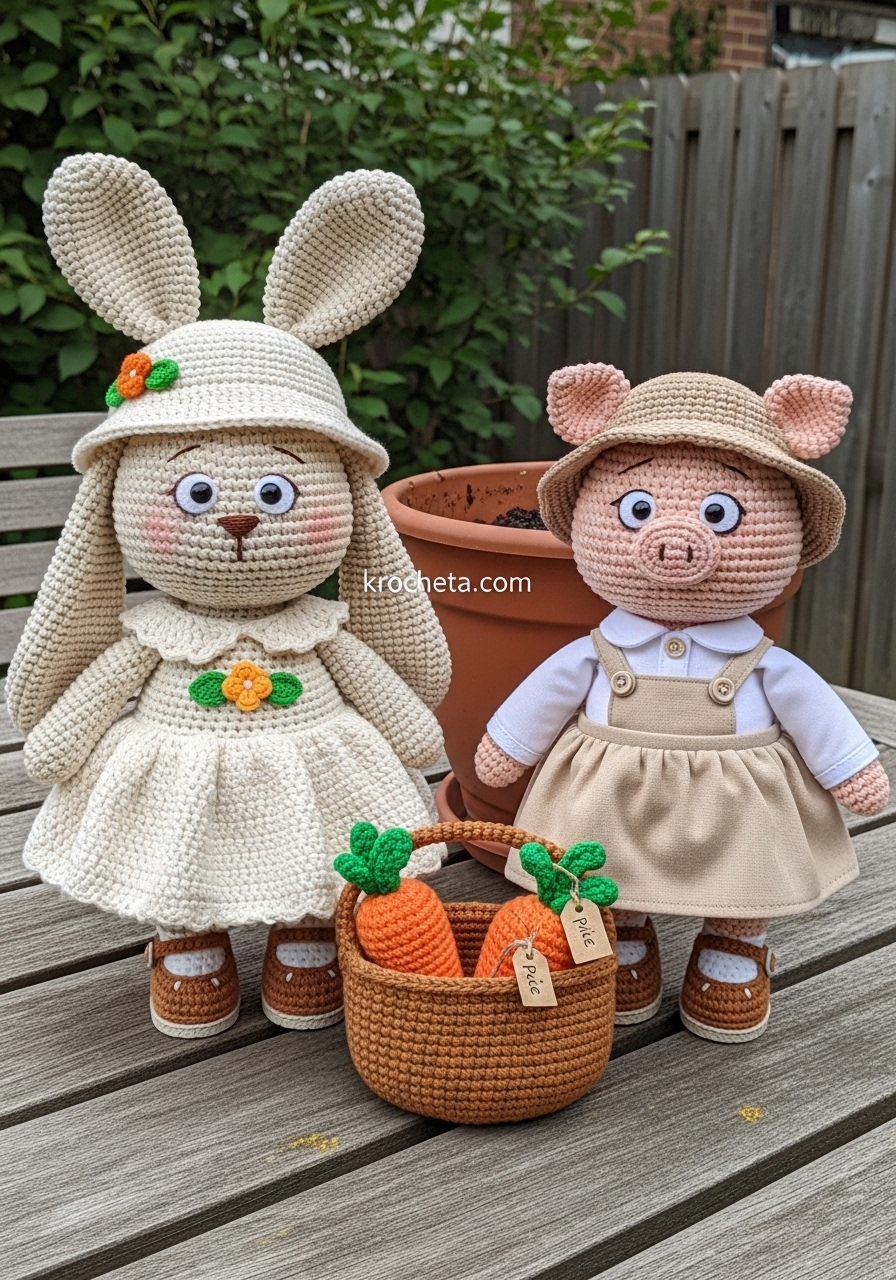
Hello again, my brilliant friend. I am overjoyed to begin this project with you. We are bringing Clementine and her piglet companion to life, capturing an innocence that speaks directly to the heart.
About This Creation & The Adorable Angle
The charm of this design lies entirely in the proportions. By lowering the eye line and expanding the cheeks, we create an irresistible baby schema. The generous head paired with a plump, pear-shaped body immediately evokes a protective, loving response from anyone who sees it. This project is an heirloom. It is meant to be held, admired, and cherished. When you craft characters with this level of specific shaping—the gentle curve of a knee, the slight bend of an elbow—your work stands far above the rest. It is this dedication to form that transforms a simple toy into a viral sensation.
Project Snapshot
📊 Difficulty: Advanced Intermediate
⏰ Est. Time: 15 to 20 hours of joyful stitching
📏 Size: Approximately 25cm (10 inches) tall
“Every stitch is a quiet promise of comfort and beauty.” — Patricia Poltera
Materials & Tools Needed
🧶 Yarn: Fine cotton weight (Sport/Baby). You will need Soft Beige, Cream, Peach, Tangerine Orange, Golden Yellow, Leaf Green, and a small amount of Brown for the accessories.
🪡 Hook: 2.0mm for the body to ensure tight stitches, and 2.5mm for the garments to allow for drape.
✨ Other Materials: 8mm safety eyes for Clementine, 6mm safety eyes for the Piglet.
✨ Soft polyester fiberfill stuffing.
✨ A long yarn needle for sculpting and assembly.
✨ Stitch markers to track your rounds.
✨ Strong craft wire or pipe cleaners for arm articulation (optional).

Abbreviations & Stitches Used
➡️ ch: chain
➡️ sl st: slip stitch
➡️ sc: single crochet
➡️ hdc: half double crochet
➡️ dc: double crochet
➡️ inc: single crochet increase (2 sc in one stitch)
➡️ dec: invisible decrease (sc 2 together through front loops only)
➡️ blo: back loops only
➡️ flo: front loops only
The Complete Amigurumi Pattern
Clementine’s Head (The Gaze of Innocence)
Artisan’s Note: Stuff the head firmly as you go, particularly pushing the stuffing into the cheeks to emphasize the wide, rounded shape.
Round 1: 6 sc in a magic ring (6)
Round 2: 6 inc (12)
Round 3: (1 sc, inc) 6 times (18)
Round 4: (2 sc, inc) 6 times (24)
Round 5: (3 sc, inc) 6 times (30)
Round 6: (4 sc, inc) 6 times (36)
Round 7: (5 sc, inc) 6 times (42)
Round 8: (6 sc, inc) 6 times (48)
Round 9: (7 sc, inc) 6 times (54)
Round 10: (8 sc, inc) 6 times (60)
Round 11: (9 sc, inc) 6 times (66)
Rounds 12 – 20: sc in each st around (66 for 9 rounds)
Round 21 (Cheek Shaping): 22 sc, (inc, 1 sc) 5 times, 2 sc, (1 sc, inc) 5 times, 22 sc (76)
Rounds 22 – 28: sc in each st around (76 for 7 rounds)
Artisan’s Note: Insert 8mm safety eyes between rounds 20 and 21, spacing them 14 stitches apart, centered right above the cheek increases.
Round 29: 22 sc, (dec, 1 sc) 5 times, 2 sc, (1 sc, dec) 5 times, 22 sc (66)
Round 30: (9 sc, dec) 6 times (60)
Round 31: (8 sc, dec) 6 times (54)
Round 32: (7 sc, dec) 6 times (48)
Round 33: (6 sc, dec) 6 times (42)
Round 34: (5 sc, dec) 6 times (36)
Round 35: (4 sc, dec) 6 times (30)
Round 36: (3 sc, dec) 6 times (24)
Round 37: (2 sc, dec) 6 times (18)
Round 38: (1 sc, dec) 6 times (12). Fasten off, leaving a long tail for sewing.
Clementine’s Body (The Plump Base)
Round 1: 6 sc in a magic ring (6)
Round 2: 6 inc (12)
Round 3: (1 sc, inc) 6 times (18)
Round 4: (2 sc, inc) 6 times (24)
Round 5: (3 sc, inc) 6 times (30)
Round 6: (4 sc, inc) 6 times (36)
Round 7: (5 sc, inc) 6 times (42)
Round 8: (6 sc, inc) 6 times (48)
Round 9: (7 sc, inc) 6 times (54)
Round 10: (8 sc, inc) 6 times (60)
Rounds 11 – 18: sc in each st around (60 for 8 rounds)
Round 19: (8 sc, dec) 6 times (54)
Rounds 20 – 21: sc in each st around (54)
Round 22: (7 sc, dec) 6 times (48)
Rounds 23 – 24: sc in each st around (48)
Round 25: (6 sc, dec) 6 times (42)
Rounds 26 – 28: sc in each st around (42)
Round 29 (Neck Shaping begins): (5 sc, dec) 6 times (36)
Round 30: sc in each st around (36)
Round 31: (4 sc, dec) 6 times (30)
Round 32: sc in each st around (30)
Round 33: (3 sc, dec) 6 times (24)
Round 34: (2 sc, dec) 6 times (18)
Round 35: (1 sc, dec) 6 times (12). Fasten off.
Clementine’s Arms (With Elbow Shaping)
Round 1: 6 sc in magic ring (6)
Round 2: 6 inc (12)
Round 3: (3 sc, inc) 3 times (15)
Rounds 4 – 6: sc in each st around (15)
Round 7 (Wrist shaping): (3 sc, dec) 3 times (12)
Rounds 8 – 12: sc in each st around (12)
Round 13 (Elbow bend): 4 sl st, 8 sc (12)
Round 14: 4 inc, 8 sc (16)
Round 15: 4 dec, 8 sc (12)
Rounds 16 – 22: sc in each st around (12). Stuff lower arm firmly, upper arm lightly. Pinch flat and crochet 5 sc across to close.
Clementine’s Legs (With Knee Shaping)
Round 1: 6 sc in magic ring (6)
Round 2: 6 inc (12)
Round 3: (1 sc, inc) 6 times (18)
Rounds 4 – 8: sc in each st around (18)
Round 9 (Ankle shaping): 6 dec, 6 sc (12)
Rounds 10 – 14: sc in each st around (12)
Round 15 (Knee shaping): 4 inc (front of knee), 8 sc (16)
Round 16: sc in each st around (16)
Round 17: 4 dec, 8 sc (12)
Rounds 18 – 25: sc in each st around (12). Stuff firmly. Fasten off.
Clementine’s Floppy Ears
Round 1: 6 sc in magic ring (6)
Round 2: 6 inc (12)
Round 3: (1 sc, inc) 6 times (18)
Rounds 4 – 6: sc in each st around (18)
Round 7: (2 sc, inc) 6 times (24)
Rounds 8 – 15: sc in each st around (24)
Round 16: (10 sc, dec) 2 times (22)
Rounds 17 – 25: sc in each st around (22)
Round 26: (9 sc, dec) 2 times (20)
Rounds 27 – 35: sc in each st around (20)
Round 36: (8 sc, dec) 2 times (18). Pinch flat and crochet 8 sc across to close. Do not stuff.
The Piglet Companion Modifications
Base Body, Arms, and Legs: Follow the exact pattern for Clementine above to maintain equal sizing.
Piglet Head: Follow Clementine’s head through Round 15. The Piglet requires a less pronounced cheek. On Round 21, substitute with: (9 sc, inc) 6 times (72), then proceed with straight rounds until decreasing.
Piglet Snout: In Peach yarn. Ch 6. Round 1: 4 sc, 3 sc in last ch, work down other side: 3 sc, 2 sc in last ch (12). Round 2: inc, 3 sc, 3 inc, 3 sc, 2 inc (18). Round 3: in BLO, sc around (18). Fasten off. Embroider two tiny nostrils.
Piglet Ears: In Peach yarn. Round 1: 4 sc in MR. Round 2: (1 sc, inc) x2 (6). Round 3: (2 sc, inc) x2 (8). Round 4: (3 sc, inc) x2 (10). Round 5: (4 sc, inc) x2 (12). Pinch flat, sc across.
Piglet Tail: In Peach yarn. Ch 15. 2 sc in second ch from hook and in each ch across. It will naturally curl.
Clementine’s Cream Dress
Bodice (in Cream): Ch 31. Row 1: sc in 2nd ch from hook and across (30). Row 2: (4 sc, inc) 6 times (36). Row 3: 5 sc, ch 6 (skip 8 sts for armhole), 10 sc, ch 6 (skip 8 sts), 5 sc.
Skirt (in Cream): Join to form a round. Round 1: 2 dc in each st around (to create extreme flare). Rounds 2 – 12: dc in each st around.
Scalloped Hem (in Peach): Join Peach yarn. (sl st, skip 1 st, 5 dc in next st, skip 1 st) repeat around.
Peter Pan Collar: Rejoin Cream to neckline. (sl st, ch 2, 2 dc, ch 2, sl st in next st) repeat 4 times on each side of the front opening.
Floral Appliques
Large Orange Flowers: In Orange. Magic ring, (ch 3, 2 dc, ch 3, sl st into ring) 5 times. Add a small Yellow French knot to the center.
Small Yellow Flowers: In Yellow. Magic ring, (ch 2, 1 hdc, ch 2, sl st into ring) 5 times.
Green Round Leaves: In Green. 8 hdc in a magic ring, sl st to close.
Clementine’s Bucket Hat
In Cream. Follow Head pattern rounds 1-10. Round 11: In FLO, (9 sc, inc) 6 times (66). Round 12: (10 sc, inc) 6 times (72). Round 13: sc in each st around (72). Round 14: sl st around the entire brim for stability.
Mary Jane Shoes
In Peach. Ch 7. Round 1: 5 sc, 3 sc in last ch. Down other side: 4 sc, 2 sc in last ch (14). Round 2: inc, 4 sc, 3 inc, 4 sc, 2 inc (20). Round 3: in BLO, sc around (20). Rounds 4-5: sc around. Round 6: 6 sc, 4 dec across the toe, 6 sc (16). Round 7: sc around. For the strap, ch 8 across the top of the foot and secure to the other side. Add a tiny yellow embroidered flower.
Piglet’s Beige Pinafore & Sun Hat
Pinafore: Work the same Bodice as the Cream Dress using Beige yarn. For the skirt, work only 8 rounds of dc. Do not add scalloped hem.
Under-Blouse Collar: Using White yarn, work the Peter Pan Collar pattern directly onto the neck of the base body before dressing.
Sun Hat: Follow Clementine’s Hat pattern, but on Round 8, ch 6 and skip 6 stitches on opposite sides to create ear-holes for the piglet’s folded ears to poke through.
Woven-Style Market Basket
In Brown. Round 1: 8 sc in MR (8). Round 2: 8 inc (16). Round 3: (1 sc, inc) 8 times (24). Round 4: (2 sc, inc) 8 times (32). Round 5: in BLO, sc around (32). Rounds 6 – 12: Work the “waistcoat stitch” (center single crochet) around to create a woven texture.
Handles: Ch 15, skip 6 stitches, sl st into the 7th. Repeat on the opposite side.
Carrots & Price Tags
Carrot: In Orange. Round 1: 4 sc in MR. Round 2: (1 sc, inc) x2 (6). Round 3: sc around (6). Round 4: (2 sc, inc) x2 (8). Rounds 5-8: sc around. Fasten off. Add Green loops of ch 10 to the top for the stem.
Tags: Cut tiny rectangles from stiff Kraft paper. Write “Price” with a fine-liner pen. Tie to the basket with a single strand of yarn.
Assembly & Final Touches
Pin the head to the body, ensuring the face looks directly forward. Sew securely through the neck stitches. Attach the arms horizontally just below the neck line. Sew the legs to the bottom of the body so the dolls can stand flat. Sew Clementine’s ears to the very top of her head, allowing them to drape gracefully. Secure the piglet’s snout just below the eye line, and fold the piglet’s ears downward before sewing. Use a small amount of pink blush on the cheeks beneath the eyes to enhance that sweet, youthful glow.
Tips & FAQs
➡️ How do I ensure the garments fit correctly? Check your tension. If you tend to crochet tightly, use the 2.5mm hook for the clothing so it slips easily over the plump amigurumi bodies.
➡️ Can I change the flower colors? Absolutely. The pastel palette is highly adaptable. Consider soft lilacs or baby blues to match your personal aesthetic.
➡️ My basket won’t stand up. What should I do? The back loop only (BLO) round creates the flat base. Ensure you pull your stitches tightly on this round. You may also insert a small circle of stiff cardboard into the bottom for a perfect finish.
A Final Word
Creating characters with this level of specific shaping takes patience, but the result is a breathtaking piece of fiber art. You have crafted not just a toy, but a story told through yarn. I am endlessly proud of the artisan you are becoming.