My dearest creator, we embark upon a deeply spiritual and rewarding journey today. The Virgen del Carmen stands as a beacon of comfort and grace. Through the rhythm of our hooks, we will bring her gentle presence to life, relying on nothing but yarn to sculpt her divine elegance.
About This Creation & Angle
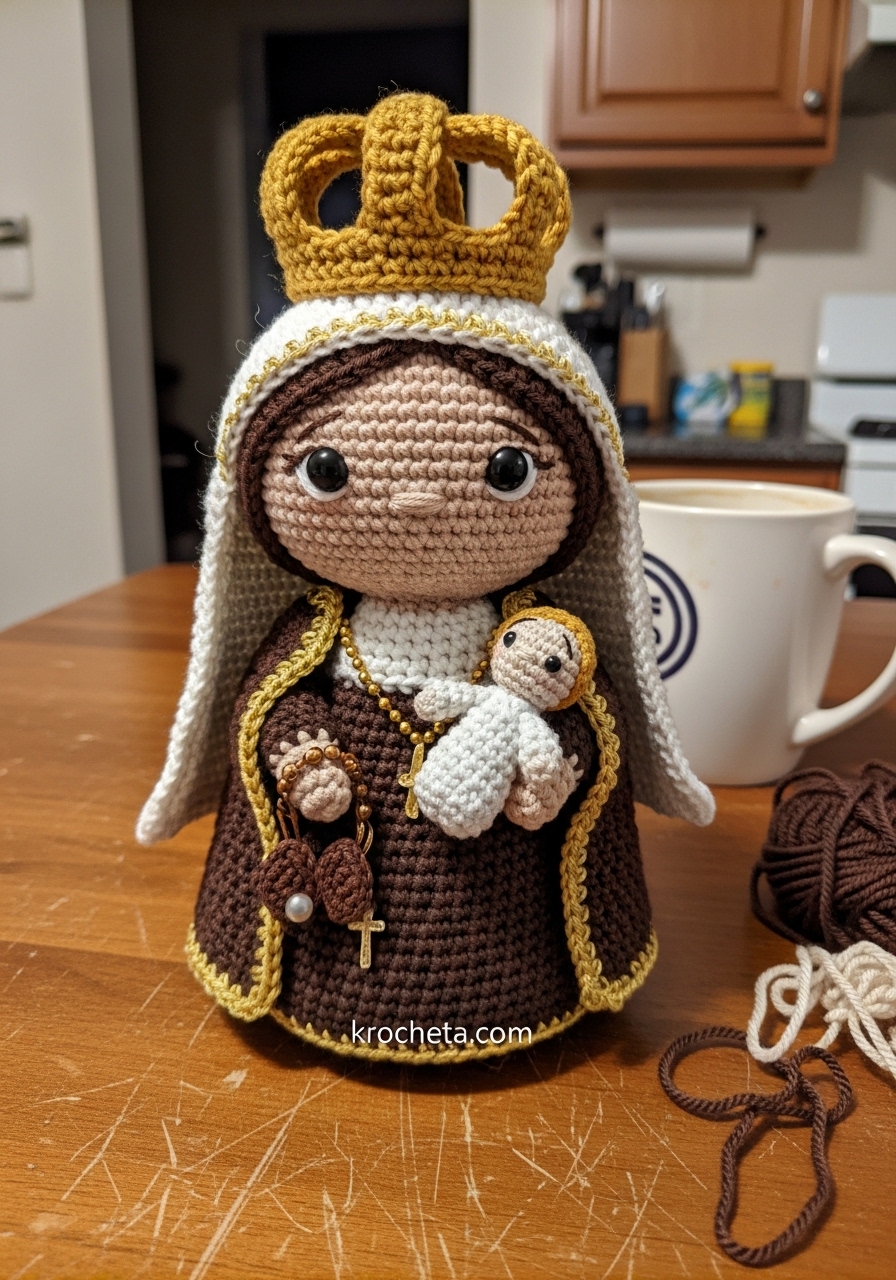
This project is a profound testament to the power of shaping and texture. We are stepping away from mixed media entirely. Every beautiful element you see, from the holy rosary to the golden appliqués, is meticulously crocheted. This ensures a cohesive, heirloom-quality creation that will last generations.
The commercial appeal of religious amigurumi is incredibly strong. Crafters constantly seek meaningful projects for baptisms, communions, and personal shrines. By mastering these highly detailed techniques, like the tiny bobble stitches for the rosary and the structured post stitches for the crown, you elevate your craft from simple toys to artisan keepsakes.
Project Snapshot:
📊 Difficulty: Advanced
⏰ Est. Time: 18 to 24 Hours
📏 Size: Approximately 25 cm (10 inches) tall
“Patience is the truest expression of devotion in our craft.” – Patricia
Materials & Tools Needed
🧶 Yarn: DK weight cotton yarn in Skin Tone, Dark Brown, White, Light Beige, Mustard/Gold, and Golden Metallic thread.
🪡 Hook: 2.25mm (for precise, tight stitches).
✨ Other Materials: Fiberfill stuffing, 10mm safety eyes, brown embroidery floss, yarn needle, and stitch markers.
Abbreviations & Stitches Used
➡️ ch: chain
➡️ sl st: slip stitch
➡️ sc: single crochet
➡️ inc: increase (2 sc in next st)
➡️ dec: invisible decrease (sc 2 together)
➡️ hdc: half double crochet
➡️ dc: double crochet
➡️ bobble: 4-dc bobble stitch
➡️ BLO: back loops only
The Complete Virgen del Carmen Pattern
The Head
Artisan’s Note: Keep your tension very tight. We want a firm, seamless canvas for her serene face.
Rnd 1: 6 sc in magic ring (6)
Rnd 2: 6 inc (12)
Rnd 3: [1 sc, inc] 6 times (18)
Rnd 4: [2 sc, inc] 6 times (24)
Rnd 5: [3 sc, inc] 6 times (30)
Rnd 6: [4 sc, inc] 6 times (36)
Rnd 7: [5 sc, inc] 6 times (42)
Rnd 8: [6 sc, inc] 6 times (48)
Rnd 9: [7 sc, inc] 6 times (54)
Rnd 10: [8 sc, inc] 6 times (60)
Rnd 11-22: 60 sc (12 rounds of 60)
Artisan’s Note: Place safety eyes between rounds 17 and 18, about 10 stitches apart. Embroider a tiny nose directly between them, and add soft pink blushing to the cheeks.
Rnd 23: [8 sc, dec] 6 times (54)
Rnd 24: [7 sc, dec] 6 times (48)
Rnd 25: [6 sc, dec] 6 times (42)
Rnd 26: [5 sc, dec] 6 times (36)
Rnd 27: [4 sc, dec] 6 times (30)
Artisan’s Note: Begin stuffing firmly, ensuring the lower cheeks are rounded and plump to capture that gaze of innocence.
Rnd 28: [3 sc, dec] 6 times (24)
Rnd 29: [2 sc, dec] 6 times (18)
Rnd 30: [1 sc, dec] 6 times (12)
Rnd 31: 6 dec (6)
Fasten off, leaving a long tail for sewing.
The Body & Base
Artisan’s Note: We build from the bottom up to ensure she stands beautifully on her own. Stuff this section extremely firmly as you go.
Using Dark Brown yarn.
Rnd 1: 8 sc in magic ring (8)
Rnd 2: 8 inc (16)
Rnd 3: [1 sc, inc] 8 times (24)
Rnd 4: [2 sc, inc] 8 times (32)
Rnd 5: [3 sc, inc] 8 times (40)
Rnd 6: [4 sc, inc] 8 times (48)
Rnd 7: [5 sc, inc] 8 times (56)
Rnd 8: BLO 56 sc (56)
Rnd 9-15: 56 sc (7 rounds of 56)
Rnd 16: [12 sc, dec] 4 times (52)
Rnd 17-21: 52 sc (5 rounds of 52)
Rnd 22: [11 sc, dec] 4 times (48)
Rnd 23-28: 48 sc (6 rounds of 48)
Rnd 29: [10 sc, dec] 4 times (44)
Rnd 30-35: 44 sc (6 rounds of 44)
Rnd 36: [9 sc, dec] 4 times (40)
Rnd 37-41: 40 sc (5 rounds of 40)
Rnd 42: [8 sc, dec] 4 times (36)
Rnd 43: [4 sc, dec] 6 times (30)
Rnd 44: [3 sc, dec] 6 times (24)
Rnd 45: [2 sc, dec] 6 times (18)
Rnd 46: [1 sc, dec] 6 times (12)
Fasten off, leaving a long tail for sewing.
Arms & Hands (Make 2)
Start with Skin Tone yarn.
Rnd 1: 6 sc in magic ring (6)
Rnd 2: [2 sc, inc] 2 times (8)
Rnd 3: 8 sc (8)
Rnd 4: 1 bobble stitch for the thumb, 7 sc (8)
Rnd 5: 8 sc (8)
Change to Dark Brown yarn.
Rnd 6: BLO 8 sc (8)
Rnd 7-22: 8 sc (16 rounds of 8)
Stuff lightly. Fasten off, leaving a tail.
Artisan’s Note: To create the arm trim, join Golden Metallic yarn to the front loops of Rnd 6. Ch 1, 8 sc, sl st. Fasten off.
The Dark Brown Robe Over-Sleeves (Make 2)
Using Dark Brown yarn.
Ch 12, join to form a circle.
Rnd 1-8: 12 sc (8 rounds of 12)
Rnd 9: [3 sc, inc] 3 times (15)
Rnd 10: 15 sc (15)
Rnd 11: [4 sc, inc] 3 times (18)
Rnd 12: 18 sc (18)
Change to Golden Metallic yarn.
Rnd 13: 18 sc (18).
Fasten off. Slide these over the arms before attaching them to the body.
Hair (Wig Cap & Strands)
Using Dark Brown yarn.
Rnd 1-10: Repeat Rounds 1-10 of the Head (60)
Rnd 11-16: 60 sc (6 rounds of 60)
Artisan’s Note: To create the flowing hair strands, ch 40, starting in 2nd ch from hook, 39 hdc back down the chain, sl st in next st of the wig cap. Repeat this around the front half of the cap. For the back strands, ch 25, 24 hdc down, sl st. Fasten off.
Light Beige Mantle
Using Light Beige yarn. Worked in rows.
Row 1: Ch 21, starting in 2nd ch, 20 sc. Turn. (20)
Row 2: Ch 1, [4 sc, inc] 4 times. Turn. (24)
Row 3: Ch 1, [3 sc, inc] 6 times. Turn. (30)
Row 4: Ch 2 (counts as hdc), hdc across. Turn. (30)
Row 5-30: Ch 2, hdc across. Turn. (30)
Artisan’s Note: Change to Golden Metallic yarn. Sc evenly around the entire mantle edge to create the border. Fasten off.
White Veil
Using White yarn. Worked in rows.
Row 1: Ch 15, starting in 2nd ch, 14 sc. Turn. (14)
Row 2-40: Ch 1, 14 sc. Turn. (14)
Fasten off. Leave a long tail for sewing to the head.
Golden Crown
Using Mustard/Gold yarn.
Rnd 1: Ch 24, join to form a ring. 24 sc.
Rnd 2-4: 24 sc (3 rounds of 24)
Rnd 5: [Ch 8, skip 3 st, sl st in next] 6 times.
Rnd 6: Work [3 sc, ch 2, 3 sc] into each ch-8 space.
Fasten off.
Golden Appliqués (Roses & Vines)
Using Golden Metallic yarn.
Roses (Make 5): Ch 10. 3 sc in 2nd ch from hook, 3 sc in each ch across. Roll into a tight spiral and sew the base.
Vines: Ch 40. Fasten off. Sew onto the dark brown robe in an elegant curving pattern, attaching the roses along the vine.
Crocheted Rosary
Using Light Beige and Golden Metallic yarn.
With Golden yarn, ch 10. Change to Beige, ch 3, dc3tog in 1st ch to make a tiny bead. Change to Golden, ch 5. Repeat this sequence 5 times.
Cross: With Golden yarn, ch 6. Sl st in 2nd ch from hook, sl st in next. Ch 3, sl st back down 2. Sl st in next main ch, ch 3, sl st back down 2. Sl st to bottom of cross. Fasten off. Attach to the rosary chain.
Crocheted Scapulars (Make 2)
Using Dark Brown yarn.
Squares: Ch 4, starting in 2nd ch, 3 sc. Turn. Ch 1, 3 sc. Fasten off. Embroider tiny golden details on it.
Cord: Ch 50 in Dark Brown. Attach one square to each end.
The Child (Baby Jesus)
Head: With Skin Tone yarn. Rnd 1: 6 sc in MR. Rnd 2: 6 inc. Rnd 3: [1 sc, inc] 6 times (18). Rnd 4-7: 18 sc. Rnd 8: [1 sc, dec] 6 times. Stuff. Fasten off.
Hair: Brown yarn. Rnd 1: 6 sc in MR. Rnd 2: 6 inc. Rnd 3: [1 sc, inc] 6 times. Rnd 4-5: 18 sc. Sew to head.
Body/Robe: White yarn. Rnd 1: 6 sc in MR. Rnd 2: 6 inc. Rnd 3: [1 sc, inc] 6 times (18). Rnd 4-10: 18 sc. Rnd 11: [1 sc, dec] 6 times. Stuff. Fasten off.
Arms: Skin tone. Ch 4, 3 sc. Fasten off.
Assembly: Sew head to body. Sew arms to sides. Embroider small golden trim.
Assembly & Final Touches
Sew the head securely to the body base.
Attach the dark brown over-sleeves to the arms, then sew the arms to the sides of the torso, angled slightly forward.
Position the wig cap onto the head, arranging the long strands beautifully around the shoulders, and sew into place.
Drape the Light Beige mantle over the shoulders and secure with small stitches.
Pin the White Veil over the hair and sew the Golden Crown to the very top.
Sew the Baby Jesus securely into the Virgin’s left arm.
Drape the crocheted rosary and scapulars over her right hand and the child’s hands.
Tips & FAQs
➡️ Q: How do I keep the crown stiff? A: You can crochet over a thin wire in round 1, or use a fabric stiffener spray on the finished crown piece before attaching it to the head.
➡️ Q: The metallic thread is hard to work with, any advice? A: Slow down your pace and ensure excellent lighting. You can hold a strand of matching golden sewing thread alongside it for extra strength and less splitting.
A Final Word
Your devotion has manifested in loops and stitches. This stunning creation is a profound reflection of your skill and patience. May this majestic figure bring deep peace and joy to whoever holds her.