
Greetings, my friend. The crisp autumn air always inspires me to craft characters ready for a grand adventure or a new season of learning. I present to you a gentle soul, a little scholar with textured curls and a heart full of quiet curiosity.
About This Creation
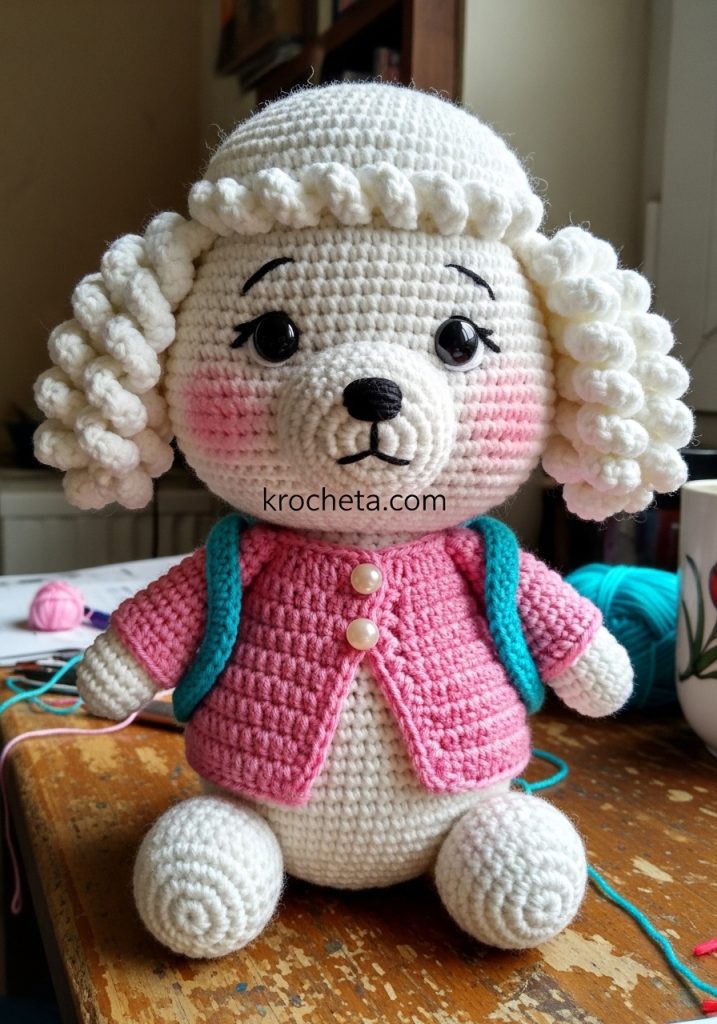
This delightful project captures the tender essence of childhood wonder. She sits proudly in her hand-stitched pink cardigan, ready to conquer the day with her tiny teal backpack. The contrast between her smooth, rounded face and the highly textured bobbles of her ears creates a tactile experience that makers and recipients alike will cherish. By placing her eyes low and wide apart, and adding a soft dusting of blush, we achieve that innocent gaze that defines our artisan style.
Project Snapshot
📊 Difficulty: Intermediate
⏰ Est. Time: 8 to 10 Hours
📏 Size: Approximately 7 inches tall seated
“Patience in the small stitches yields a character with boundless charm.” – Patricia
Materials & Tools Needed
🧶 Yarn: Worsted weight cotton blend in Snow White, Blush Pink, and Ocean Teal. Small scrap of Black for the nose and mouth.
🪡 Hook: 3.0mm crochet hook for tight, clean stitches.
✨ Other Materials: 10mm black safety eyes.
✨ Two small pearl buttons.
✨ Premium polyester fiberfill stuffing.
✨ Pink cosmetic blush or soft pastel chalk.
✨ Yarn needle and stitch markers.
Abbreviations & Stitches Used
➡️ ch: chain
➡️ sl st: slip stitch
➡️ sc: single crochet
➡️ inc: increase (2 sc in one stitch)
➡️ dec: invisible decrease (sc 2 together through front loops)
➡️ bobble: 5-double crochet bobble stitch
The Complete Penny the Poodle Pattern
The Head We begin from the top, working our way down to her cheeks.
Rnd 1: 6 sc in a magic ring (6)
Rnd 2: 6 inc (12)
Rnd 3: [1 sc, 1 inc] 6 times (18)
Rnd 4: [2 sc, 1 inc] 6 times (24)
Rnd 5: [3 sc, 1 inc] 6 times (30)
Rnd 6: [4 sc, 1 inc] 6 times (36)
Rnd 7: [5 sc, 1 inc] 6 times (42)
Rnd 8: [6 sc, 1 inc] 6 times (48)
Rnd 9: [7 sc, 1 inc] 6 times (54)
Rnd 10: [8 sc, 1 inc] 6 times (60)
Rnd 11 to Rnd 20: 1 sc in each st around for 10 rounds (60) Artisan’s Note: Place safety eyes between rounds 16 and 17, spacing them 11 stitches apart to ensure that sweet, wide-eyed gaze.
Rnd 21: [8 sc, 1 dec] 6 times (54) Artisan’s Note: Here we begin shaping the lower cheeks.
Rnd 22: [7 sc, 1 dec] 6 times (48)
Rnd 23: [6 sc, 1 dec] 6 times (42)
Rnd 24: [5 sc, 1 dec] 6 times (36)
Rnd 25: [4 sc, 1 dec] 6 times (30) Artisan’s Note: Begin stuffing the head firmly. Ensure the cheeks are nicely rounded.
Rnd 26: [3 sc, 1 dec] 6 times (24)
Rnd 27: [2 sc, 1 dec] 6 times (18)
Rnd 28: [1 sc, 1 dec] 6 times (12)
Rnd 29: 6 dec (6). Fasten off and weave in the end.
The Snout Worked in a continuous spiral to create a gentle protrusion.
Rnd 1: 6 sc in a magic ring (6)
Rnd 2: 6 inc (12)
Rnd 3: [1 sc, 1 inc] 6 times (18)
Rnd 4: [2 sc, 1 inc] 6 times (24)
Rnd 5 to Rnd 7: 1 sc in each st around for 3 rounds (24). Fasten off, leaving a long tail for sewing.
The Textured Ears (Make 2) This creates the signature poodle curls using bobble stitches.
Rnd 1: 6 sc in a magic ring (6)
Rnd 2: 6 inc (12)
Rnd 3: [1 sc, 1 bobble] 6 times (12)
Rnd 4: [1 sc, 1 inc] 6 times (18)
Rnd 5: [1 sc, 1 bobble] 9 times (18)
Rnd 6: [2 sc, 1 inc] 6 times (24)
Rnd 7 to Rnd 12: [1 sc, 1 bobble] 12 times for 6 rounds (24)
Rnd 13: [2 sc, 1 dec] 6 times (18)
Rnd 14: [1 sc, 1 bobble] 9 times (18). Fasten off, leaving a long tail. Do not stuff the ears. Flatten the top opening.
The Body A plump, pear-shaped base for perfect seated balance.
Rnd 1: 6 sc in a magic ring (6)
Rnd 2: 6 inc (12)
Rnd 3: [1 sc, 1 inc] 6 times (18)
Rnd 4: [2 sc, 1 inc] 6 times (24)
Rnd 5: [3 sc, 1 inc] 6 times (30)
Rnd 6: [4 sc, 1 inc] 6 times (36)
Rnd 7: [5 sc, 1 inc] 6 times (42)
Rnd 8: [6 sc, 1 inc] 6 times (48)
Rnd 9: [7 sc, 1 inc] 6 times (54)
Rnd 10 to Rnd 16: 1 sc in each st around for 7 rounds (54)
Rnd 17: [7 sc, 1 dec] 6 times (48)
Rnd 18 to Rnd 19: 1 sc in each st around for 2 rounds (48)
Rnd 20: [6 sc, 1 dec] 6 times (42)
Rnd 21 to Rnd 22: 1 sc in each st around for 2 rounds (42)
Rnd 23: [5 sc, 1 dec] 6 times (36)
Rnd 24: 1 sc in each st around (36)
Rnd 25: [4 sc, 1 dec] 6 times (30) Artisan’s Note: Stuff the bottom of the body firmly to establish the seated shape.
Rnd 26: 1 sc in each st around (30)
Rnd 27: [3 sc, 1 dec] 6 times (24)
Rnd 28: 1 sc in each st around (24)
Rnd 29: [2 sc, 1 dec] 6 times (18)
Rnd 30: 1 sc in each st around (18). Fasten off, leaving a long tail for sewing. Stuff the remainder of the body.
The Arms (Make 2) Simple tubes with slight shaping at the paws.
Rnd 1: 6 sc in a magic ring (6)
Rnd 2: 6 inc (12)
Rnd 3: [3 sc, 1 inc] 3 times (15)
Rnd 4 to Rnd 5: 1 sc in each st around for 2 rounds (15)
Rnd 6: [3 sc, 1 dec] 3 times (12)
Rnd 7 to Rnd 16: 1 sc in each st around for 10 rounds (12) Artisan’s Note: Lightly stuff the lower half of the arm only.
Rnd 17: Fold flat and sc 6 across both sides to close. Fasten off, leaving a tail for sewing.
The Legs (Make 2) Short and chubby for stability.
Rnd 1: 6 sc in a magic ring (6)
Rnd 2: 6 inc (12)
Rnd 3: [1 sc, 1 inc] 6 times (18)
Rnd 4: [2 sc, 1 inc] 6 times (24)
Rnd 5 to Rnd 7: 1 sc in each st around for 3 rounds (24)
Rnd 8: 6 dec, 12 sc (18) Artisan’s Note: The decreases form the top of the foot.
Rnd 9: 3 dec, 12 sc (15)
Rnd 10 to Rnd 14: 1 sc in each st around for 5 rounds (15) Artisan’s Note: Stuff the foot firmly, and the upper leg softly.
Rnd 15: [3 sc, 1 dec] 3 times (12). Fasten off, leaving a long tail.
The Pink Cardigan Worked flat in rows. Ch 1 at the end of each row does not count as a stitch.
Row 1: Ch 25. Starting in the second ch from hook, 24 sc. Turn. (24)
Row 2: 24 inc. Turn. (48)
Row 3: [7 sc, 1 inc] 6 times. Turn. (54)
Row 4: 8 sc, ch 6, skip 11 sts (armhole), 16 sc, ch 6, skip 11 sts, 8 sc. Turn.
Row 5: 8 sc, 6 sc in ch space, 16 sc, 6 sc in ch space, 8 sc. Turn. (44)
Row 6 to Row 14: 1 sc in each st across for 9 rows (44). Fasten off and weave in ends.
Cardigan Sleeves Join pink yarn at the underarm of the armhole space.
Rnd 1 to Rnd 8: Work 17 sc evenly around the armhole opening. Join with a sl st, ch 1. (17)
Rnd 9: 1 sc in each st around. Fasten off and weave in ends. Repeat for the second sleeve.
The Blue Backpack A charming accessory worked in continuous rounds.
Rnd 1: Ch 9. Starting in the second ch from hook, 7 sc, 3 sc in the last ch. Working down the opposite side of the chain, 6 sc, 2 sc in the last ch (18)
Rnd 2: 1 inc, 6 sc, 3 inc, 6 sc, 2 inc (24)
Rnd 3: 1 sc, 1 inc, 6 sc, [1 sc, 1 inc] 3 times, 6 sc, [1 sc, 1 inc] 2 times (30)
Rnd 4: Working in back loops only, 1 sc in each st around (30)
Rnd 5 to Rnd 12: 1 sc in each st around for 8 rounds (30)
Rnd 13: [3 sc, 1 dec] 6 times (24)
Rnd 14: Pinch the opening flat and sc across both sides to close. Fasten off.
Backpack Straps (Make 2) Ch 20. Fasten off, leaving tails on both ends to sew onto the backpack.
Assembly & Final Touches
Sew the snout securely to the center of the face, aligning the top edge just below the eyes. Stuff it firmly before closing the final stitches.
Using black yarn, embroider a triangular nose on the snout and a straight vertical line down to a small, gentle smile.
Attach the textured ears to the sides of the head, beginning around round 6.
Sew the head onto the open neck of the body. Add extra stuffing to the neck joint to prevent wobbling.
Attach the arms to the sides of the body, just below the neck seam.
Sew the legs to the lower sides of the body so she sits comfortably.
Dress her in the pink cardigan. Sew two pearl buttons onto the front and use the gaps between stitches on the opposite side as buttonholes.
Sew the straps onto the teal backpack, then place it over her shoulders.
Finally, apply a generous dusting of pink blush beneath her eyes to awaken her sweet expression.
Tips & FAQs
➡️ How do I keep the head from flopping? Always add a dense core of stuffing right at the neck joint during assembly. You can also insert a small rolled tube of felt for extra stability.
➡️ Can I use a different yarn? Absolutely. A cotton blend yields excellent stitch definition for the ear bobbles, but a soft acrylic will work beautifully. Just ensure your hook size matches your yarn to maintain a tight fabric.
A Final Word
Holding this completed little scholar brings such quiet joy to the heart. Your hands have shaped a character with true soul and undeniable charm. May she bring a smile to anyone who crosses her path.