
My wonderful friend, we arrive at the workbench. It is time to let our hands bring this little traveler into existence. Let us pour our affection into every single stitch.
About This Creation & The Artisan Angle
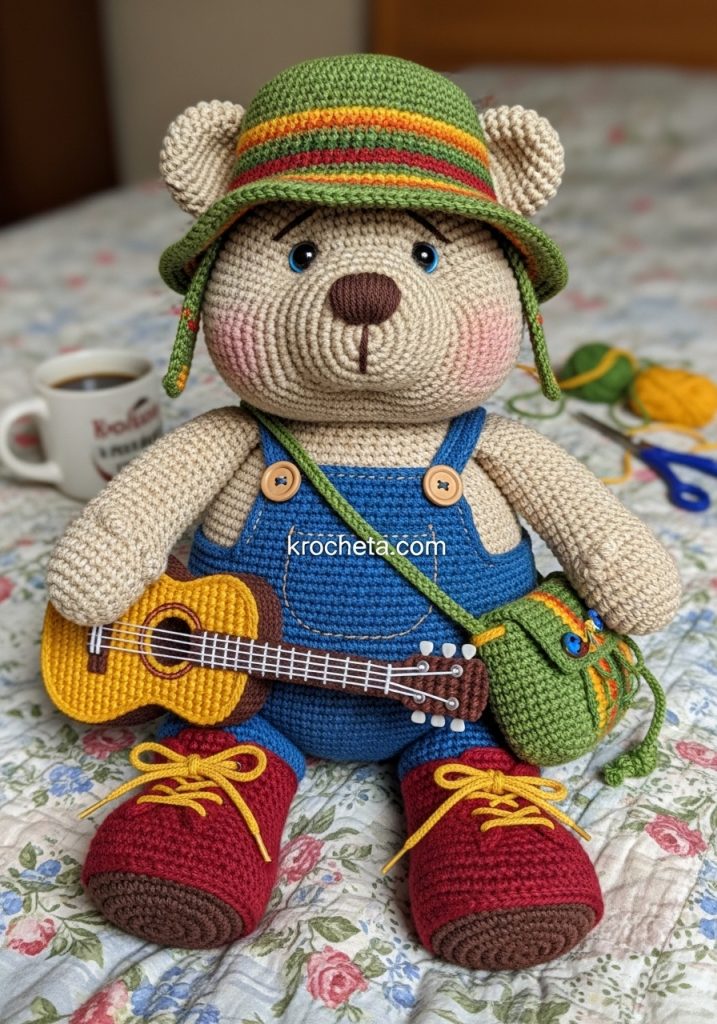
There is a profound joy in crafting a character with a story. Our little bear is a wanderer, carrying melodies in his paws and memories in his woven sack. This project focuses on deep, intentional shaping. We build character through the soft curve of his cheeks and the gentle bend of his limbs. Mastering these forms elevates your crochet from a simple craft to true heirloom toy making.
Project Snapshot
📊 Difficulty: Advanced Intermediate
⏰ Est. Time: 15 to 18 hours
📏 Size: Approximately 10 inches (25 cm) standing
“A well-made toy does not merely sit on a shelf. It waits, patiently, to be loved.” — Patricia Poltera
Materials & Tools Needed
🧶 Yarn: Medium weight (Worsted) cotton blend. You will need Sand (body), Denim Blue (overalls), Cherry Red (boots), Mustard Yellow (guitar, boots trim), Forest Green (hat, bag), and Burnt Orange (hat, bag).
🪡 Hook: 2.75mm (Size C) for a tight, flawless gauge.
✨ Other Materials: 8mm safety eyes.
✨ Soft fiberfill stuffing.
✨ Black embroidery thread.
✨ Two small wooden buttons.
✨ Yarn needle for assembly.
✨ Stitch markers.
Abbreviations & Stitches Used
ch: chain
sl st: slip stitch
sc: single crochet
inc: single crochet increase (two stitches in one)
dec: invisible single crochet decrease
hdc: half double crochet
dc: double crochet
The Complete Troubadour Bear Pattern
The Head (Sand Yarn)
We begin with the mind of our traveler. The lower placement of the eyes gives him that innocent, youthful gaze.
➡️ Rnd 1: 6 sc in a magic ring [6]
➡️ Rnd 2: Inc in each st around [12]
➡️ Rnd 3: (Sc 1, inc) x 6 [18]
➡️ Rnd 4: (Sc 2, inc) x 6 [24]
➡️ Rnd 5: (Sc 3, inc) x 6 [30]
➡️ Rnd 6: (Sc 4, inc) x 6 [36]
➡️ Rnd 7: (Sc 5, inc) x 6 [42]
➡️ Rnd 8: (Sc 6, inc) x 6 [48]
➡️ Rnd 9: (Sc 7, inc) x 6 [54]
➡️ Rnd 10: (Sc 8, inc) x 6 [60]
➡️ Rnd 11-16: Sc in each st around (6 rounds) [60]
➡️ Rnd 17: Sc 20, (inc, sc 1) x 5, sc 10, (sc 1, inc) x 5, sc 20 [70] (These increases form the chubby cheeks)
➡️ Rnd 18-24: Sc in each st around (7 rounds) [70]
➡️ Artisan’s Note: Place 8mm safety eyes between Rnds 15 and 16, leaving 12 stitches between them.
➡️ Rnd 25: Sc 20, (dec, sc 1) x 5, sc 10, (sc 1, dec) x 5, sc 20 [60]
➡️ Rnd 26: (Sc 8, dec) x 6 [54]
➡️ Rnd 27: (Sc 7, dec) x 6 [48]
➡️ Rnd 28: (Sc 6, dec) x 6 [42]
➡️ Rnd 29: (Sc 5, dec) x 6 [36]
➡️ Rnd 30: (Sc 4, dec) x 6 [30]
➡️ Rnd 31: (Sc 3, dec) x 6 [24]
➡️ Rnd 32: (Sc 2, dec) x 6 [18]
➡️ Fasten off, leaving a long tail for sewing. Stuff the head firmly, paying special attention to padding the cheeks outward.
The Snout (Sand Yarn)
➡️ Rnd 1: 6 sc in a magic ring [6]
➡️ Rnd 2: Inc in each st around [12]
➡️ Rnd 3: (Sc 1, inc) x 6 [18]
➡️ Rnd 4: (Sc 2, inc) x 6 [24]
➡️ Rnd 5-6: Sc in each st around [24]
➡️ Fasten off, leaving a tail. Using black thread, embroider a small, soft triangle nose and a short vertical line for the mouth.
The Ears (Make 2, Sand Yarn)
➡️ Rnd 1: 6 sc in a magic ring [6]
➡️ Rnd 2: Inc in each st around [12]
➡️ Rnd 3: (Sc 1, inc) x 6 [18]
➡️ Rnd 4-6: Sc in each st around [18]
➡️ Fasten off. Do not stuff. Fold flat.
The Body (Sand Yarn)
We require a plump, round belly.
➡️ Rnd 1: 6 sc in a magic ring [6]
➡️ Rnd 2: Inc in each st around [12]
➡️ Rnd 3: (Sc 1, inc) x 6 [18]
➡️ Rnd 4: (Sc 2, inc) x 6 [24]
➡️ Rnd 5: (Sc 3, inc) x 6 [30]
➡️ Rnd 6: (Sc 4, inc) x 6 [36]
➡️ Rnd 7: (Sc 5, inc) x 6 [42]
➡️ Rnd 8: (Sc 6, inc) x 6 [48]
➡️ Rnd 9: (Sc 7, inc) x 6 [54]
➡️ Rnd 10-18: Sc in each st around (9 rounds) [54]
➡️ Rnd 19: (Sc 7, dec) x 6 [48]
➡️ Rnd 20-21: Sc in each st around [48]
➡️ Rnd 22: (Sc 6, dec) x 6 [42]
➡️ Rnd 23-24: Sc in each st around [42]
➡️ Rnd 25: (Sc 5, dec) x 6 [36]
➡️ Rnd 26-27: Sc in each st around [36]
➡️ Rnd 28: (Sc 4, dec) x 6 [30]
➡️ Rnd 29: Sc in each st around [30]
➡️ Rnd 30: (Sc 3, dec) x 6 [24]
➡️ Rnd 31: (Sc 2, dec) x 6 [18]
➡️ Fasten off. Stuff firmly, shaping a beautifully rounded base.
The Arms (Make 2, Sand Yarn)
➡️ Rnd 1: 6 sc in a magic ring [6]
➡️ Rnd 2: Inc in each st around [12]
➡️ Rnd 3: (Sc 3, inc) x 3 [15]
➡️ Rnd 4-6: Sc in each st around [15]
➡️ Rnd 7: (Sc 3, dec) x 3 [12]
➡️ Rnd 8-12: Sc in each st around [12]
➡️ Rnd 13: Dec x 2, sc 4, inc x 2, sc 2 [12] (This creates the delicate bend of the elbow)
➡️ Rnd 14-22: Sc in each st around [12]
➡️ Fasten off. Stuff the hands firmly, but lightly stuff the upper arm. Fold the top flat.
The Legs (Make 2, Sand Yarn)
➡️ Rnd 1: 6 sc in a magic ring [6]
➡️ Rnd 2: Inc in each st around [12]
➡️ Rnd 3: (Sc 1, inc) x 6 [18]
➡️ Rnd 4: (Sc 2, inc) x 6 [24]
➡️ Rnd 5-8: Sc in each st around [24]
➡️ Rnd 9: (Sc 2, dec) x 6 [18]
➡️ Rnd 10-14: Sc in each st around [18]
➡️ Rnd 15: Dec x 3, sc 6, inc x 3, sc 3 [18] (This creates a gentle knee curve)
➡️ Rnd 16-20: Sc in each st around [18]
➡️ Fasten off. Stuff firmly throughout.
The Overalls (Denim Blue Yarn)
➡️ Rnd 1: Ch 48, join with sl st to form a circle.
➡️ Rnd 2-8: Ch 1, hdc 48, join [48]
➡️ Divide for pant legs. Count 24 stitches for the first leg.
➡️ Rnd 9-18 (First Leg): Ch 1, hdc 24, join [24]
➡️ Fasten off. Rejoin yarn at the division for the second leg.
➡️ Rnd 9-18 (Second Leg): Ch 1, hdc 24, join [24]
➡️ Front Bib: Rejoin yarn at the top center front of the trousers. Ch 1, sc 14. Turn.
➡️ Rows 2-8: Ch 1, sc 14, turn. Fasten off.
➡️ Straps (Make 2): Ch 25. Sc in second ch from hook and across [24]. Fasten off. Sew wooden buttons to the front bib corners.
The Wanderer’s Boots (Make 2, Cherry Red Yarn)
➡️ Rnd 1: Ch 7. Starting in 2nd ch from hook: sc 5, 3 sc in last ch. Working down opposite side: sc 4, inc [14]
➡️ Rnd 2: Inc, sc 4, inc x 3, sc 4, inc x 2 [20]
➡️ Rnd 3: Sc 1, inc, sc 4, (sc 1, inc) x 3, sc 4, (sc 1, inc) x 2 [26]
➡️ Rnd 4: In back loops only, sc around [26]
➡️ Rnd 5-6: Sc in each st around [26]
➡️ Rnd 7: Sc 8, dec x 5, sc 8 [21]
➡️ Rnd 8: Sc 6, dec x 4, sc 7 [17]
➡️ Rnd 9-11: Sc in each st around [17]
➡️ Fasten off. Using Mustard Yellow yarn, embroider cross-lacing up the front of the boots.
The Striped Bucket Hat (Alternate Green, Orange, Yellow)
➡️ Rnd 1: (Green) 6 sc in magic ring [6]
➡️ Rnd 2: Inc in each st around [12]
➡️ Rnd 3: (Orange) (Sc 1, inc) x 6 [18]
➡️ Rnd 4: (Sc 2, inc) x 6 [24]
➡️ Rnd 5: (Yellow) (Sc 3, inc) x 6 [30]
➡️ Rnd 6: (Sc 4, inc) x 6 [36]
➡️ Rnd 7: (Green) (Sc 5, inc) x 6 [42]
➡️ Rnd 8: (Sc 6, inc) x 6 [48]
➡️ Rnd 9: (Orange) (Sc 7, inc) x 6 [54]
➡️ Rnd 10: (Sc 8, inc) x 6 [60]
➡️ Rnd 11-15: (Alternate colors) Sc in each st around [60]
➡️ Rnd 16 (Creating ear slits): Sc 15, ch 8 (skip 8 sts), sc 14, ch 8 (skip 8 sts), sc 15 [60]
➡️ Rnd 17: Sc in each st around, including the chains [60]
➡️ Rnd 18: (Front loops only) (Sc 4, inc) x 12 [72]
➡️ Rnd 19-21: Sc in each st around [72]. Fasten off.
The Troubadour’s Guitar (Mustard Yellow Yarn)
➡️ Rnd 1: 6 sc in magic ring [6]
➡️ Rnd 2: Inc in each st around [12]
➡️ Rnd 3: (Sc 1, inc) x 6 [18]
➡️ Rnd 4-6: Sc in each st around [18]
➡️ Rnd 7: (Sc 1, dec) x 6 [12]
➡️ Rnd 8: Sc in each st around [12]
➡️ Rnd 9: (Sc 1, inc) x 6 [18]
➡️ Rnd 10: (Sc 2, inc) x 6 [24]
➡️ Rnd 11-13: Sc in each st around [24]
➡️ Rnd 14: (Sc 2, dec) x 6 [18]
➡️ Rnd 15: (Sc 1, dec) x 6 [12]. Stuff lightly.
➡️ Rnd 16: Dec x 6 [6]. Fasten off.
➡️ Guitar Neck (Sand Yarn): Ch 4. Sc in 2nd ch and across [3]. Turn and sc for 10 rows. Fasten off and sew to the body of the guitar. Embroider black lines for strings.
The Journey Bag (Alternate Green and Orange)
➡️ Rnd 1: 6 sc in magic ring [6]
➡️ Rnd 2: Inc in each st around [12]
➡️ Rnd 3: (Sc 1, inc) x 6 [18]
➡️ Rnd 4: (Sc 2, inc) x 6 [24]
➡️ Rnd 5: In back loops only, sc around [24]
➡️ Rnd 6-12: Sc in each st around [24]
➡️ Rnd 13: (Sc 2, ch 1, skip 1) x 8 [24] (Creates holes for the drawstring)
➡️ Rnd 14: Sc in each st and ch space [24]. Fasten off.
➡️ Strap: Ch 40, fasten off and attach to sides. Thread a strand of yellow yarn through the holes to cinch.
Assembly & Final Touches
➡️ Position the snout just below the centerline of the eyes. Sew firmly, adding a tiny bit of stuffing before closing.
➡️ Attach the ears to the top sides of the head, checking alignment against the slits in the bucket hat.
➡️ Sew the head to the body. Ensure the neck is highly stabilized.
➡️ Attach the legs to the bottom of the body. They should allow the bear to sit securely.
➡️ Attach the arms flat to the upper sides of the body, just beneath the neck seam.
➡️ Dress your bear in his overalls, cross the straps in the back, and secure them to the buttons. Put on his boots, his hat, and sling his bag and guitar over his shoulders.
Tips & FAQs
🧶 How do I ensure the cheeks look plump? Take your time while stuffing. Push small amounts of fiberfill specifically to the sides of the face where the increase stitches live.
🧶 My hat won’t fit over the ears! Tension changes everything. If you crochet tightly, you may need to go up half a hook size for the hat, or simply add two extra chain stitches to the ear slits in Round 16.
🧶 Can I wash this toy? If you used a sturdy cotton blend as recommended, spot cleaning with a damp cloth is best. If a full bath is required, hand wash gently in cool water and reshape while drying.
A Final Word
There is a quiet dignity in taking a simple ball of yarn and building a friend. As you finish tying off the final thread on his guitar, I hope you feel the deep satisfaction of the artisan. Your troubadour is ready for his grand adventure