My dear friends, the time has come to bring a little countryside charm to our hooks. Tessa is waiting for her story to begin. Grab your favorite cup of tea, and let us shape her beautifully together.
About This Creation & Angle
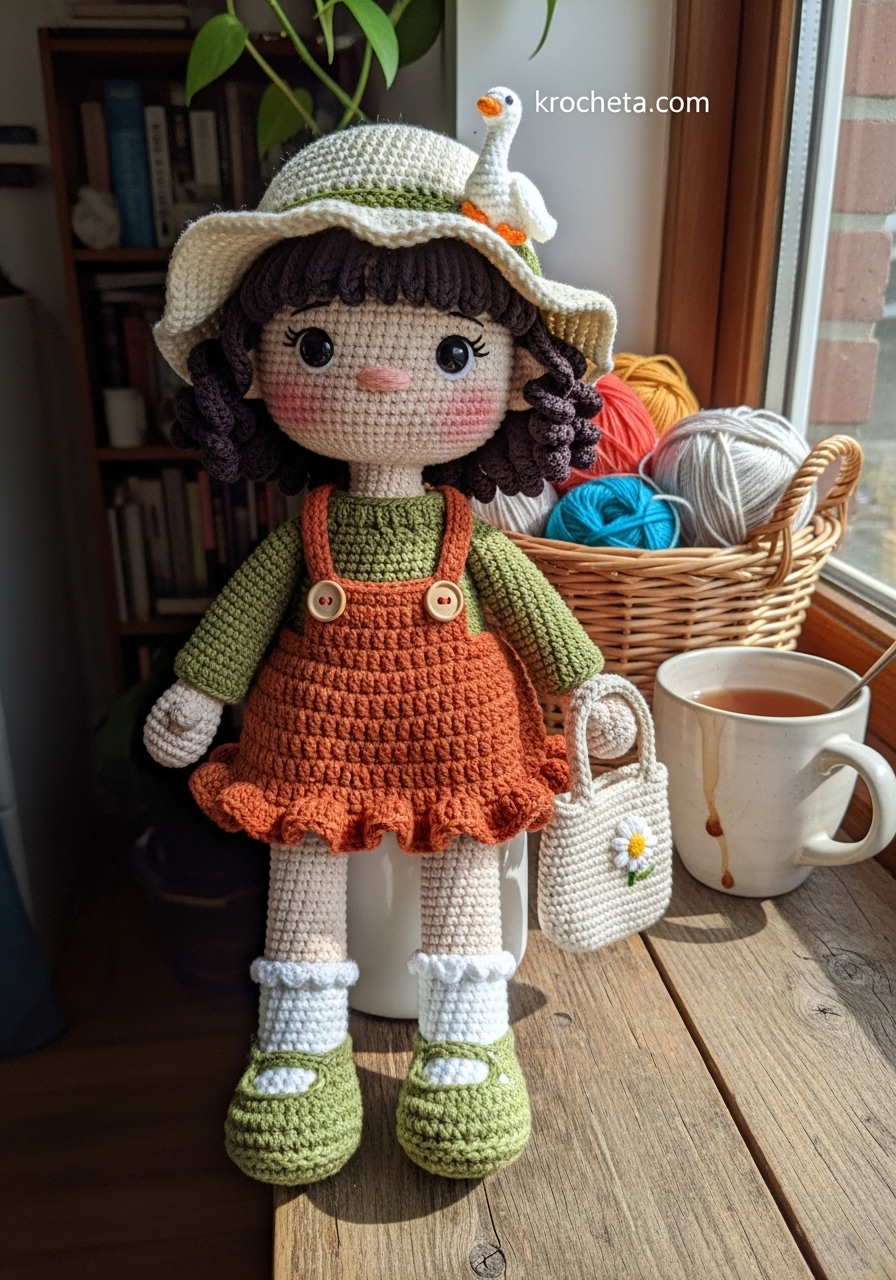
Tessa the Goose Girl brings a nostalgic breath of fresh air to our crochet baskets. We are focusing heavily on creating soft, rounded features to evoke a feeling of pure, innocent youthfulness. Her oversized head paired with a delicate, smaller body requires careful tension, but the result is undeniably precious.
This pattern focuses heavily on achieving professional-level stitch definition, particularly in her textured, fully crocheted shoes and the glorious ruffles of her rust-orange dress. The little white goose companion perched atop her wide-brimmed hat adds a narrative element that turns a simple doll into a cherished heirloom.
Project Snapshot
📊 Difficulty: Advanced Intermediate
⏰ Est. Time: 15-20 Hours
📏 Size: Approximately 10 inches tall
“True magic lies in the quiet, steady rhythm of your stitches.” – Patricia Poltera
Materials & Tools Needed
🧶 Yarn: DK weight cotton yarn. Colors: Soft Peach (skin), Olive Green (sweater/shoes), Rust Orange (dress), Cream (hat/goose/bag), Dark Brown (hair), White (socks/goose details).
🪡 Hook: 2.25mm (or size needed for tight tension).
✨ Other Materials: 8mm safety eyes, wooden star buttons (x2), soft toy stuffing, tapestry needle, black embroidery floss, stitch marker.

Abbreviations & Stitches Used
➡️ ch: chain
➡️ sl st: slip stitch
➡️ sc: single crochet
➡️ hdc: half double crochet
➡️ dc: double crochet
➡️ inc: increase (2 sc in one stitch)
➡️ dec: invisible decrease (sc 2 together through front loops)
➡️ BLO: back loop only
➡️ FLO: front loop only
The Complete Tessa Pattern
Head
(Soft Peach yarn)
Rnd 1: 6 sc in a magic ring (6)
Rnd 2: 6 inc (12)
Rnd 3: [1 sc, inc] 6 times (18)
Rnd 4: [2 sc, inc] 6 times (24)
Rnd 5: [3 sc, inc] 6 times (30)
Rnd 6: [4 sc, inc] 6 times (36)
Rnd 7: [5 sc, inc] 6 times (42)
Rnd 8: [6 sc, inc] 6 times (48)
Rnd 9: [7 sc, inc] 6 times (54)
Rnd 10: [8 sc, inc] 6 times (60)
Rnd 11: [9 sc, inc] 6 times (66)
Rnd 12: [10 sc, inc] 6 times (72)
Rnds 13-24: 72 sc around (12 rounds)
Artisan’s Note: Place safety eyes very low, between rounds 21 and 22, about 11 stitches apart. We want that wide-set, innocent gaze. Embroider a tiny, straight nose directly between the eyes.
Rnd 25: 18 sc, [inc, 1 sc] 6 times, 6 sc, [1 sc, inc] 6 times, 24 sc (84) – This shapes our plump cheeks.
Rnds 26-29: 84 sc around (4 rounds)
Rnd 30: 18 sc, [dec, 1 sc] 6 times, 6 sc, [1 sc, dec] 6 times, 24 sc (72)
Rnd 31: [10 sc, dec] 6 times (66)
Rnd 32: [9 sc, dec] 6 times (60)
Rnd 33: [8 sc, dec] 6 times (54)
Rnd 34: [7 sc, dec] 6 times (48)
Artisan’s Note: Begin stuffing firmly here. Focus on pushing the stuffing out into the cheeks to maintain their rounded shape.
Rnd 35: [6 sc, dec] 6 times (42)
Rnd 36: [5 sc, dec] 6 times (36)
Rnd 37: [4 sc, dec] 6 times (30)
Rnd 38: [3 sc, dec] 6 times (24)
Rnd 39: [2 sc, dec] 6 times (18)
Fasten off, leaving a long tail for sewing.
Hair Cap & Bouncy Curls
(Dark Brown yarn)
Rnds 1-12: Repeat Rnds 1-12 of Head (72)
Rnds 13-20: 72 sc around (8 rounds)
Curls: Ch 15, starting in 2nd ch from hook, 2 sc in each ch across. Sl st into next stitch on the cap. Repeat around the lower edge for a full head of ringlets.
Legs & Scalloped Socks (x2)
(White yarn)
Rnd 1: 6 sc in magic ring (6)
Rnd 2: 6 inc (12)
Rnd 3: [1 sc, inc] 6 times (18)
Rnds 4-6: 18 sc around (3 rounds)
Rnd 7 (Scallop Edge): [Sl st, skip 1 st, 5 dc in next st, skip 1 st] repeat around. Fasten off White.
(Soft Peach yarn – Join in BLO of Rnd 6)
Rnd 8: 18 sc in BLO (18)
Rnds 9-25: 18 sc around (17 rounds)
Artisan’s Note: Stuff the bottom of the leg firmly, but lightly near the top so she can sit gracefully.
Fasten off the first leg. Make the second leg but do not fasten off.
Olive Green Shoes (x2)
(Olive Green yarn)
Artisan’s Note: As requested, these shoes are fully crocheted with rich texture, not just implied. We will use post stitches for depth.
Rnd 1: Ch 7, starting in 2nd ch from hook: 5 sc, 3 sc in last ch, work down opposite side: 4 sc, inc (14)
Rnd 2: Inc, 4 sc, 3 inc, 4 sc, 2 inc (20)
Rnd 3: 1 sc, inc, 4 sc, [1 sc, inc] 3 times, 4 sc, [1 sc, inc] 2 times (26)
Rnd 4: 26 sc in BLO (26)
Rnd 5: 26 sc around (26)
Rnd 6: 8 sc, 5 dec, 8 sc (21)
Rnd 7: 8 sc, 3 dec, 7 sc (18)
Rnd 8 (Texture round): [Front Post sc around next st, regular sc in next st] 9 times (18)
Fasten off, weave in ends. Slip onto the feet.
Torso
(Soft Peach yarn)
Join legs together. Ch 3 from the second leg, sl st into the first leg.
Rnd 26: 18 sc around first leg, 3 sc in chs, 18 sc around second leg, 3 sc in opposite side of chs (42)
Rnds 27-32: 42 sc around (6 rounds)
(Change to Olive Green yarn for the sweater base)
Rnd 33: 42 sc around (42)
Rnd 34: 42 sc in BLO (42)
Rnds 35-40: 42 sc around (6 rounds)
Rnd 41: [5 sc, dec] 6 times (36)
Rnd 42: [4 sc, dec] 6 times (30)
Rnd 43: [3 sc, dec] 6 times (24)
Rnd 44: [2 sc, dec] 6 times (18)
Fasten off. Stuff torso firmly, ensuring the hips are completely filled out.
Arms (x2)
(Soft Peach yarn)
Rnd 1: 6 sc in magic ring (6)
Rnd 2: [1 sc, inc] 3 times (9)
Rnds 3-5: 9 sc around (3 rounds)
(Change to Olive Green yarn)
Rnds 6-22: 9 sc around (17 rounds)
Fasten off, leaving a tail. Stuff only the hands.
Rust Orange Overall Dress
(Rust Orange yarn)
Rnd 1: Join yarn in the FLO of Rnd 34 of the Torso. Ch 2, 2 dc in every stitch around. Sl st to join. (84 dc)
Rnds 2-10: Ch 2, 84 dc around. Sl st to join. (9 rounds)
Rnd 11 (Ruffle): Ch 1, [1 sc, 3 dc in next st] repeat around. Sl st to join. Fasten off.
Straps (Make 2): Ch 20. Sl st in each ch across. Sew to the front and back of the dress waist, attaching the wooden star buttons at the front.
Wide-Brimmed Cream Sun Hat
(Cream yarn)
Rnd 1: 6 sc in magic ring (6)
Rnd 2: 6 inc (12)
Rnd 3: [1 sc, inc] 6 times (18)
Rnd 4: [2 sc, inc] 6 times (24)
Rnd 5: [3 sc, inc] 6 times (30)
Rnd 6: [4 sc, inc] 6 times (36)
Rnd 7: [5 sc, inc] 6 times (42)
Rnd 8: [6 sc, inc] 6 times (48)
Rnd 9: [7 sc, inc] 6 times (54)
Rnds 10-14: 54 sc around (5 rounds)
Rnd 15 (Brim): Working in FLO, [8 sc, inc] 6 times (60)
Rnd 16: [4 sc, inc, 4 sc] 6 times (66)
Rnd 17: [10 sc, inc] 6 times (72)
Rnd 18: [5 sc, inc, 5 sc] 6 times (78)
Rnd 19: [12 sc, inc] 6 times (84)
Rnd 20: [6 sc, inc, 6 sc] 6 times (90)
Rnd 21: 90 sc around. Fasten off securely.
The Little White Goose
(White yarn)
Rnd 1: 6 sc in magic ring (6)
Rnd 2: [1 sc, inc] 3 times (9)
Rnds 3-5 (Neck): 9 sc around (3 rounds)
Rnd 6 (Body): [2 sc, inc] 3 times (12)
Rnd 7: [1 sc, inc] 6 times (18)
Rnds 8-10: 18 sc around (3 rounds)
Rnd 11: [1 sc, dec] 6 times (12)
Stuff lightly.
Rnd 12: 6 dec (6)
Fasten off.
Beak (Rust Orange): Ch 3, sl st in 2nd ch, sc in next. Sew to face.
Wings (Make 2, White): Ch 4, sc in 2nd ch, hdc in next, dc in last. Sew to sides.
Cream Tote Bag
(Cream yarn)
Rnd 1: Ch 10, sc in 2nd ch, 7 sc, 3 sc in last ch, down other side: 7 sc, inc (20)
Rnds 2-8: 20 sc around.
Handles: Ch 12, skip 4 sts, sc in next 6, ch 12, skip 4 sts, sc in next 6.
Artisan’s Note: Take a strand of yellow and white embroidery thread to stitch a tiny daisy directly onto the front of the bag.
Assembly & Final Touches
Sew the head securely to the torso, ensuring it sits firmly without wobbling. Attach the hair cap to the head, letting the curls cascade naturally. Pin the arms to the sides of the torso, just below the neck, and sew them flat. Place the shoes on the feet. Gently set the hat upon her head and carefully stitch the little goose to the brim. Drape the tote bag over her arm. A light dusting of real blush on her cheeks completes the look.
Tips & FAQs
Q: My doll’s head feels wobbly. How do I fix this?
A: Make sure you stuff the neck area incredibly firm. You can also insert a small rolled-up piece of felt or a specialized doll joint for extra stability.
Q: Can I use acrylic yarn instead of cotton?
A: You certainly can. Keep in mind that cotton provides the sharp, crisp stitch definition seen in the photos, while acrylic will yield a slightly softer, fuzzier finish.
A Final Word
I am so incredibly proud of what you are creating. These little stitches hold memories, patience, and love. Please, share your completed Tessa with our community—I cannot wait to see her sitting on your crafting desk.