My dearest creator, the time has come to bring our vision to life. Gather your softest yarns and your favorite hook, for we are about to craft something truly magnificent together. Let your hands work their magic as we shape Clementine and her loyal little friend.
About This Creation & Angle
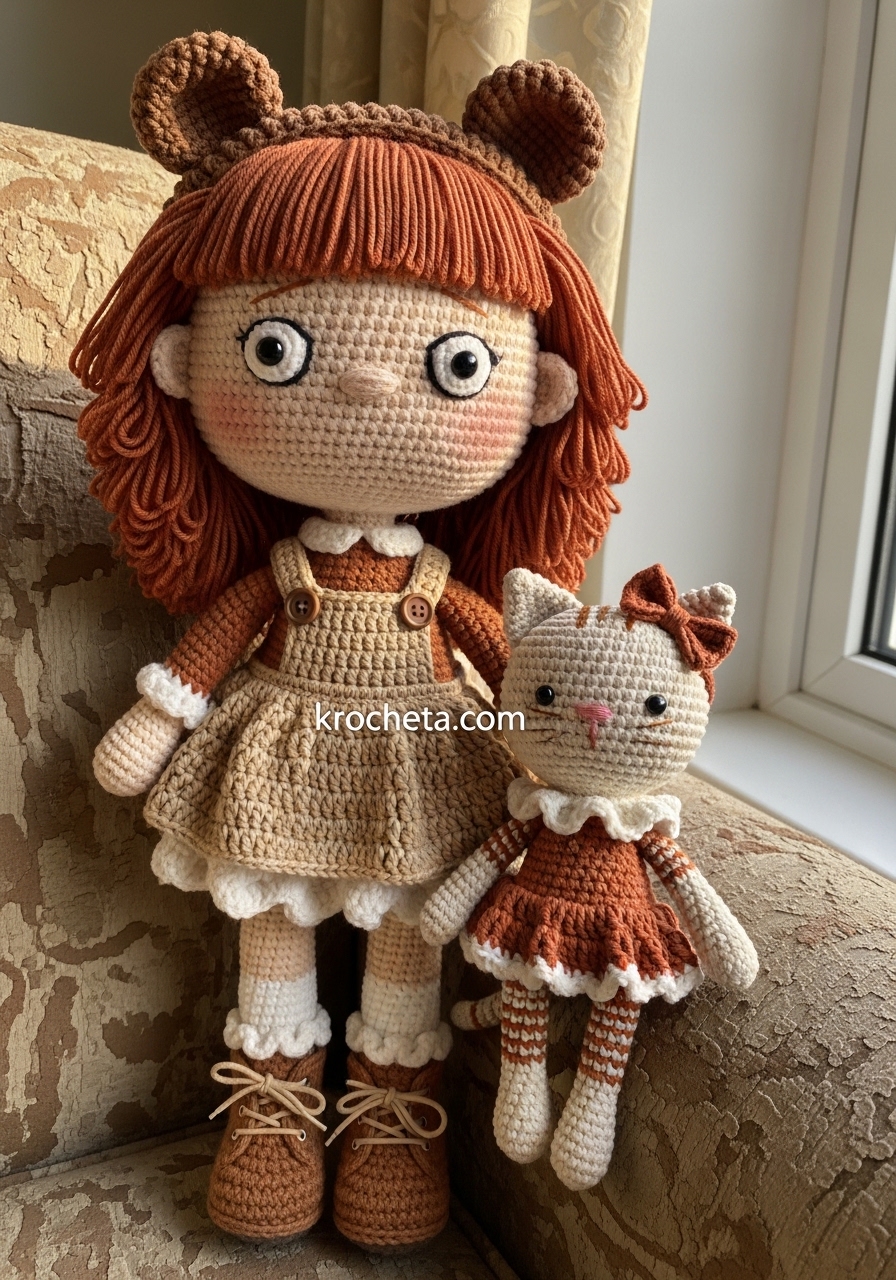
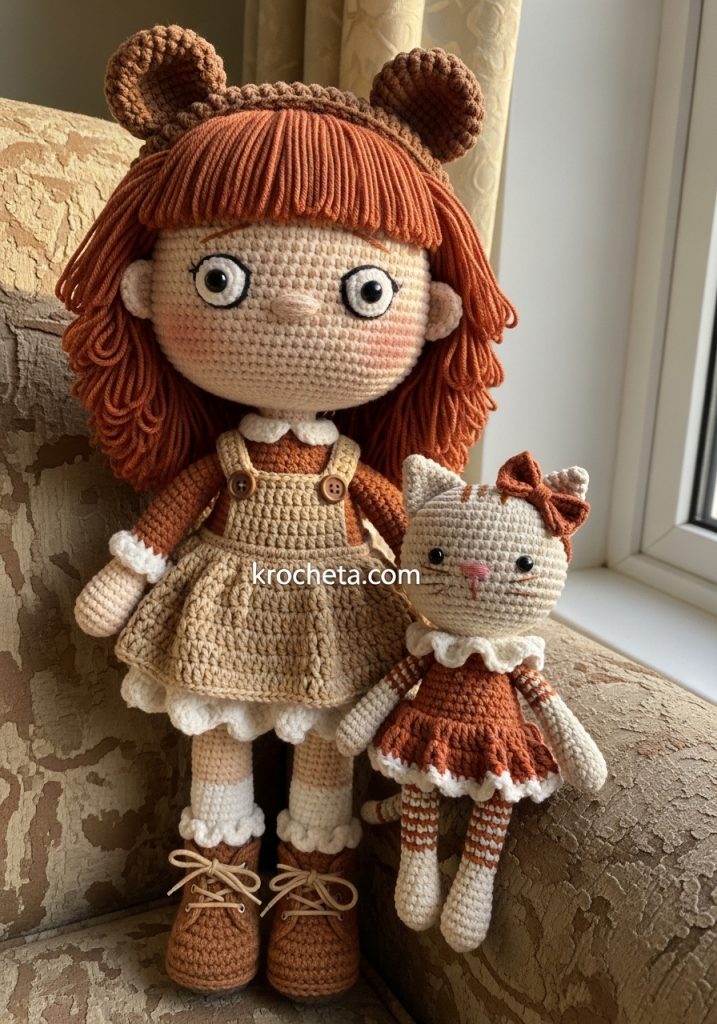
Every stitch in this project tells a story of comfort and charm. Clementine and her kitty companion are designed with the classic baby schema in mind. They feature oversized heads, low-set eyes, and wonderfully chubby cheeks that instantly melt the heart. This pattern serves as an excellent guide for mastering subtle amigurumi shaping techniques, making it a valuable addition to your crochet portfolio. Whether you are crafting a keepsake or building your inventory for artisan markets, these two will capture attention immediately. We use a palette of rustic, warm pastels to evoke a sense of nostalgic innocence.
Project Snapshot
📊 Difficulty: Intermediate to Advanced
⏰ Est. Time: 15 to 18 Hours
📏 Size: Clementine is 25cm tall, Cat is 12cm tall
“Patience is the secret ingredient in every stitch; let the yarn tell you its story.” – Patricia Poltera
Materials & Tools Needed
🧶 Yarn: Fine weight cotton or cotton-blend in Light Peach, Cream, Soft Tan, Warm Brown, Copper, and Rust
🪡 Hook: 2.0mm and 2.25mm crochet hooks
✨ Other Materials: 8mm and 6mm safety eyes, soft polyester fiberfill, yarn needle, stitch markers, black and pink embroidery thread
Abbreviations & Stitches Used
ch: chain
sc: single crochet
inc: increase (2 sc in one stitch)
dec: invisible decrease
sl st: slip stitch
hdc: half double crochet
dc: double crochet
BLO: back loops only
FLO: front loops only
The Complete Clementine and Cat Pattern
➡️ THE CLEMENTINE DOLL
✨ Clementine’s Head Using Light Peach yarn. Rnd 1: 6 sc in magic ring (6) Rnd 2: 6 inc (12) Rnd 3: (1 sc, inc) x 6 (18) Rnd 4: (2 sc, inc) x 6 (24) Rnd 5: (3 sc, inc) x 6 (30) Rnd 6: (4 sc, inc) x 6 (36) Rnd 7: (5 sc, inc) x 6 (42) Rnd 8: (6 sc, inc) x 6 (48) Rnd 9: (7 sc, inc) x 6 (54) Rnd 10: (8 sc, inc) x 6 (60) Rnd 11: (9 sc, inc) x 6 (66) Rnd 12: (10 sc, inc) x 6 (72) Rnd 13 to Rnd 22: sc in all 72 sts (72) Rnd 23: (Cheek increases) 20 sc, (inc, 1 sc) x 6, 8 sc, (1 sc, inc) x 6, 20 sc (84) Rnd 24 to Rnd 29: sc in all 84 sts (84) Rnd 30: 20 sc, (dec, 1 sc) x 6, 8 sc, (1 sc, dec) x 6, 20 sc (72) Rnd 31: (10 sc, dec) x 6 (66) Rnd 32: (9 sc, dec) x 6 (60) Rnd 33: (8 sc, dec) x 6 (54) Rnd 34: (7 sc, dec) x 6 (48) Rnd 35: (6 sc, dec) x 6 (42) Rnd 36: (5 sc, dec) x 6 (36) Rnd 37: (4 sc, dec) x 6 (30) Rnd 38: (3 sc, dec) x 6 (24) Rnd 39: (2 sc, dec) x 6 (18) Fasten off, leaving a long tail for sewing. Stuff firmly, expanding the cheeks outward. Artisan’s Note: Place the 8mm safety eyes between Rnds 21 and 22, directly above the cheek increases, spaced 11 stitches apart to ensure that beautiful, wide-set gaze of innocence.
✨ Hair Cap & Flowing Strands Using Copper yarn. Rnd 1 to Rnd 11: Follow Rnds 1 through 11 of the Head pattern (66) Rnd 12 to Rnd 18: sc in all 66 sts (66) Strands: ch 45, starting in 3rd ch from hook, 43 hdc back down the chain, sl st into next st on the cap. Repeat this around the entire edge of the cap to create thick, flowing layers. Fasten off and leave a long tail to sew to the head.
✨ Clementine’s Body Using Cream yarn (for undergarments) and Light Peach. Rnd 1: With Cream, 6 sc in magic ring (6) Rnd 2: 6 inc (12) Rnd 3: (1 sc, inc) x 6 (18) Rnd 4: (2 sc, inc) x 6 (24) Rnd 5: (3 sc, inc) x 6 (30) Rnd 6: (4 sc, inc) x 6 (36) Rnd 7: (5 sc, inc) x 6 (42) Rnd 8: (6 sc, inc) x 6 (48) Rnd 9 to Rnd 15: sc in all 48 sts (48) Rnd 16: (6 sc, dec) x 6 (42) Rnd 17: sc in all 42 sts (42) Rnd 18: Change to Light Peach. BLO sc in all 42 sts (42) Rnd 19: (5 sc, dec) x 6 (36) Rnd 20 to Rnd 25: sc in all 36 sts (36) Rnd 26: (4 sc, dec) x 6 (30) Rnd 27 to Rnd 30: sc in all 30 sts (30) Rnd 31: (3 sc, dec) x 6 (24) Rnd 32: (2 sc, dec) x 6 (18) Rnd 33: sc in all 18 sts (18) Fasten off. Stuff the body, creating a beautifully rounded, plump little belly.
✨ Arms (Make 2) Using Light Peach yarn. Rnd 1: 5 sc in magic ring (5) Rnd 2: 5 inc (10) Rnd 3 to Rnd 5: sc in all 10 sts (10) Rnd 6: (Thumb shaping) 4-dc bobble st in next st, 9 sc (10) Rnd 7 to Rnd 12: sc in all 10 sts (10) Rnd 13: (Elbow shaping) 2 inc, 4 sc, 2 dec (10) Rnd 14 to Rnd 22: sc in all 10 sts (10) Lightly stuff the bottom half, leaving the top flat. Fold flat and 4 sc across to close.
✨ Legs (Make 2) Using Light Peach yarn. Rnd 1: ch 6, start in 2nd ch from hook, 4 sc, 3 sc in last ch, turn to work opposite side, 3 sc, inc (12) Rnd 2: inc, 3 sc, 3 inc, 3 sc, 2 inc (18) Rnd 3 to Rnd 5: sc in all 18 sts (18) Rnd 6: 5 sc, 4 dec, 5 sc (14) Rnd 7: 5 sc, 2 dec, 5 sc (12) Rnd 8 to Rnd 14: sc in all 12 sts (12) Rnd 15: (Knee shaping) 2 inc, 4 sc, 2 dec, 2 sc (12) Rnd 16 to Rnd 24: sc in all 12 sts (12) Stuff firmly at the bottom, lightly at the top. Fasten off.
✨ Ruffled Socks (Make 2) Using Cream yarn. Rnd 1: ch 15, join to form circle. sc 15 around (15) Rnd 2 to Rnd 5: sc in all 15 sts (15) Rnd 6: (Ruffle edge) FLO (sc, ch 3, sc in same st), skip 1. Repeat around. Fasten off. Slip over the legs.
✨ Artisan Boots (Make 2) Using Warm Brown yarn. Rnd 1: ch 7, start in 2nd ch, 5 sc, 3 sc in last ch, opposite side, 4 sc, inc (14) Rnd 2: inc, 4 sc, 3 inc, 4 sc, 2 inc (20) Rnd 3: 1 sc, inc, 4 sc, (1 sc, inc) x 3, 4 sc, (1 sc, inc) x 2 (26) Rnd 4: BLO sc in all 26 sts (26) Rnd 5 to Rnd 7: sc in all 26 sts (26) Rnd 8: 7 sc, 6 dec, 7 sc (20) Rnd 9: 6 sc, 4 dec, 6 sc (16) Rnd 10 to Rnd 14: sc in all 16 sts (16) Rnd 15: FLO sc in all 16 sts, adding an extra 3 rounds of straight sc to fold over as the thick cuff. Fasten off.
✨ Petticoat Using Cream yarn. Attach to FLO of Body Rnd 18. Rnd 1: ch 2, 2 dc in every st around (84) Rnd 2 to Rnd 6: dc in all 84 sts (84) Rnd 7: (sc, skip 1, 5 dc in next st, skip 1) repeat around for a wide ruffle. Fasten off.
✨ Pinafore Dress Using Soft Tan yarn. Worked top-down in rows to create an open back. Row 1: ch 25, start in 2nd ch, 24 sc, turn (24) Row 2: (3 sc, inc) x 6, turn (30) Row 3: 4 sc, ch 6 (skip 6 sts for armhole), 10 sc, ch 6 (skip 6 sts), 4 sc, turn (30) Row 4 to Row 6: sc in all 30 sts, turn (30) Row 7: (Bodice shaping) 2 dc in every st across, join to work in the round (60) Rnd 8 to Rnd 14: dc in all 60 sts (60) Rnd 15: (Ruffle edge) sl st, ch 2, 2 hdc in same st, skip 1. Repeat around. Artisan’s Note: Add a simple chained tie to the back of the bodice to secure the pinafore around her waist.
✨ Bear-Ear Headband Using Warm Brown yarn. Band: ch 40, sc back down the chain. Ears (Make 2): 6 sc in magic ring, 6 inc (12), sc around for 2 rounds. Fold flat and sew to the band.
➡️ HER COMPANION CAT
✨ Cat Head Using Soft Tan yarn. Rnd 1: ch 11, starting in 2nd ch from hook: 9 sc, 3 sc in last ch, continue on other side of ch, 8 sc, inc (22) Rnd 2: inc, 8 sc, 3 inc, 8 sc, 2 inc (28) Rnd 3: 1 sc, inc, 8 sc, (1 sc, inc) x 3, 8 sc, (1 sc, inc) x 2 (34) Rnd 4: 2 sc, inc, 8 sc, (2 sc, inc) x 3, 8 sc, (2 sc, inc) x 2 (40) Rnd 5: 3 sc, inc, 8 sc, (3 sc, inc) x 3, 8 sc, (3 sc, inc) x 2 (46) Rnd 6: 4 sc, inc, 8 sc, (4 sc, inc) x 3, 8 sc, (4 sc, inc) x 2 (52) Rnd 7 to Rnd 16: sc in all 52 sts (52) Rnd 17: (Cheek shaping) 14 sc, (inc, 1 sc) x 4, 8 sc, (1 sc, inc) x 4, 14 sc (60) Rnd 18 to Rnd 21: sc in all 60 sts (60) Rnd 22: (8 sc, dec) x 6 (54) Rnd 23: (7 sc, dec) x 6 (48) Rnd 24: (6 sc, dec) x 6 (42) Rnd 25: (5 sc, dec) x 6 (36) Rnd 26: (4 sc, dec) x 6 (30) Rnd 27: (3 sc, dec) x 6 (24) Fasten off. Stuff to highlight the extreme width of the cheeks. Place 6mm safety eyes very wide apart, low on the face.
✨ Cat Ears (Make 2) Using Soft Tan yarn. Rnd 1: 4 sc in magic ring (4) Rnd 2: (1 sc, inc) x 2 (6) Rnd 3: (2 sc, inc) x 2 (8) Rnd 4: (3 sc, inc) x 2 (10) Rnd 5: (4 sc, inc) x 2 (12) Rnd 6: (5 sc, inc) x 2 (14) Flatten and leave a tail for sewing. Soften the tips slightly with your fingers.
✨ Cat Body Using Cream yarn (belly) and Soft Tan. Rnd 1: With Soft Tan, 6 sc in magic ring (6) Rnd 2: 6 inc (12) Rnd 3: (1 sc, inc) x 6 (18) Rnd 4: (2 sc, inc) x 6 (24) Rnd 5: (3 sc, inc) x 6 (30) Rnd 6: (4 sc, inc) x 6 (36) Rnd 7 to Rnd 11: sc in all 36 sts (36) Rnd 12: (4 sc, dec) x 6 (30) Rnd 13 to Rnd 15: sc in all 30 sts (30) Rnd 16: (3 sc, dec) x 6 (24) Rnd 17: sc in all 24 sts (24) Stuff firmly, shaping into a teardrop with a plump base.
✨ Cat Arms & Legs (Make 4) Using Cream (paws) and Soft Tan. Rnd 1: With Cream, 6 sc in magic ring (6) Rnd 2: (2 sc, inc) x 2 (8) Rnd 3: sc in all 8 sts (8) Rnd 4: Change to Soft Tan. sc in all 8 sts (8) Rnd 5 to Rnd 10: sc in all 8 sts (8) Leave unstuffed. Fold and crochet 3 sc across to close.
✨ Cat Tail Using Soft Tan and Warm Brown for stripes. Rnd 1: With Soft Tan, 5 sc in magic ring (5) Rnd 2 to Rnd 20: sc in all 5 sts, changing colors every 2 rounds to create seamless stripes (5) Do not stuff. Fasten off and leave a tail.
✨ Ruffled Collar Dress Using Rust yarn. Bodice: ch 24, join. Rnd 1 to Rnd 3: sc in all 24 sts (24) Rnd 4: 2 dc in every st around (48) Rnd 5 to Rnd 7: dc in all 48 sts (48) Rnd 8: (Bobble hem) 5 sc, 4-dc bobble st. Repeat around. Fasten off. Collar: Rejoin yarn at the top neckline. (sc, ch 3, sc in same st) in every stitch around to create a magnificent ruffle.
✨ Tiny Head Bow Using Rust yarn. In magic ring: (ch 3, 3 dc, ch 3, sl st) x 2. Pull tight, wrap yarn around the center, and secure to the cat’s ear.
Assembly & Final Touches
Sew Clementine’s head to her body with tiny, invisible stitches, securing the neck firmly. Attach her arms evenly just below the neckline. Position her beautifully thick hair cap slightly back from her forehead, letting the copper strands fall naturally.
For the cat, attach the ears widely spaced on the head. Sew the head to the teardrop body, then position the arms and legs so the cat sits perfectly upright. Use your pink embroidery thread to stitch a tiny, delicate nose right between the wide-set eyes. Add gentle touches of pink blush to both Clementine’s and her kitty’s cheeks for that ultimate sweet finish.
Tips & FAQs
🧶 How do I achieve the perfect cheek shaping? Tension is your best friend here. Keep your stitches tight during the increase rounds of the cheeks, and pack your fiberfill outward against the sides of the face rather than just in the center.
🧶 Can I change the yarn weight? Absolutely. Just ensure your hook size matches your chosen yarn to create a dense fabric where no stuffing shows through. If you choose a chunky yarn, your Clementine will become a lovely, oversized huggable piece!
A Final Word
Your hands have breathed life into yarn, creating a true masterpiece of softness and charm. Display your Clementine and her precious friend with profound pride, for artisan work like yours is a gift to the world.