My dearest creator, I am overjoyed that you have chosen to bring this plush vision of Clementine to life. She is a project of pure heart, designed to be hugged and cherished for generations. Gather your softest yarns, and let us begin this beautiful work.
About This Creation & Angle
We are working with thick chenille yarn to give Clementine an ultra-plush, luxurious finish. This transforms a classic amigurumi project into a premium, boutique-quality companion.
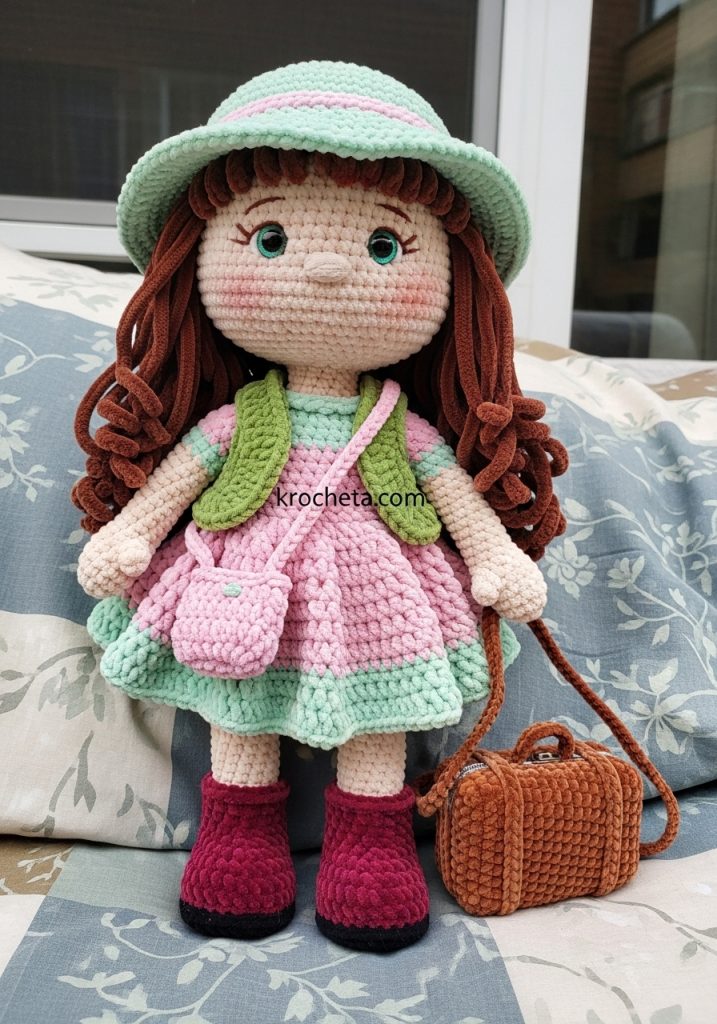
Her oversized head and wide-set eyes capture a gaze of pure innocence, while her chubby little limbs ensure there are absolutely zero sharp angles.
She is a world traveler, fully equipped with a textured pastel dress, a cozy leaf-green vest, sturdy boots, and a structured vintage suitcase to carry her dreams.
Project Snapshot:
➡️ Difficulty: Intermediate
➡️ Est. Time: 15 hours
➡️ Size: 28cm (11 inches) tall
“In every rounded stitch, we secure a memory. In every soft curve, we create a comfort.” – Patricia Poltera
Materials & Tools Needed
🧶 Yarn: Chenille super bulky (weight 6) in Beige, Chocolate Brown, Pastel Pink, Mint Green, Leaf Green, Berry Red, and Vintage Brown.
🪡 Hook: 4.5mm crochet hook
✨ Other Materials: 12mm safety eyes, polyfill stuffing, yarn needle, stitch markers, small plastic canvas sheets.
Abbreviations & Stitches Used
ch: chain
sl st: slip stitch
sc: single crochet
inc: single crochet increase
dec: invisible decrease
hdc: half double crochet
dc: double crochet
bobble: 4-dc bobble stitch
BLO: back loop only
FLO: front loop only
The Complete Velvet Clementine Pattern
Head
Rnd 1: 6 sc in a magic ring (6)
Rnd 2: inc in each st around (12)
Rnd 3: (sc, inc) x 6 (18)
Rnd 4: (2 sc, inc) x 6 (24)
Rnd 5: (3 sc, inc) x 6 (30)
Rnd 6: (4 sc, inc) x 6 (36)
Rnd 7: (5 sc, inc) x 6 (42)
Rnd 8: (6 sc, inc) x 6 (48)
Rnd 9: (7 sc, inc) x 6 (54)
Rnd 10: (8 sc, inc) x 6 (60)
Rnd 11 to Rnd 19: sc in each st around (60)
Artisan’s Note: This is where we shape her sweet, plump cheeks.
Rnd 20: 15 sc, (sc, inc) x 6, 6 sc, (inc, sc) x 6, 15 sc (72)
Rnd 21 to Rnd 25: sc in each st around (72)
Artisan’s Note: Insert 12mm safety eyes between rounds 17 and 18, exactly 11 stitches apart. Keep them low and wide-set for that innocent gaze.
Rnd 26: 15 sc, (sc, dec) x 6, 6 sc, (dec, sc) x 6, 15 sc (60)
Rnd 27: (8 sc, dec) x 6 (54)
Rnd 28: (7 sc, dec) x 6 (48)
Rnd 29: (6 sc, dec) x 6 (42)
Rnd 30: (5 sc, dec) x 6 (36)
Rnd 31: (4 sc, dec) x 6 (30)
Rnd 32: (3 sc, dec) x 6 (24)
Rnd 33: (2 sc, dec) x 6 (18)
Rnd 34: (sc, dec) x 6 (12)
Fasten off, leaving a long tail for sewing. Stuff firmly, ensuring her cheeks are full and rounded.
Body
Rnd 1: With Mint Green, 6 sc in a magic ring (6)
Rnd 2: inc in each st around (12)
Rnd 3: (sc, inc) x 6 (18)
Rnd 4: (2 sc, inc) x 6 (24)
Rnd 5: (3 sc, inc) x 6 (30)
Rnd 6: (4 sc, inc) x 6 (36)
Rnd 7: (5 sc, inc) x 6 (42)
Rnd 8: (6 sc, inc) x 6 (48)
Rnd 9 to Rnd 14: sc in each st around (48)
Rnd 15: (6 sc, dec) x 6 (42)
Rnd 16 to Rnd 18: sc in each st around (42)
Rnd 19: (5 sc, dec) x 6 (36)
Rnd 20 to Rnd 22: sc in each st around (36)
Rnd 23: Change to Beige yarn. Working in BLO: (4 sc, dec) x 6 (30)
Rnd 24 to Rnd 26: sc in each st around (30)
Rnd 27: (3 sc, dec) x 6 (24)
Rnd 28: (2 sc, dec) x 6 (18)
Rnd 29: sc in each st around (18)
Fasten off. Stuff the body with a focus on creating a chubby, rounded belly.
Arms (Make 2)
Rnd 1: With Beige, 5 sc in a magic ring (5)
Rnd 2: inc in each st around (10)
Rnd 3: (sc, inc) x 5 (15)
Rnd 4 to Rnd 6: sc in each st around (15)
Rnd 7: (sc, dec) x 5 (10)
Rnd 8 to Rnd 12: sc in each st around (10)
Artisan’s Note: Creating a soft elbow bend here.
Rnd 13: 3 sl st, 4 sc, 3 sl st (10)
Rnd 14 to Rnd 20: sc in each st around (10)
Fasten off. Stuff only the hands lightly.
Legs (Make 2)
Rnd 1: With Beige, 6 sc in a magic ring (6)
Rnd 2: inc in each st around (12)
Rnd 3: (sc, inc) x 6 (18)
Rnd 4: (2 sc, inc) x 6 (24)
Rnd 5 to Rnd 10: sc in each st around (24)
Rnd 11: (2 sc, dec) x 6 (18)
Rnd 12 to Rnd 14: sc in each st around (18)
Artisan’s Note: We will now shape the gentle curve of the plump knee.
Rnd 15: 4 sl st, 10 sc, 4 sl st (18)
Rnd 16: 4 sl st, 10 sc, 4 sl st (18)
Rnd 17 to Rnd 22: sc in each st around (18)
Rnd 23: (sc, dec) x 6 (12)
Fasten off. Stuff firmly at the bottom, and much softer near the top.
Textured Hair
Rnd 1: With Chocolate Brown, 6 sc in a magic ring (6)
Rnd 2: inc in each st around (12)
Rnd 3: (sc, inc) x 6 (18)
Rnd 4: (2 sc, inc) x 6 (24)
Rnd 5: (3 sc, inc) x 6 (30)
Rnd 6: (4 sc, inc) x 6 (36)
Rnd 7: (5 sc, inc) x 6 (42)
Rnd 8: (6 sc, inc) x 6 (48)
Rnd 9: (7 sc, inc) x 6 (54)
Hair Strands: ch 45, start in 2nd ch from hook, hdc down the entire chain, sl st to the next st on the wig cap. Repeat this process for all 54 stitches to create a thick, flowing velvet mane. Fasten off and leave a long tail for securing to the head.
The Travel Dress
Attach Pastel Pink yarn to the front loops of Body Rnd 23.
Rnd 1: ch 2, 2 dc in each st around (60). Join with sl st.
Rnd 2 to Rnd 4: ch 2, dc in each st around (60). Join.
Rnd 5: Change to Mint Green. ch 1, sc in each st around (60). Join.
Rnd 6: Change to Pastel Pink. ch 2, (4 dc, 1 bobble stitch) x 12 (60). Join.
Rnd 7 to Rnd 10: ch 2, dc in each st around (60). Join. Fasten off and weave in ends.
The Cozy Vest
Row 1: With Leaf Green, ch 25. Starting in 2nd ch from hook, 24 sc, turn.
Row 2: ch 1, (3 sc, inc) x 6 (30), turn.
Row 3: ch 1, 4 sc, ch 6, skip 6 sts (armhole), 10 sc, ch 6, skip 6 sts (armhole), 4 sc, turn.
Row 4: ch 1, sc across including chains (30), turn.
Row 5 to Row 8: ch 1, sc in each st across (30), turn. Fasten off.
The Sun Hat
Rnd 1: With Pastel Pink, 6 sc in a magic ring (6)
Rnd 2: inc in each st around (12)
Rnd 3: (sc, inc) x 6 (18)
Rnd 4: (2 sc, inc) x 6 (24)
Rnd 5: (3 sc, inc) x 6 (30)
Rnd 6: (4 sc, inc) x 6 (36)
Rnd 7: (5 sc, inc) x 6 (42)
Rnd 8: (6 sc, inc) x 6 (48)
Rnd 9 to Rnd 12: sc in each st around (48)
Rnd 13: Change to Mint Green for the band. sc in each st around (48)
Rnd 14: Change back to Pastel Pink. Working in FLO: (7 sc, inc) x 6 (54)
Rnd 15: (8 sc, inc) x 6 (60)
Rnd 16 and Rnd 17: sc in each st around (60). Fasten off.
The Chunky Boots (Make 2)
Rnd 1: With Berry Red, ch 7. sc in 2nd ch from hook, 4 sc, 3 sc in last ch. Working down the opposite side: 4 sc, 2 sc in last ch (14)
Rnd 2: inc, 4 sc, 3 inc, 4 sc, 2 inc (20)
Rnd 3: BLO sc in each st around (20)
Rnd 4 and Rnd 5: sc in each st around (20)
Rnd 6: 6 sc, 4 dec, 6 sc (16)
Rnd 7: 5 sc, 3 dec, 5 sc (13)
Rnd 8 to Rnd 10: sc in each st around (13). Fasten off.
The Mini Tote Bag
Rnd 1: With Pastel Pink, ch 11. sc in 2nd ch from hook, 8 sc, 3 sc in last ch. Opposite side: 8 sc, 2 sc in last ch (22)
Rnd 2 to Rnd 7: sc in each st around (22)
Rnd 8: 4 sc, ch 12, skip 5 sts, 6 sc, ch 12, skip 5 sts, 2 sc.
Rnd 9: sc in each st and chain around. Fasten off.
The Vintage Suitcase
Panels (Make 2 with Vintage Brown)
Row 1: ch 16, starting in 2nd ch, 15 sc, turn.
Row 2 to Row 10: ch 1, 15 sc, turn. Fasten off.
Suitcase Sides
Attach Vintage Brown to the edge of one panel. sc around the entire perimeter, putting 3 sc in each corner. Repeat for 4 rounds to build the depth. Fasten off. Repeat on the second panel.
Artisan’s Note: Cut two pieces of plastic canvas slightly smaller than your panels and insert them inside to give the suitcase a rigid, structured look. Sew the two halves together along one long side to create a living hinge.
Straps (Make 2): ch 40, fasten off. Wrap around the suitcase and sew into place.
Assembly & Final Touches
Pin the oversized head perfectly centered onto the body. Sew securely using the long tail.
Attach the arms on either side of round 28 of the body.
Sew the legs to the flat base of the body, pointing forward.
Secure the wig cap to the top of the head, allowing the velvet strands to frame her sweet face.
Tips & FAQs
How do I work with velvet yarn without shedding?
Burn the ends slightly with a lighter to seal them before sewing any pieces together.
Can I wash her?
Spot clean only to preserve the structural integrity of the chenille yarn and her plastic canvas suitcase.
A Final Word
May your hands be steady and your heart full as you complete this darling traveler. She is ready to see the world, starting with your own living room.