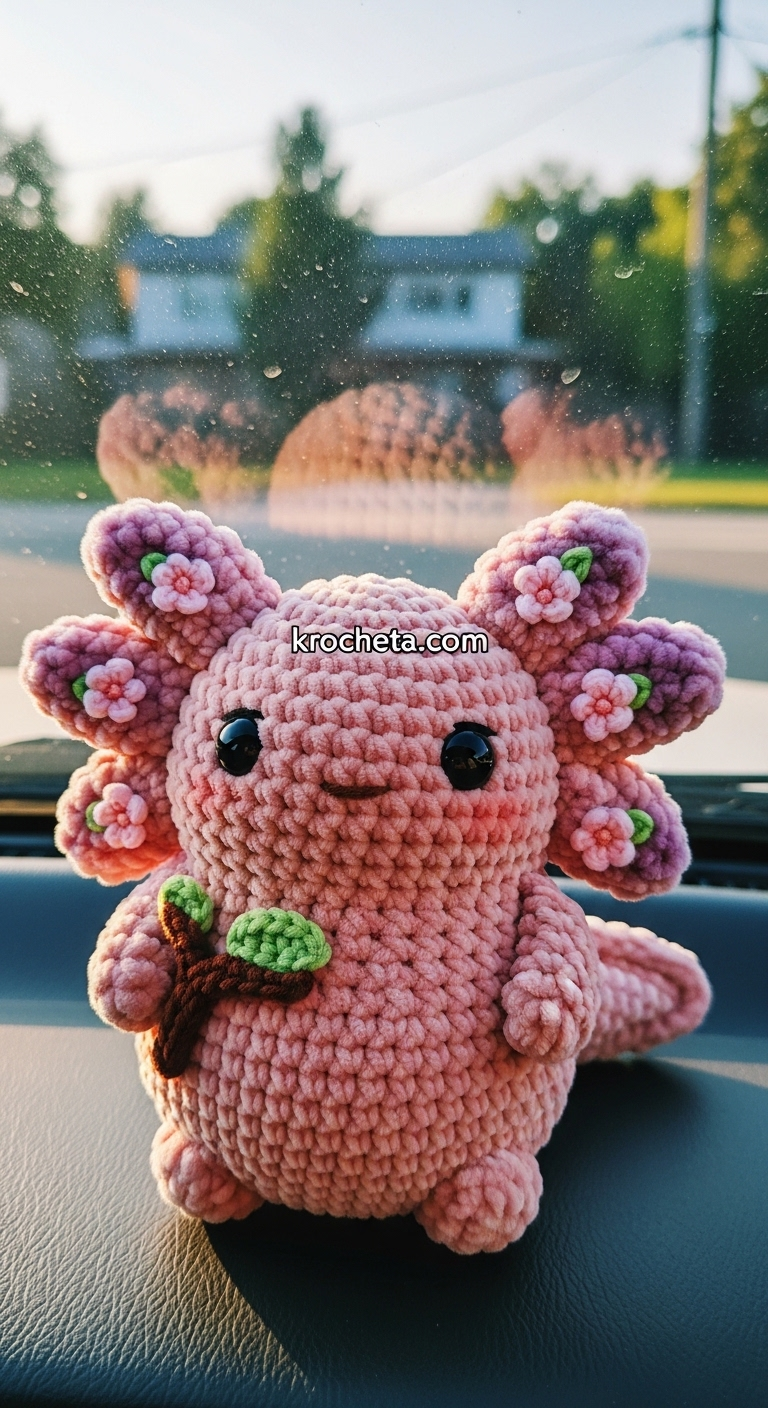
We are leaving the shallow waters of simple loops and entering the deep ocean of texture. This creation, the Sakura Guardian, is designed to challenge you. It marries the luxury of velvet, the wild softness of fur, and the delicate precision of micro-crochet. When you hold him, he will feel like a cloud resting in your hands, heavy with the promise of spring. Let us stitch with intention.
About This Creation & The “Mixed-Media” Angle
To truly capture the viral imagination, we must move beyond single-texture amigurumi. The Sakura Guardian uses a “Tri-Texture” approach:
- Velvet Body: Reflects light and feels premium.
- Faux-Fur Gills: Mimics the ethereal flow of water.
- Cotton Micro-Florals: Adds sharp, high-definition detail against the blur of the fur.
This contrast creates a visual depth that phone cameras love. It looks expensive because it is rich in craftsmanship.
Project Snapshot
📊 Difficulty: Advanced Intermediate (Requires handling different yarn weights)
⏰ Est. Time: 8–10 Hours
📏 Size: Approx. 8 inches (20 cm) tall
“Complexity is just a series of simple steps taken with great love.” — Patricia
Materials & Tools Needed
🧶 Main Yarn (Body): Super Bulky Velvet Yarn in Blush Pink (e.g., Bernat Velvet or similar)
🧶 Gill Yarn: White or Pale Pink Faux Fur Yarn
🧶 Detail Yarn: Mercerized Cotton (Sport weight) in Dark Pink (flowers), Green (leaves), and Brown (branch)
🪡 Hooks: 5.0mm (H) for Velvet, 2.5mm (C) for Micro-Details

✨ Other Materials: 16mm Safety Eyes, Polyfill, Stitch Markers, Dark Brown Embroidery Floss, Craft Wire (optional for branch stability)
Abbreviations & Stitches Used
ch: chain
sl st: slip stitch
sc: single crochet
hdc: half double crochet
dc: double crochet
inc: increase (2 sc in one st)
dec: decrease (sc 2 together)
FLO: front loop only
BLO: back loop only
The Complete Sakura Guardian Pattern
Component 1: The Velvet Head (Main Body Color)
Use 5.0mm hook. Work gently; velvet snaps if pulled too hard.
R1: 6 sc in a magic ring (6)
R2: inc in each st around (12)
R3: (sc 1, inc) x 6 (18)
R4: (sc 2, inc) x 6 (24)
R5: (sc 3, inc) x 6 (30)
R6: (sc 4, inc) x 6 (36)
R7: (sc 5, inc) x 6 (42)
R8: (sc 6, inc) x 6 (48)
R9: (sc 7, inc) x 6 (54)
R10–R18: sc in each st around (54) [The velvet creates a plush, wide shape]
R19: (sc 7, dec) x 6 (48)
R20: (sc 6, dec) x 6 (42)
Insert 16mm Safety Eyes between R15 and R16, roughly 10 stitches apart.
R21: (sc 5, dec) x 6 (36)
R22: (sc 4, dec) x 6 (30)
R23: (sc 3, dec) x 6 (24)
Stuff the head firmly but carefully to avoid stretching the velvet gaps.
R24: (sc 2, dec) x 6 (18)
R25: (sc 1, dec) x 6 (12)
R26: dec around (6)
Fasten off and weave in end.
Component 2: The Fur Gill Structure (Make 6)
Use 5.0mm hook and Faux Fur Yarn. We make a structural base.
R1: Ch 6.
R2: Starting in 2nd ch, sc 5 down the chain.
R3: Ch 1, turn. sc 5.
R4: Ch 1, turn. sc 5.
Fasten off. You now have a rectangular strip of fur. Fold it in half lengthwise and sew the edges together to create a thick, fluffy “log.” This density is key.
Component 3: Micro-Sakura Blossoms (Make 8)
Use 2.5mm hook and Dark Pink Cotton. These are TINY.
R1: In a Magic Ring: (ch 2, dc, ch 2, sl st) x 5.
Pull ring tight. You have a 5-petal flower. Leave a long tail for sewing.
Component 4: Micro-Leaves (Make 8)
Use 2.5mm hook and Green Cotton.
R1: Ch 5.
R2: Sl st in 2nd ch, sc in next, hdc in next, sl st in last.
Fasten off. Leave tail.
Component 5: The Velvet Body
Use 5.0mm hook.
R1: 6 sc in a magic ring (6)
R2: inc in each st around (12)
R3: (sc 1, inc) x 6 (18)
R4: (sc 2, inc) x 6 (24)
R5: (sc 3, inc) x 6 (30)
R6: (sc 4, inc) x 6 (36)
R7: (sc 5, inc) x 6 (42)
R8–R12: sc in each st around (42)
R13: (sc 5, dec) x 6 (36)
R14–R15: sc in each st around (36)
R16: (sc 4, dec) x 6 (30)
R17–R18: sc in each st around (30)
R19: (sc 3, dec) x 6 (24)
R20: sc in each st around (24)
R21: (sc 2, dec) x 6 (18)
Fasten off. Leave long tail for sewing. Stuff firmly to support the heavy head.
Component 6: The Velvet Tail
Use 5.0mm hook.
R1: 4 sc in a magic ring (4)
R2: (sc 1, inc) x 2 (6)
R3: (sc 2, inc) x 2 (8)
R4: (sc 3, inc) x 2 (10)
R5: (sc 4, inc) x 2 (12)
R6: (sc 5, inc) x 2 (14)
R7: (sc 6, inc) x 2 (16)
R8–R15: sc in each st around (16)
R16: (sc 6, dec) x 2 (14)
R17: (sc 5, dec) x 2 (12)
Fasten off. Do not stuff. Flatten the tail.
Component 7: Limbs (Make 2 Arms, 2 Legs)
Use 5.0mm hook. Legs are slightly larger.
Arms:
R1: 5 sc in MR (5) -> R2: inc (10) -> R3-R7: sc around (10). Fasten off.
Legs:
R1: 6 sc in MR (6) -> R2: inc (12) -> R3: (sc 1, inc) (18) -> R4-R5: sc around (18) -> R6: (sc 1, dec) (12). Fasten off.
Component 8: The Guardian’s Branch (Accessory)
Use 2.5mm hook and Brown Cotton.
R1: Ch 15.
R2: Sl st in 2nd ch and across (14).
Branch off: Ch 5, sl st back down 4, continue sl st on main branch.
Sew 3 Micro-Sakura and 3 Leaves to this branch.
Assembly & Final Touches
➡️ The Crown of Spring: Sew the 6 Fur Gills to the head. Critical Step: Sew one Micro-Sakura blossom onto the top of the upper left gill, and one onto the middle right gill. Nest them deep so they look like they are growing from the fur.
➡️ The Body Mechanics: Sew head to body. Attach legs to the front (sitting pose). Attach arms.
➡️ The Tummy Tattoo: Using Dark Brown embroidery floss, stitch a simple “Y” shape on the white belly patch (if you added one) or directly on the velvet. Sew 2 Micro-Sakura flowers to the ends of the “Y”.
➡️ The Tail: Sew the tail to the back, wrapping it around the right hip. Sew 2 Micro-Leaves to the ridge of the tail.
➡️ The Face: Embroider a wide, flat nose bridge in pink to give a “bovine” or “soft” look, and a tiny mouth.
Tips & FAQs
Q: The velvet yarn is “worming” (loops coming loose).
A: Your tension is too loose. Go down a hook size (try 4.5mm) or tighten your grip.
Q: Can I glue the flowers on?
A: For a child’s toy, no. For a display art piece, yes, fabric glue works, but sewing is the mark of a master.
A Final Word
You have not just crocheted; you have gardened. The Sakura Guardian is alive with texture. He is ready to face the world.