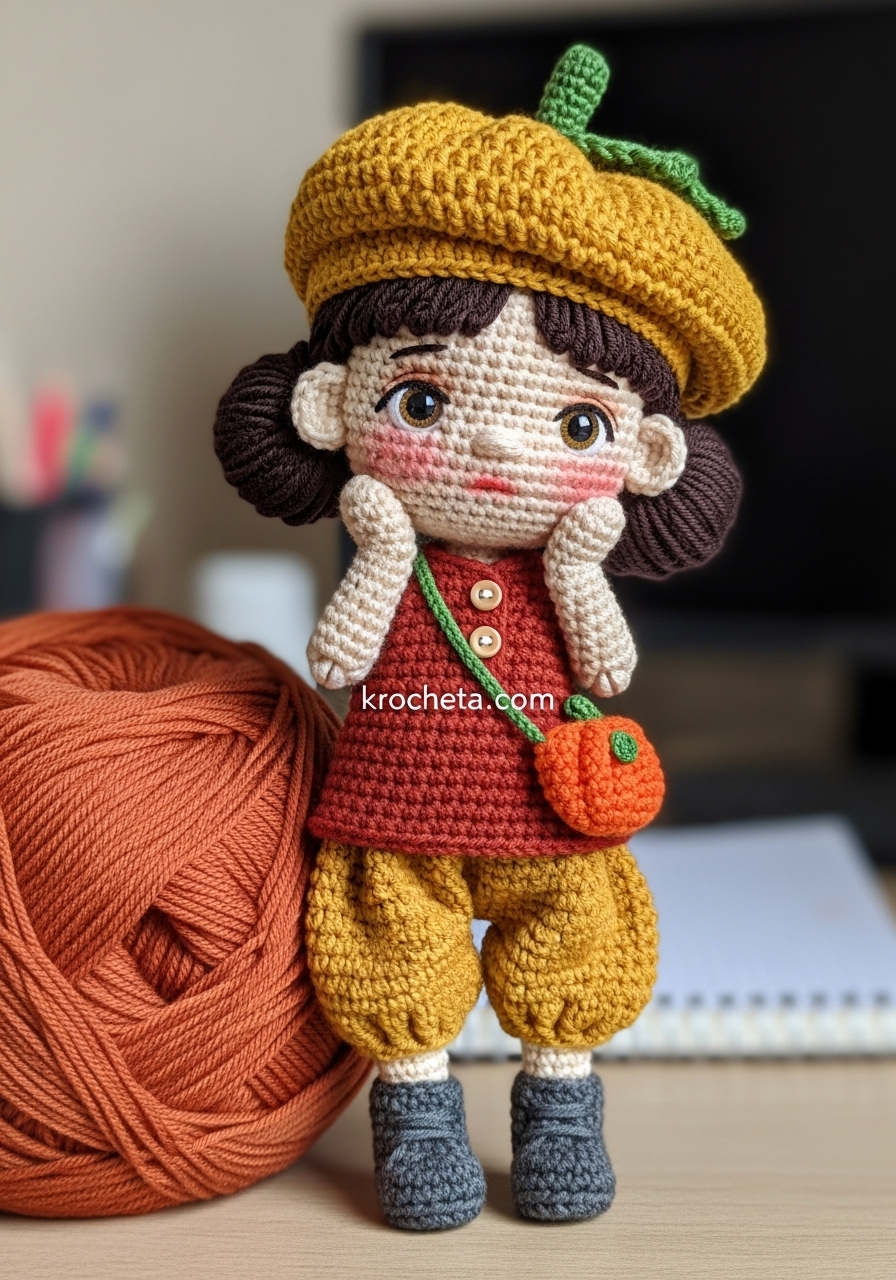
My dear maker, today we shape more than just yarn; we shape a feeling. Amber is that quiet moment when the leaves turn gold and the air grows crisp. She is designed to be held, to sit on a shelf and watch over a room with those wide, innocent eyes. We shall stitch her tightly, with intention, ensuring every loop contributes to her story. Let us begin this journey of texture and warmth.
About This Creation & Angle
Amber is not merely a doll; she is a study in autumnal texture. We are moving away from the standard smooth amigurumi look to embrace the tactile. The pattern focuses on the contrast between the structural ribbing of her pumpkin beret and the softness of her oversized bloomers.
This project is designed for the thoughtful crafter who enjoys construction. We are building her outfit directly onto her body for a seamless finish, reducing the need for sewing loose garments while maintaining that layered, “dressed-up” appearance. She is the perfect companion for your fall decor or a treasured gift for a vintage soul.
Project Snapshot:
📊 Difficulty: Intermediate (Requires color changes and shaping)
⏰ Est. Time: 6–8 Hours of focused craft
📏 Size: Approx. 14cm (using DK yarn)
“The beauty of amigurumi lies in the tension—tight enough to hold the shape, soft enough to hold the love.” — Patricia
Materials & Tools Needed
🧶 Yarn: 100% Cotton or Cotton blend in DK weight. Colors: Cream (Skin), Mustard Yellow (Hat/Pants), Rust Red (Tunic), Dark Chocolate (Hair), Charcoal Grey (Boots), Pumpkin Orange (Bag), Leaf Green (Stem).
🪡 Hook: 2.25mm or 2.50mm (Choose a size smaller than recommended for the yarn to prevent gaps).
✨ Other Materials: 8mm Safety Eyes, Fiberfill stuffing, Tapestry needle, Blush for cheeks, Stitch markers, Black embroidery thread.

Abbreviations & Stitches Used
ch: chain
sl st: slip stitch
sc: single crochet
inc: increase (2 sc in one st)
dec: decrease (invisible decrease preferred)
BLO: back loop only
FLO: front loop only
bobble: 4-dc bobble stitch (for hair buns)
The Complete Amber Pattern
Part 1: The Boots & Legs (Make 2)
We begin at the foundation, giving her sturdy little boots to stand upon.
Start with Charcoal Grey.
R1: Magic ring, 6 sc (6)
R2: Inc in every st (12)
R3: (Sc 1, inc) x 6 (18)
R4: BLO sc in each st around (18)
R5–6: Sc in each st around (18)
R7: Sc 5, dec x 4, sc 5 (14) — Shaping the toe
R8: Sc 5, dec x 2, sc 5 (12)
R9: Switch to Cream (Skin color). BLO sc in each st around (12)
R10–12: Sc in each st around (12)
Fasten off the first leg. Do not fasten off the second leg.
Part 2: The Body & Baggy Trousers
We join the legs and immediately create the volume for her trousers.
R13: From second leg, ch 3, join to first leg with sl st. Sc 12 around first leg, sc 3 along chain, sc 12 around second leg, sc 3 along other side of chain. (30)
R14: Switch to Mustard Yellow. Inc in every 5th st around (36)
R15: (Sc 5, inc) x 6 (42) — Creating the bloomers width
R16–19: Sc in each st around (42)
R20: (Sc 5, dec) x 6 (36)
R21: (Sc 4, dec) x 6 (30)
R22: Switch to Rust Red (The Tunic). BLO sc in each st around (30)
R23–24: Sc in each st around (30)
R25: (Sc 3, dec) x 6 (24)
R26–27: Sc in each st around (24)
R28: (Sc 2, dec) x 6 (18)
R29: Switch to Cream. BLO sc in each st around (18)
R30: (Sc 1, dec) x 6 (12) — Stuff the body firmly now.
R31: Sc around (12) — The Neck
Part 3: The Head
Continuing directly from the neck. We want a “chubby” shape, so we expand rapidly.
R32: FLO inc in every st (24)
R33: (Sc 3, inc) x 6 (30)
R34: (Sc 4, inc) x 6 (36)
R35: (Sc 5, inc) x 6 (42)
R36: (Sc 6, inc) x 6 (48)
R37–46: Sc in each st around (48) — 10 rounds of height for the face.
Insert Safety Eyes between R41 and R42, approx 9 stitches apart. Ensure they are wide-set.
R47: (Sc 6, dec) x 6 (42)
R48: (Sc 5, dec) x 6 (36)
R49: (Sc 4, dec) x 6 (30)
R50: (Sc 3, dec) x 6 (24)
R51: (Sc 2, dec) x 6 (18) — Stuff the head firmly.
R52: (Sc 1, dec) x 6 (12)
R53: Dec x 6 (6). Close the hole.
Part 4: The Arms (Make 2)
Start with Cream.
R1: Magic ring, 6 sc (6)
R2–8: Sc in each st around (6)
R9: Switch to Rust Red. Sc around (6)
R10: Inc in every st (12) — The sleeve flare
R11–12: Sc around (12)
Fasten off, leaving a tail for sewing. Do not stuff the hands, lightly stuff the sleeves.
Part 5: The Hair Cap & Buns
Using Dark Chocolate yarn.
R1: Magic ring, 6 sc (6)
R2: Inc in every st (12)
R3: (Sc 1, inc) x 6 (18)
R4: (Sc 2, inc) x 6 (24)
R5: (Sc 3, inc) x 6 (30)
R6: (Sc 4, inc) x 6 (36)
R7: (Sc 5, inc) x 6 (42)
R8–12: Sc in each st around (42)
R13: Sc 1, sl st, skip 1, 5 dc in next st (Shell for bangs), skip 1, sl st. Repeat for desired fringe width. Sc around the rest.
The Buns (Make 2): Magic Ring, 6 sc. R2: Inc around (12). R3: Bobble st, sc 1 around. R4: Dec around. Sew these to the sides of the hair cap.
Part 6: The Pumpkin Beret
Using Mustard Yellow.
R1: Magic ring, 8 sc (8)
R2: Inc in every st (16)
R3: (BPDC – Back Post Double Crochet, DC in same st) around — Creates the ribbed pumpkin texture.
R4: Increase in every 3rd st while maintaining the post stitch pattern.
R5–8: Continue working in rounds, keeping the post stitches aligned to create “segments.”
R9: Sc around, decreasing every 4th st to tighten the brim.
R10: Switch to Green. Chain 5, sl st back down to create the stem at the top center.
Assembly & Final Touches
- The Face: Using pink yarn or real cosmetic blush, apply generous rosy circles under the eyes. Embroider a tiny nose using the skin-tone yarn (wrap it 3 times horizontally) one row below the eyes.
- The Hair: Sew the wig cap onto the head. Position the buns low, near the “ears” area.
- The Pose: Sew the arms to the body at round 29. Tack the hands to the cheeks to create the “shy” pose shown in the muse image.
- The Collar: Reattach Rust yarn to the unworked loops of the neck (R29). Ch 2, DC around, sl st to close.
- The Bag: Make a small magic ring sphere in Orange (6, 12, 12, 12, 6). Chain 25 in Green for the strap. Drape over her shoulder before sewing the hands to the face.
Tips & FAQs
Q: Can I use wool yarn?
A: Absolutely. Wool will give Amber a fuzzier, more vintage texture which suits the autumn theme beautifully. Just ensure you hand-wash her carefully.
Q: My head is wobbling. How do I fix it?
A: Because the head is large (the “Echo of Youth” aesthetic), you may need to insert a craft stick or a rolled tube of felt into the neck before closing the head to support the weight.
A Final Word
There is a quiet magic in finishing a doll like Amber. When you embroider that tiny nose and place the beret just so, she ceases to be yarn and stuffing; she becomes a character with a secret to keep. I hope she brings a touch of cozy serenity to your home. Until we meet again at the hook.
— Patricia Poltera