Welcome back to the worktable. There is a special kind of magic in taking a character known for being a bit frightful and softening his edges until he is simply irresistible. This project is about texture and personality—transforming simple yarn into a companion with a story to tell.
Let us pick up our hooks and begin this adventure together.
About This Creation
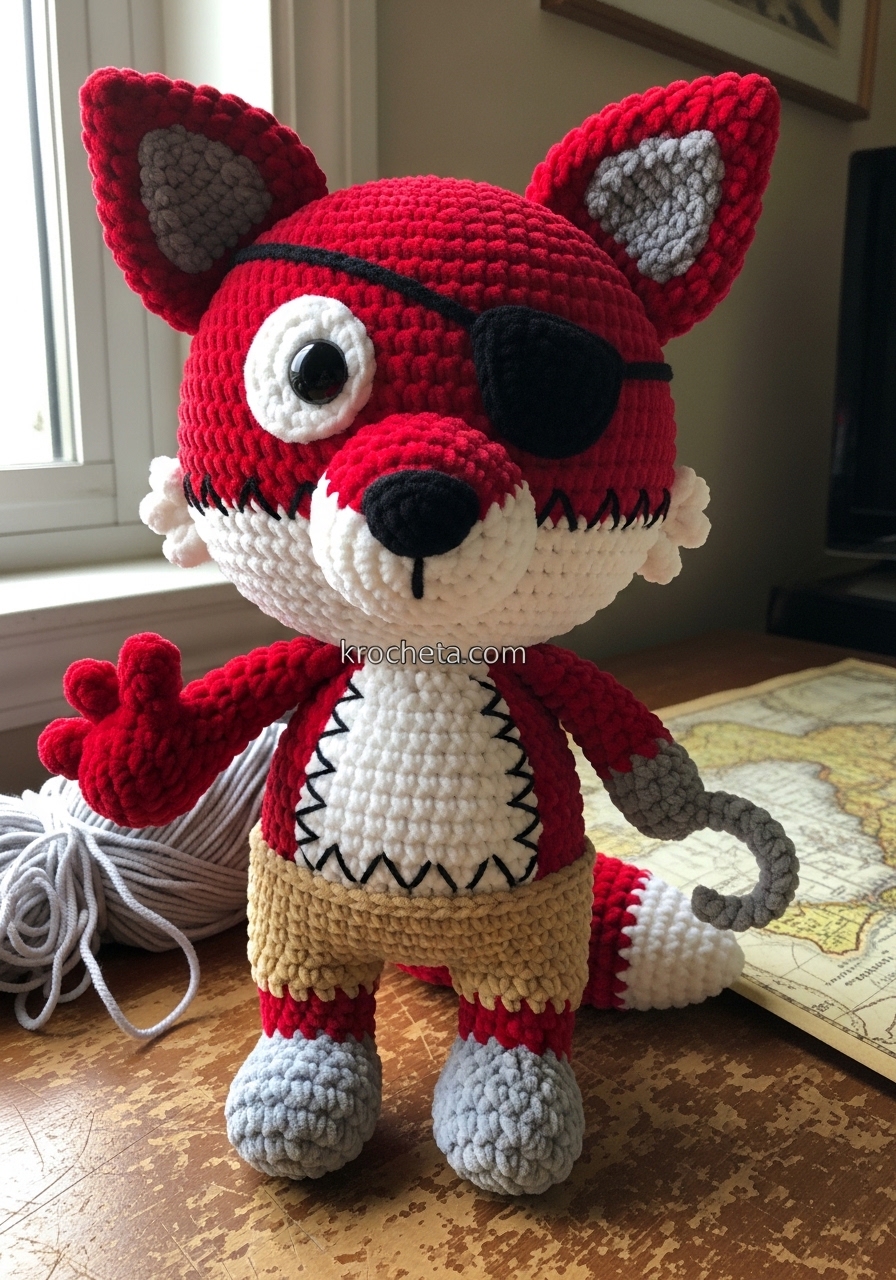
We are crafting “Captain Velvet,” a pirate fox who has traded his high-seas terror for high-quality snuggles. The secret to this project lies in the yarn choice. By using super bulky chenille or velvet yarn, we instantly soften the silhouette.
Where the original inspiration might have sharp, robotic joints, our Captain features rounded paws and a chubby, pear-shaped body. He is designed to sit proudly on a shelf or be carried around by a little one. This is not just a toy; it is a statement piece of soft sculpture.
Project Snapshot
📊 Difficulty: Intermediate (Requires comfort with color changes and sewing)
⏰ Est. Time: 6–8 Hours
📏 Size: Approx. 11 inches (28 cm) tall using Super Bulky yarn
“True craftsmanship is not about perfection, but about the character you stitch into every row.” — Patricia
Materials & Tools Needed
🧶 Yarn: Super Bulky (Size 6) Chenille/Velvet yarn. ➡️ Main Color: Deep Crimson Red (approx. 100g) ➡️ Accent A: Cream/White (Muzzle, Tummy) ➡️ Accent B: Steel Grey (Legs, Hook base) ➡️ Accent C: Tan/Brown (Shorts) ➡️ Accent D: Black (Eyepatch)
🪡 Hook: 4.5mm or 5.0mm (we want tight tension so no stuffing shows)
✨ Other Materials: ➡️ 18mm Safety Eyes (Black) ➡️ Fiberfill stuffing ➡️ Yarn needle (large eye) ➡️ Stitch markers ➡️ Black embroidery thread (for eyebrows/details)
Abbreviations & Stitches Used
ch: chain
sl st: slip stitch
sc: single crochet
inc: increase (2 sc in one st)
dec: decrease (invisible decrease preferred)
BLO: back loop only
FLO: front loop only
The Complete Captain Velvet Pattern
The Head (In Red)
We begin with the seat of his personality. We want a generous, rounded shape.
Round 1: Start 6 sc in a magic ring. (6)
Round 2: Inc in every st. (12)
Round 3: (1 sc, inc) x 6. (18)
Round 4: (2 sc, inc) x 6. (24)
Round 5: (3 sc, inc) x 6. (30)
Round 6: (4 sc, inc) x 6. (36)
Round 7: (5 sc, inc) x 6. (42)
Round 8: (6 sc, inc) x 6. (48)
Rounds 9–17: Sc in each st around. (48) Note: This builds the height.
Round 18: (6 sc, dec) x 6. (42)
Round 19: (5 sc, dec) x 6. (36)
Round 20: (4 sc, dec) x 6. (30)
Insert safety eyes between Rounds 14 and 15, about 7 stitches apart. Ensure they are wide-set for that “innocent” look.
Round 21: (3 sc, dec) x 6. (24)
Round 22: (2 sc, dec) x 6. (18)
Stuff the head firmly, ensuring the cheeks are rounded.
Round 23: (1 sc, dec) x 6. (12)
Round 24: Dec x 6. (6)
Fasten off and weave in the end.
The Muzzle (In Cream)
Round 1: Chain 6. Start in 2nd ch from hook.
Round 2: 4 sc, 3 sc in last ch. Turn to other side of ch. 3 sc, inc. (12)
Round 3: Inc, 3 sc, 3 inc, 3 sc, 2 inc. (18)
Round 4: 1 sc, inc, 4 sc, (1 sc, inc) x 3, 4 sc, (1 sc, inc) x 2. (24)
Rounds 5–6: Sc in each st around. (24)
Fasten off, leaving a long tail for sewing. Before attaching, sew a black nose onto the upper center of the muzzle.
Cheek Tufts (Make 2 in Red)
These give him his fox-like silhouette.
Round 1: 4 sc in magic ring. (4)
Round 2: (1 sc, inc) x 2. (6)
Round 3: (2 sc, inc) x 2. (8)
Round 4: (3 sc, inc) x 2. (10)
Round 5: Sc in each st around. (10)
Flatten the piece (do not stuff). Fasten off.
The Ears (Make 2)
Round 1: In Red, 4 sc in magic ring. (4)
Round 2: (1 sc, inc) x 2. (6)
Round 3: (2 sc, inc) x 2. (8)
Round 4: (3 sc, inc) x 2. (10)
Round 5: (4 sc, inc) x 2. (12)
Round 6: (5 sc, inc) x 2. (14)
Round 7: (6 sc, inc) x 2. (16)
Rounds 8–10: Sc in each st around. (16)
Fasten off. Artisan’s Note: I recommend sewing a small triangular piece of grey felt or crocheting a smaller grey triangle to stitch inside the ear for depth.
The Body (In Red)
Round 1: 6 sc in magic ring. (6)
Round 2: Inc in every st. (12)
Round 3: (1 sc, inc) x 6. (18)
Round 4: (2 sc, inc) x 6. (24)
Round 5: (3 sc, inc) x 6. (30)
Round 6: (4 sc, inc) x 6. (36)
Rounds 7–11: Sc in each st around. (36)
Round 12: (4 sc, dec) x 6. (30)
Rounds 13–14: Sc in each st around. (30)
Round 15: (3 sc, dec) x 6. (24)
Rounds 16–17: Sc in each st around. (24)
Round 18: (2 sc, dec) x 6. (18)
Fasten off, leaving a tail for sewing head to body. Stuff firmly.
Tummy Patch (In Cream)
Work in rows.
Row 1: Ch 5, sc in 2nd ch from hook and across. (4) Turn.
Row 2: Inc, 2 sc, inc. (6) Turn.
Row 3: Inc, 4 sc, inc. (8) Turn.
Rows 4–6: Sc across. (8) Turn.
Row 7: Dec, 4 sc, dec. (6) Turn.
Row 8: Dec, 2 sc, dec. (4) Turn.
Fasten off. Embroider “tear” marks with black yarn before sewing to the belly.
Shorts (In Tan/Brown)
Round 1: Ch 36, join to first ch with sl st (ensure it fits around the widest part of the body).
Rounds 2–5: Sc in each st around. (36)
Round 6: (Leg holes) Sc 18, skip remaining 18, join to start. This creates the first leg hole. Continue to sc around these 18 stitches for 2 rounds. Fasten off.
Re-attach yarn to the unworked 18 stitches and sc around for 2 rounds to create the second leg hole.
Artisan’s Note: Don’t worry if the edges look rough; that adds to the pirate charm!
Legs (Make 2 in Grey)
Round 1: 6 sc in magic ring. (6)
Round 2: Inc in every st. (12)
Round 3: (Blo) Sc in each st around. (12) This creates a flat foot base.
Rounds 4–8: Sc in each st around. (12)
Stuff lightly. Fasten off.
Arms (Make 1 Red Arm, 1 Hook Arm)
Red Arm: Start in Grey (Hand).
Round 1: 5 sc in magic ring.
Round 2: Inc in every st. (10)
Rounds 3–4: Sc around.
Change to Red.
Rounds 5–10: Sc around. (10)
Stuff lightly.
Hook Arm: Start in Grey/Silver.
Round 1: Ch 8, sl st to join.
Rounds 2–6: Sc around to make a tube. Insert a pipe cleaner bent into a hook shape.
Change to Red.
Rounds 7–11: Sc around (10). Stuff the red part lightly.
Assembly & Final Touches
- Head to Body: Secure the head firmly. The chenille yarn can be slippery, so use a strong cotton thread for sewing if possible.
- Face: Sew the muzzle centrally between the eyes. Attach the ears at rounds 4–5 of the head. Sew the cheek tufts just below the ears.
- Eyepatch: Crochet a black circle (6 sc in MR, inc to 12). Chain a long strap (approx 30 ch) and sew it across the head, placing the patch over one eye.
- Limbs: Attach legs to the bottom of the body (under the shorts). Sew arms at the neck seam.
- Details: Embroider eyebrows above the eyes for expression. You can make him look confused, angry, or happy depending on the angle!
Tips & FAQs
Q: My chenille yarn is shedding! A: This is common. Lightly singe the ends of the yarn with a lighter (carefully!) before sewing to stop the fraying.
Q: Can I brush the tail? A: If you use acrylic yarn for the tail, yes. But do not brush chenille yarn; it will bald. For a fluffy tail, just use a textured yarn.
A Final Word
You have navigated the stormy seas of shaping and the tricky winds of texture, and now you have a loyal first mate. Captain Velvet is more than a toy; he is a testament to your ability to see the softness in everything.
May your hook always find the loop,
Patricia