
The air turns crisp, the leaves begin their slow drift to the earth, and our hooks yearn for the warmth of wool. It is I, Patricia, welcoming you back to the atelier. Today, we honor the turning of the season with Elara, a sprite who wears the forest floor as her gown. May your stitches be even and your heart be full as we bring her to life.
About This Creation
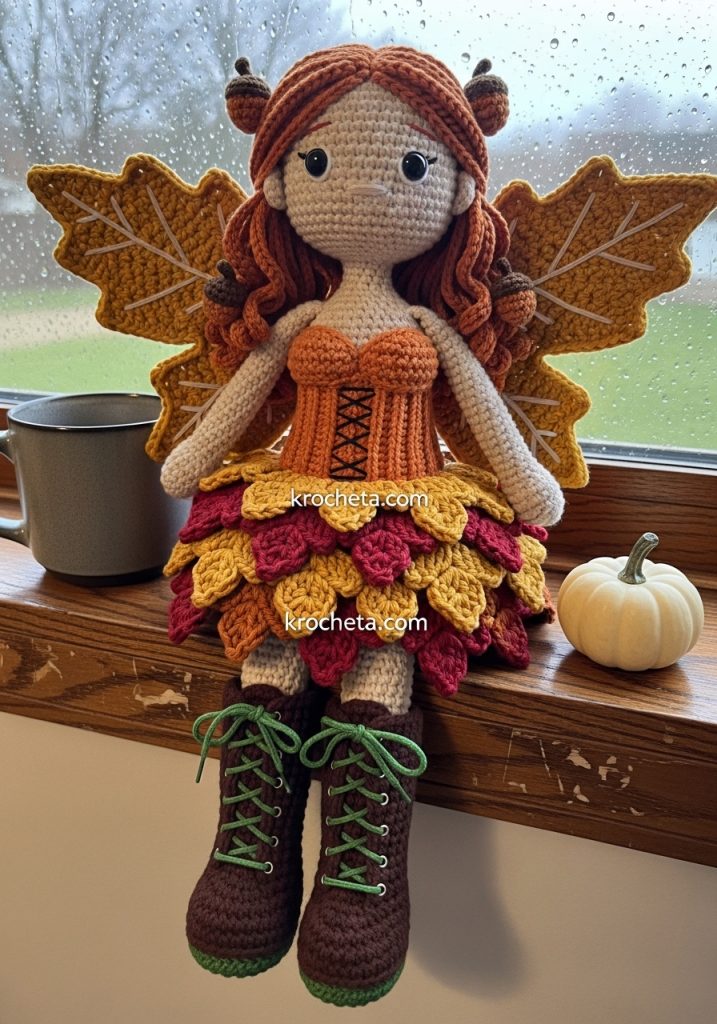
Elara is not merely a doll; she is a celebration of nature’s palette. While many amigurumi projects focus on simple shapes, this design challenges you to sculpt with yarn. We are moving beyond the basics to explore texture—specifically in the layered foliage of her skirt and the structured ribbing of her bodice.
This project is perfect for the intermediate crocheter looking to master component assembly. The commercial appeal here is timeless; seasonal decor is always in high demand. Elara sits beautifully on a mantlepiece surrounded by real pumpkins or serves as a cherished heirloom gift for an autumn baby.
Project Snapshot
📊 Difficulty: Intermediate (Requires patience with assembly)
⏰ Est. Time: 12–15 Hours
📏 Size: Approximately 11 inches (28 cm) tall
“We do not rush the leaf as it turns from green to gold; do not rush your stitches.” — Patricia
Materials & Tools Needed
🧶 Yarn: 100% Cotton DK weight (e.g., Ricorumi or Hobbii Rainbow). Colors:
- Paper White or Cream (Skin Tone)
- Rust Red (Hair)
- Pumpkin Orange (Bodice)
- Deep Red (Skirt Leaf A)
- Golden Yellow (Skirt Leaf B/Wings)
- Chocolate Brown (Boots)
- Olive Green (Boot Laces)
- Beige (Wing Embroidery)
🪡 Hook: 2.5mm (or size to obtain tight tension)
✨ Other Materials:
- Safety Eyes (8mm or 9mm)
- Fiberfill stuffing
- Tapestry needle (sharp tip preferred for embroidery)
- Stitch markers
- Optional: Thin craft wire for posable wings
Abbreviations & Stitches Used
MR: Magic Ring ch: chain sl st: slip stitch sc: single crochet hdc: half double crochet dc: double crochet inc: increase (2 sc in one st) dec: decrease (invisible decrease preferred) BLO: back loop only
The Complete Elara Pattern
The Head (Skin Tone) We begin with the seat of her wisdom. Stuff firmly as you go to avoid lumps.
R1: 6 sc in MR (6) R2: inc in each st around (12) R3: 🧶 sc 1, inc 🧶 rep around (18) R4: 🧶 sc 2, inc 🧶 rep around (24) R5: 🧶 sc 3, inc 🧶 rep around (30) R6: 🧶 sc 4, inc 🧶 rep around (36) R7: 🧶 sc 5, inc 🧶 rep around (42) R8: 🧶 sc 6, inc 🧶 rep around (48) R9: 🧶 sc 7, inc 🧶 rep around (54) R10–22: sc in each st around (54) [13 rounds for a noble forehead] Insert safety eyes between R18 and R19, approx 10 stitches apart. R23: 🧶 sc 7, dec 🧶 rep around (48) R24: 🧶 sc 6, dec 🧶 rep around (42) R25: 🧶 sc 5, dec 🧶 rep around (36) R26: 🧶 sc 4, dec 🧶 rep around (30) R27: 🧶 sc 3, dec 🧶 rep around (24) R28: 🧶 sc 2, dec 🧶 rep around (18) Fasten off, leaving a long tail for sewing. Embroider a small nose one row below the eyes using skin-tone yarn.
The Legs & Boots (Make 2) Start with Chocolate Brown for the boots.
R1: 6 sc in MR (6) R2: inc in each st around (12) R3: 🧶 sc 1, inc 🧶 rep around (18) R4: BLO sc in each st around (18) [Create the sole edge] R5–7: sc in each st around (18) R8: 🧶 sc 4, dec x 5, sc 4 🧶 (13) [Shaping the toe] R9–14: sc in each st around (13) [Boot shaft] Change to Skin Tone R15: BLO sc in each st around (13) R16–28: sc in each st around (13) [Leg height] Fasten off the first leg. Do not fasten off the second leg.
The Body Join the legs to begin the torso.
R29: From second leg, ch 3, join to first leg with sl st. Sc around first leg (13), sc across ch (3), sc around second leg (13), sc across other side of ch (3). (32) R30–35: sc in each st around (32) [Hips] Change to Pumpkin Orange (Bodice) R36: sc in each st around (32) R37: BLO sc in each st around (32) [Ridge for skirt attachment later] R38–45: sc in each st around (32) R46: 🧶 sc 6, dec 🧶 rep around (28) R47: sc in each st around (28) R48: 🧶 sc 5, dec 🧶 rep around (24) R49: sc in each st around (24) Change to Skin Tone R50: 🧶 sc 2, dec 🧶 rep around (18) R51: sc in each st around (18) [Neck] Fasten off.
The Arms (Make 2) Skin Tone. Lightly stuff the hand only.
R1: 5 sc in MR (5) R2: inc in each st around (10) R3–5: sc in each st around (10) R6: dec, sc 8 (9) R7–18: sc in each st around (9) Fasten off, leave tail for sewing.
The Foliage Skirt (Leaf Motifs) Make 5 in Deep Red, 5 in Golden Yellow. Artisan’s Note: These are worked in rows, not rounds.
Ch 8. Row 1: Starting in 2nd ch from hook: sc, hdc, dc, dc, hdc, sc, sl st in last ch. Rotate to work on the other side of the chain: sl st, sc, hdc, dc, dc, hdc, sc. Fasten off. Leave tails to sew these onto the front loops of R37 on the body. Alternate colors for a vibrant effect.
The Wings (Make 2) Mustard/Golden Yellow.
R1: 6 sc in MR (6) R2: inc in each st around (12) R3: 🧶 sc 1, inc 🧶 rep around (18) R4: 🧶 sc 2, inc 🧶 rep around (24) R5: 🧶 sc 3, inc 🧶 rep around (30) R6: 🧶 sc 4, inc 🧶 rep around (36) R7: Flatten the circle and crochet through both layers to close: 18 sc. Shape the tip: Ch 6, turn, sl st down the chain, sl st back into the main wing body. Fasten off. Use Beige yarn to embroider “V” shapes on the wings to mimic leaf veins.
The Wig Cap & Hair Rust Red.
R1–9: Repeat R1–9 of the Head pattern (54). R10–14: sc in each st around. Fasten off and sew to head. Strands: Cut 20 pieces of yarn approx 8 inches long. Fold in half and latch-hook them into the wig cap along the hairline and crown. Trim to desired length.
Accessories: The Acorns Nut (Brown): 6 sc in MR, inc to 12, sc 2 rows, dec to 6. Close. Cap (Darker Brown): 6 sc in MR, inc to 12. Sew onto nut. Make 2 and sew to the hair.
Assembly & Final Touches
➡️ Sew Head to Body: Ensure the nose is centered over the bodice. ➡️ Attach Arms: Sew at R49 of the body. ➡️ Skirt Construction: Pin the leaves onto the BLO ridge at the waist (R37). Overlap them slightly so no orange shows through. Sew firmly. ➡️ Boot Laces: Use Olive Green yarn and a tapestry needle to create “X” crosses up the front of the brown boots. ➡️ Wing Attachment: Sew wings to the back of the bodice. If you want them perky, insert a small U-shaped wire through the back before sewing.
Tips & FAQs
Q: My wings are floppy. How do I fix this? A: You can crochet a second identical piece for each wing and slip stitch them together for double thickness, or use spray starch.
Q: Can I brush the hair? A: If you use cotton yarn, brushing will separate the plies and create a frizzy, wool-like texture. For defined strands, do not brush.
A Final Word
There is a quiet magic in creating something that reflects the world outside our window. As you fasten that final thread, take a moment to admire the texture you have built. You have not just made a doll; you have crafted a companion for the season.
Yours in creativity, Patricia