
There is a quiet magic in February, isn’t there? It is the month where we stitch our affections into physical form. Today, Clementine steps into the role of a little messenger of love. I wanted to design an ensemble that feels like a warm hug on a cold day—something timeless, sweet, and utterly devoted to the art of caring.
This project is not just about yarn; it is about the intention we pour into every loop. Whether you are keeping her or gifting her to a sweetheart, I hope this pattern brings a gentle warmth to your hands.
About This Look
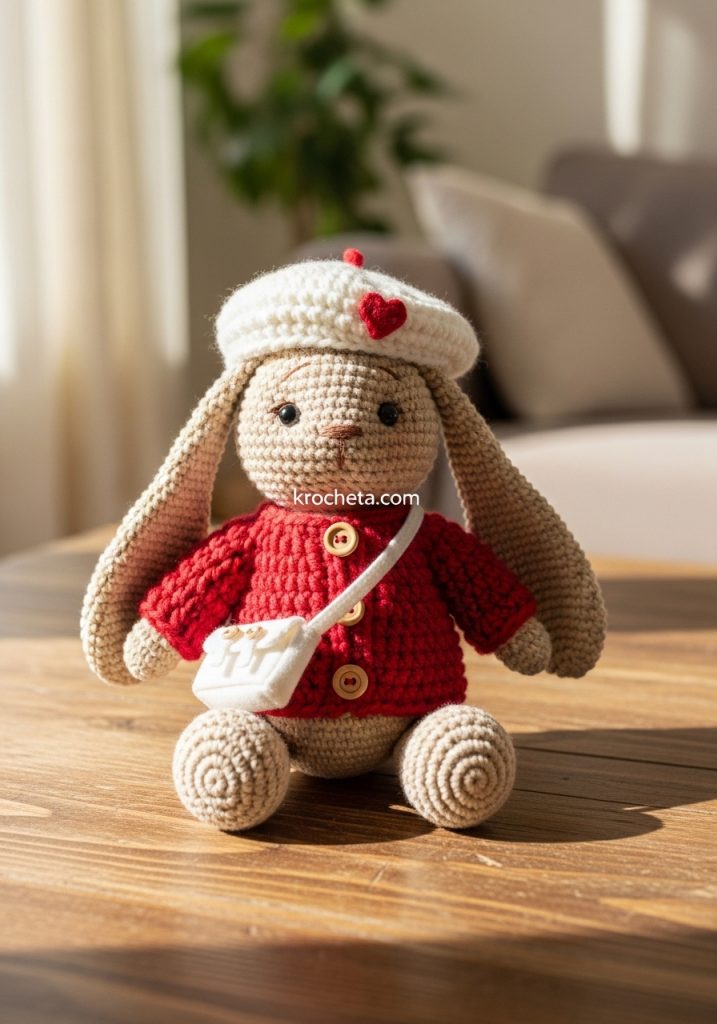
We are dressing our beloved Clementine in “The Cupid’s Courier” collection. The centerpiece is a chunky, tomato-red cardigan that offers a pop of vibrant color against her oatmeal-beige fur. To keep her ears warm, she dons a classic white beret, simple in structure but elevated by a single, hand-embroidered red heart. Finally, she carries a miniature messenger bag, perfect for holding tiny love notes or a spare button. It is a rustic, romantic look that fits perfectly into a farmhouse aesthetic.
Project Snapshot:
📊 Difficulty: Intermediate
⏰ Est. Time: 6–8 Hours
📏 Size: 25cm (approx 10 inches) standing
Materials & Tools
🧶 Yarn: DK Cotton or Acrylic in Beige (Body), White (Inner Ears/Beret/Bag), Tomato Red (Cardigan/Heart Embroidery).
🪡 Hook: 2.75mm or 3.0mm (to ensure tight stitches).
✨ Accessories: Safety eyes (10mm), Polyfill stuffing, 3 small wooden buttons (10mm) for the cardigan, 1 tiny red button for the bag.
The Pattern: Clementine’s Base
(Summary Instructions)
➡️ Head: Work in a continuous spiral using Beige. Start with a magic ring (6). Increase steadily to 54 stitches. Work 10 rounds even. Insert safety eyes between rounds 17 and 18, approx 9 stitches apart. Decrease back down to 24 stitches. Fasten off.
➡️ Ears (Make 2): These are Clementine’s signature. Using Beige, cast on 6 sc in a magic ring. Increase to 18 sc. Work even for 15 rounds to create that long, floppy drape. Flatten and sew the opening closed. For the inner ear, crochet a smaller, flatter strip in White and sew it onto the beige piece before attaching to the head.
➡️ Body: Using Beige, create a pear shape. Start with 6 sc in a ring, increasing to 48 stitches for the hips. Work even for 6 rounds. Decrease gradually as you move up to the neck, ending with 24 stitches to match the head. Stuff firmly.
➡️ Arms & Legs: Simple tubes. Legs should be sturdy (start with 6, inc to 18, work even, stuff bottom only). Arms are thinner (start with 6, inc to 12, work even for length).
The Pattern: Cupid’s Courier Collection
(Full Instructions)
The Tomato Red Cardigan
Worked in rows. Chain 1 at the start of each row and turn.
🪡 Row 1: Chain 25. Sc in 2nd ch from hook and each ch across. (24)
🪡 Row 2: (Sc 2, inc) x 8. (32)
🪡 Row 3 (Armholes): Sc 5, chain 4, skip 6 stitches (armhole), sc 10, chain 4, skip 6 stitches (armhole), sc 5. (30 stitches total working into chains)
🪡 Row 4: Sc in each stitch and chain across. (30)
🪡 Rows 5–9: Sc in each stitch across. (30)
🪡 Row 10: Sc in each stitch. Fasten off and weave in ends.
🪡 Finish: Sew the three small wooden buttons evenly down the left side of the front opening. The stitches on the opposite side will serve as buttonholes.
The White Heart Beret
Worked in continuous rounds. Do not join.
🪡 Round 1: With White yarn, 6 sc in a magic ring. (6)
🪡 Round 2: Inc in each st around. (12)
🪡 Round 3: (Sc 1, inc) x 6. (18)
🪡 Round 4: (Sc 2, inc) x 6. (24)
🪡 Round 5: (Sc 3, inc) x 6. (30)
🪡 Round 6: (Sc 4, inc) x 6. (36)
🪡 Round 7: (Sc 5, inc) x 6. (42)
🪡 Rounds 8–10: Sc in each st around. (42)
🪡 Round 11: (Sc 5, dec) x 6. (36)
🪡 Round 12: Sc in each st around. Sl st to join. Fasten off, leaving a long tail.
🪡 Decoration: Using the Red yarn and a tapestry needle, embroider a small “V” shape on the brim to form a heart.
The Love Note Messenger Bag
Worked in rows to create a rectangle, then folded.
🪡 Row 1: With White yarn, Chain 9. Sc in 2nd ch from hook and across. (8)
🪡 Rows 2–18: Sc in each st across. (8)
🪡 Flap Decrease: On the next row, dec, sc 4, dec. (6). Turn.
🪡 Next Row: Dec, sc 2, dec. (4). Turn.
🪡 Button Loop: Chain 4, slip stitch into the last stitch of the row to create a loop. Fasten off.
🪡 Strap: Chain 45 (or long enough to cross Clementine’s body). Fasten off.
Assembly
Now, let us bring her to life.
➡️ The Fit: Pull the cardigan onto Clementine carefully. It should fit snugly. Button it up to keep her cozy.
➡️ The Tilt: Place the beret on her head. Do not pull it straight down; tilt it slightly to the side (over one ear) for that classic artistic look. You may use a sewing pin to secure it if she is for display, or stitch it down if she is a toy for a child.
➡️ The Bag: Fold the bottom of the bag rectangle up (about halfway) and sew the sides together to form the pocket. Sew the tiny red button onto the front of the pocket. Attach the strap ends to the top corners of the bag. Sling it over her shoulder so it rests on her hip.
A Final Word
I hope this little project brings a quiet joy to your evening. Clementine looks quite ready to deliver a message of love, doesn’t she? Until next time, keep your stitches even and your tea warm.
Patricia Poltera