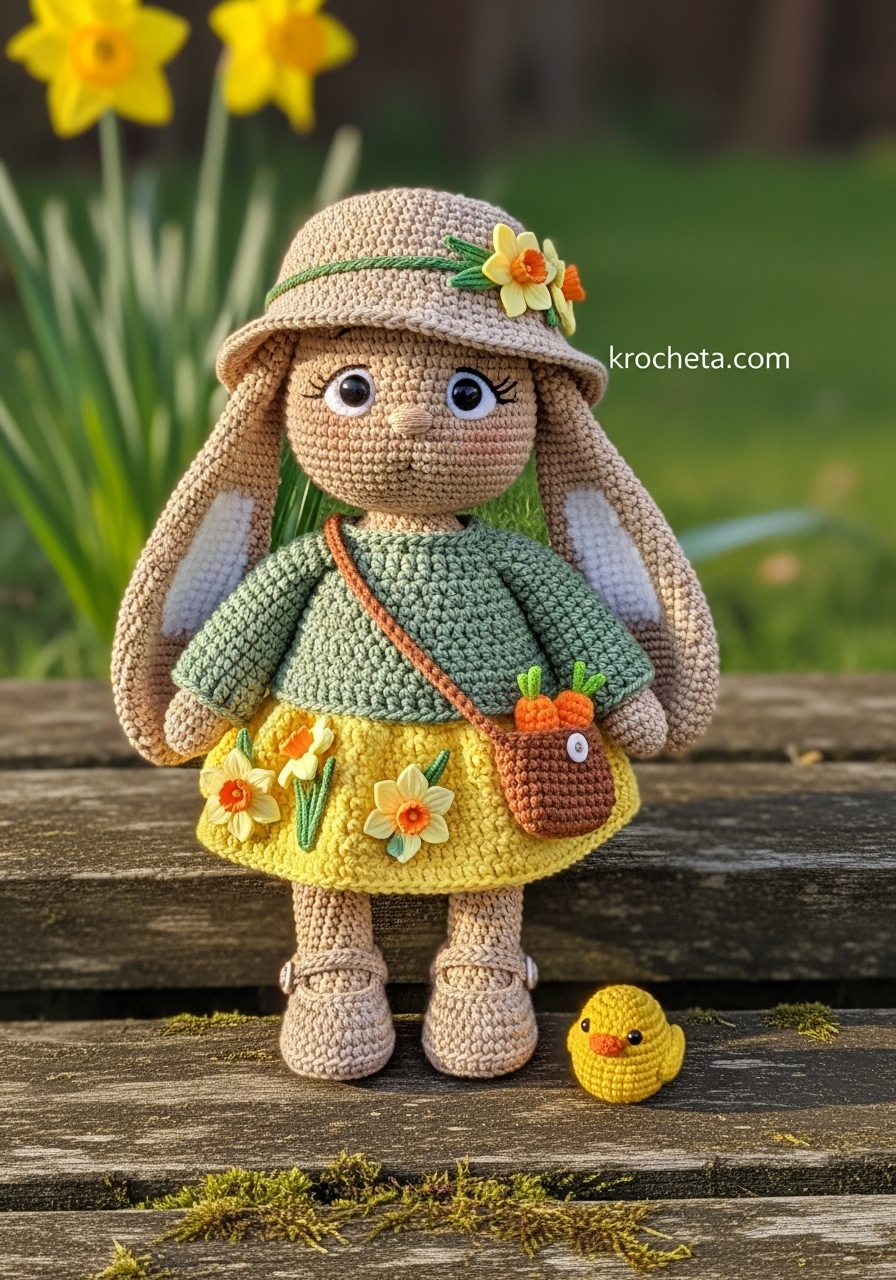
Dearest maker, welcome back to the workbench. Today, we channel the gentle promise of new blooms into fiber and form. Petal is not merely a toy; she is a soft companion designed to sit watch over springtime memories. We shall stitch her with patience, ensuring every loop is cast with love and precision.
About This Creation & The Harmony of Textures
In this project, we move beyond simple single crochet to explore the tactile joy of variation. By pairing the smooth, organic shape of the bunny with the rich, raised texture of the “Alpine Stitch” on her sweater, we create a piece that delights the fingertips as much as the eyes. This contrast elevates the finished doll from a simple craft to a boutique-quality heirloom.
Project Snapshot
📊 Difficulty: Intermediate
⏰ Est. Time: 12–15 Hours
📏 Size: Approx. 24cm (9.5 inches) tall
“The soul of the doll is found in the shaping of the cheeks. Do not rush these rounds.” — Patricia
Materials & Tools Needed
🧶 Yarn: DK/Light Worsted Weight Cotton or Cotton Blend.
- Oatmeal (Skin/Fur)
- Sage Green (Sweater)
- Buttercup Yellow (Skirt/Duck/Daffodils)
- Soft Brown (Basket/Shoes)
- Scrap Orange & Green (Carrots)
🪡 Hook: 2.50mm (or size to obtain tight tension)
✨ Other Materials:
- 10mm Safety Eyes (Black)
- Pink Embroidery Floss (Nose)
- Polyester Fiberfill (High quality)
- Pastel Pink Soft Pastel/Chalk (Cheeks)
- Yarn Needle & Stitch Markers

Abbreviations & Stitches Used
ch: chain
sl st: slip stitch
sc: single crochet
inc: increase (2 sc in one st)
dec: invisible decrease
hdc: half double crochet
dc: double crochet
fpdc: front post double crochet (for sweater texture)
BLO: back loop only
The Complete Petal & Puddle Pattern
Component 1: The Head (Oatmeal)
Work in a continuous spiral. Stuff firmly as you go.
Rnd 1: Start 6 sc in a magic ring. [6]
Rnd 2: Inc in each st around. [12]
Rnd 3: (Sc 1, inc) x 6. [18]
Rnd 4: (Sc 2, inc) x 6. [24]
Rnd 5: (Sc 3, inc) x 6. [30]
Rnd 6: (Sc 4, inc) x 6. [36]
Rnd 7: (Sc 5, inc) x 6. [42]
Rnd 8: (Sc 6, inc) x 6. [48]
Rnd 9: (Sc 7, inc) x 6. [54]
Rnd 10: (Sc 8, inc) x 6. [60]
Rnds 11–18: Sc in each st around. [60]
Cheek Shaping (Crucial for the “Sweet Gaze” look)
Rnd 19: Sc 18, (inc, sc 1) x 6, sc 6, (inc, sc 1) x 6, sc 18. [72]
Rnds 20–24: Sc in each st around. [72]
Rnd 25: Sc 18, (dec, sc 1) x 6, sc 6, (dec, sc 1) x 6, sc 18. [60]
Insert safety eyes between Rnds 18 and 19, placed centrally within the cheek increase sections, approx 11 stitches apart.
Rnd 26: (Sc 8, dec) x 6. [54]
Rnd 27: (Sc 7, dec) x 6. [48]
Rnd 28: (Sc 6, dec) x 6. [42]
Rnd 29: (Sc 5, dec) x 6. [36]
Rnd 30: (Sc 4, dec) x 6. [30]
Rnd 31: (Sc 3, dec) x 6. [24]
Rnd 32: (Sc 2, dec) x 6. [18]
Fasten off, leaving a long tail for sewing. Stuff the cheeks firmly to ensure they puff out.
Component 2: The Body (Oatmeal)
Rnd 1: Start 6 sc in a magic ring. [6]
Rnd 2: Inc in each st around. [12]
Rnd 3: (Sc 1, inc) x 6. [18]
Rnd 4: (Sc 2, inc) x 6. [24]
Rnd 5: (Sc 3, inc) x 6. [30]
Rnd 6: (Sc 4, inc) x 6. [36]
Rnd 7: (Sc 5, inc) x 6. [42]
Rnd 8: (Sc 6, inc) x 6. [48]
Rnds 9–14: Sc in each st around. [48]
Rnd 15: (Sc 6, dec) x 6. [42]
Rnds 16–18: Sc in each st around. [42]
Rnd 19: (Sc 5, dec) x 6. [36]
Rnds 20–22: Sc in each st around. [36]
Rnd 23: (Sc 4, dec) x 6. [30]
Rnds 24–25: Sc in each st around. [30]
Rnd 26: (Sc 3, dec) x 6. [24]
Rnds 27–28: Sc in each st around. [24]
Rnd 29: (Sc 2, dec) x 6. [18]
Fasten off. Stuff firmly, keeping the belly rounded.
Component 3: The Lop Ears (Make 2 – Oatmeal)
Rnd 1: Start 6 sc in a magic ring. [6]
Rnd 2: Inc in each st around. [12]
Rnd 3: (Sc 1, inc) x 6. [18]
Rnds 4–8: Sc in each st around. [18]
Rnd 9: (Sc 2, inc) x 6. [24]
Rnds 10–20: Sc in each st around. [24]
Rnd 21: (Sc 2, dec) x 6. [18]
Rnds 22–26: Sc in each st around. [18]
Rnd 27: (Sc 1, dec) x 6. [12]
Rnds 28–30: Sc in each st around. [12]
Flatten the opening and sc across both layers to close. Do not stuff.
Component 4: Arms & Legs
Legs (Make 2 – Oatmeal)
Rnd 1: Ch 6. Start in 2nd ch from hook. Sc 4, 3 sc in last ch. Rotate to other side. Sc 3, inc in last st. [12]
Rnd 2: Inc, sc 3, inc x 3, sc 3, inc x 2. [18]
Rnds 3–5: Sc in each st around. [18]
Rnd 6: Sc 5, dec x 4, sc 5. [14]
Rnd 7: Sc 5, dec x 2, sc 5. [12]
Rnds 8–18: Sc in each st around. [12]
Fasten off. Stuff feet firmly, legs lightly.
Arms (Make 2 – Oatmeal)
Rnd 1: Start 6 sc in a magic ring. [6]
Rnd 2: (Sc 2, inc) x 2. [8]
Rnds 3–14: Sc in each st around. [8]
Fasten off. Stuff hands only.
Component 5: The Textured Sweater (Sage Green)
Worked in joined rounds. Chain does not count as a stitch.
Rnd 1: Ch 30, join to form a circle. Ch 1, sc in each st around. Join. [30]
Rnd 2: Ch 2, dc in each st around. Join. [30]
Rnd 3: Ch 1, fpdc around next st, sc in next st repeat around. Join. [30]
Rnd 4: Ch 2, dc in each st around. Join. [30]
Rnd 5: Ch 1, sc in next st, fpdc around next st repeat around. Join. [30]
Rnds 6–9: Repeat Rnds 2–5.
Rnd 10: Ch 1, sc in each st around. [30]
Sleeves (Make 2): Attach yarn to armhole area (divide body or make separately). Make 12 sc in a ring. Work 8 rounds of sc.
Component 6: The Daffodil Skirt (Buttercup Yellow)
Rnd 1: Ch 32 (ensure it fits bunny waist), join. Sc around. [32]
Rnd 2: (Sc 3, inc) around. [40]
Rnd 3: (Sc 4, inc) around. [48]
Rnds 4–10: Dc in each st around. [48]
Rnd 11 (Scallop Hem): Sk 1, 5 dc in next st, sk 1, sl st in next repeat around.
Daffodil Appliqué (Make 3): Make a magic ring. In ring: Ch 2, 2 dc, ch 2, sl st repeat 5 times for petals. Center: Orange yarn, popcorn stitch in the middle. Stem: Green yarn, surface slip stitch or chain embroidery onto skirt.
Component 7: Accessories (Hat, Bag, & Puddle)
Bucket Hat (Beige): Standard circle expansion to 42 sts. Work even for 5 rows. Brim: (Sc 2, inc) around. Work 2 rounds even.
Forager’s Bag (Brown): Ch 10. Sc around chain oval for base. Work 8 rounds of alternating dc, sc for texture. Ch 40 for strap.
Puddle the Duckling (Yellow): Rnd 1: 6 sc in MR. Rnd 2: Inc around. [12] Rnd 3: (Sc 1, inc) around. [18] Rnds 4–7: Sc around. [18] Rnd 8: (Sc 1, dec) around. [12] Rnd 9: Dec around. [6] Close. Beak: Orange, ch 2, sc in 2nd ch. Sew to face. Wings: Ch 4, sc back. Sew to sides.
Assembly & Final Touches
➡️ Face: Embroider a “Y” shape nose with pink floss between the eyes. Apply pastel chalk to the cheeks.
➡️ Limbs: Sew legs to the bottom of the body (Rnds 5-8). Sew arms to Rnd 27 of the body.
➡️ Dressing: Put the sweater on first, then the skirt. Ensure the daffodils face forward.
➡️ Hat: Place slightly askew on the head, allowing one lop ear to peek out more than the other.
➡️ Puddle: Place the duckling near her feet or tucked into the bag.
Tips & FAQs
Q: How do I get the sweater texture to pop? A: Ensure you are working your Front Post Double Crochet (fpdc) stitches around the post of the stitch two rows below, not the immediate row. This creates the deep relief.
Q: My hat is too loose. A: Amigurumi tension is tight; clothing tension is often looser. Try dropping a hook size (e.g., to 2.25mm) for the accessories if they feel floppy.
A Final Word
There is a quiet magic in finishing a piece like Petal. As you weave in that final end, you have not just completed a pattern; you have birthed a character with a story yet to be told. May she bring the freshness of spring to your home.
Stitch with intention, Patricia