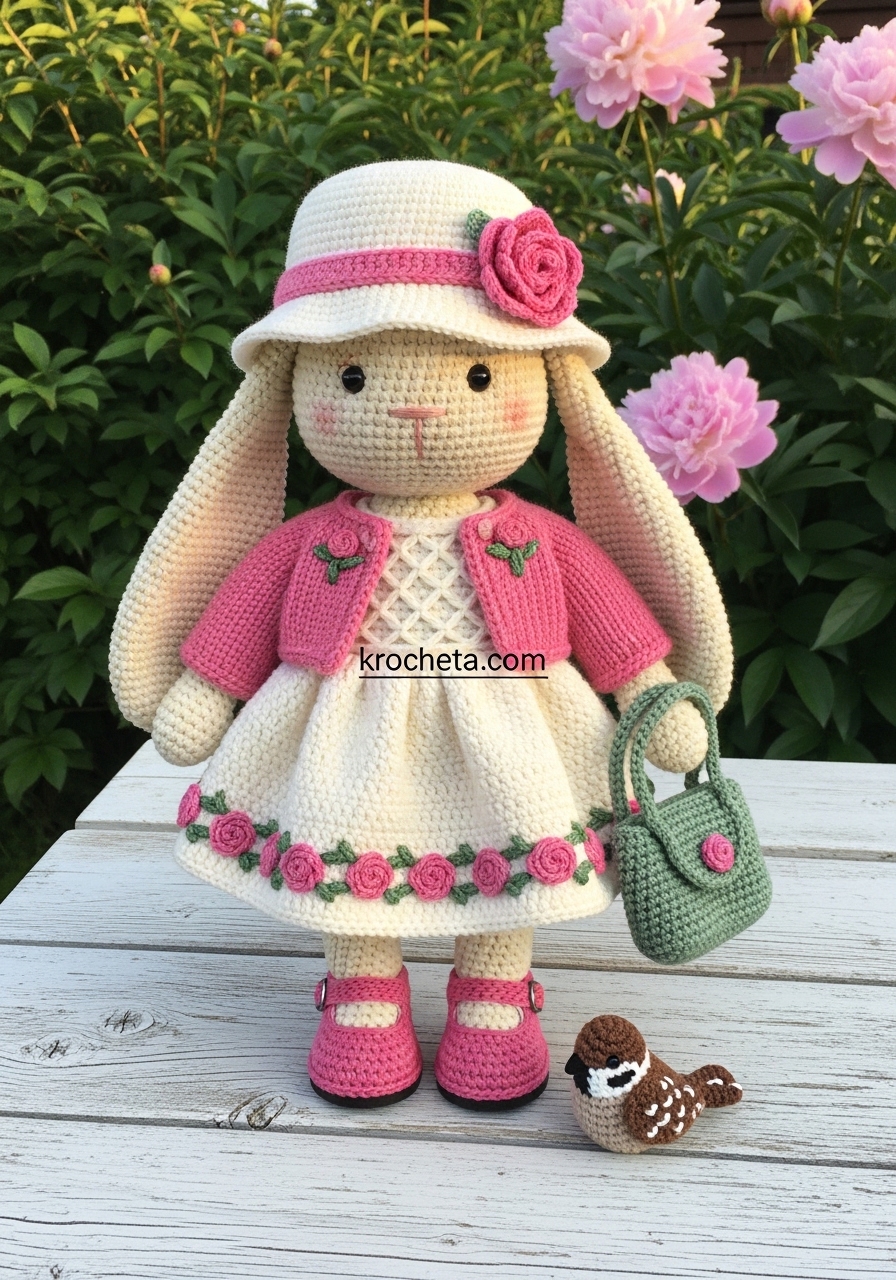
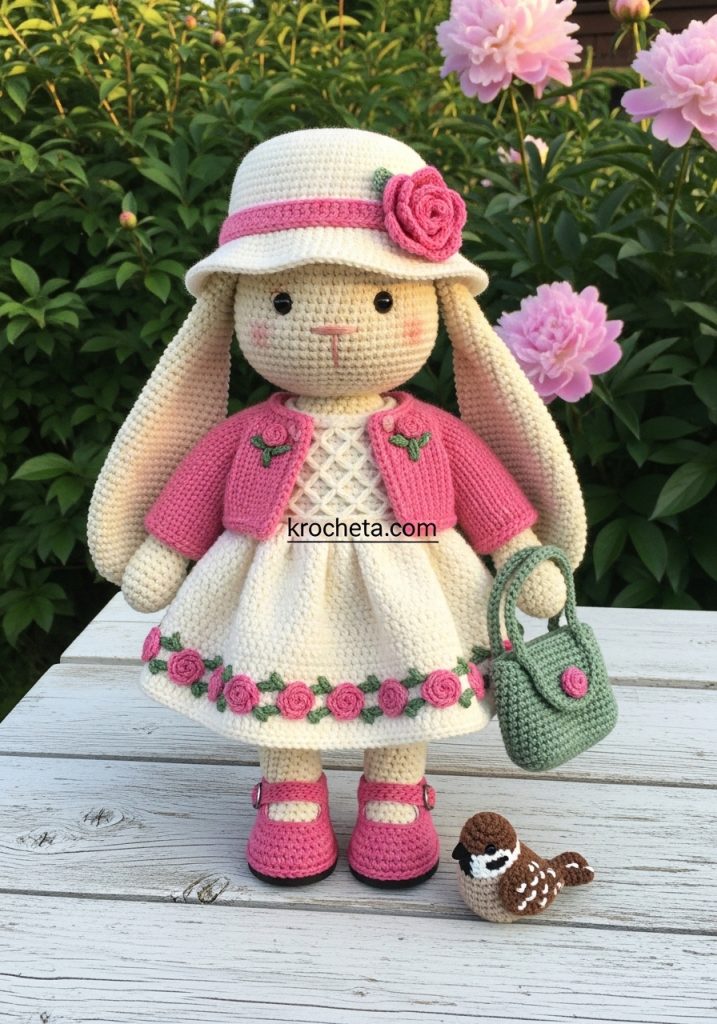
The Peony Parlor Bunny captures the essence of a bygone era, where afternoons were spent sipping tea in sunlit parlors. We are focusing here on “Heirloom Construction.” Unlike quick market makes, this project utilizes tight tension, structural integrity in the neck, and removable clothing layers. This elevates the final piece from a simple craft to a premium gift or a high-value item for your boutique. She is designed to be dressed, posed, and cherished.
Project Snapshot
📊 Difficulty: Intermediate (Requires garment shaping and embroidery)
⏰ Est. Time: 15–18 Hours of dedicated craftsmanship
📏 Size: Approx. 28cm (11 inches) standing
“We do not rush the rose; we allow it to bloom stitch by stitch.” — Patricia
Materials & Tools Needed
🧶 Yarn: 100% Cotton DK or Sport Weight. Colors: Antique Cream (100g), Dusty Rose (50g), Sage Green (20g), Walnut Brown (scraps).
🪡 Hook: 2.25mm (for the doll) and 2.75mm (for clothing).
✨ Other Materials: 10mm Safety Eyes, Polyester Fiberfill, Tapestry Needle, Stitch Markers, small oval piece of plastic (for shoe soles), small metal craft clasp (for bag, optional).
Abbreviations & Stitches Used
ch: chain
sl st: slip stitch
sc: single crochet
hdc: half double crochet
dc: double crochet
inc: increase (2 sc in one st)
dec: decrease (invisible decrease preferred)
BLO: back loops only
FLO: front loops only
Bobble: 4-dc bobble stitch
The Complete Peony Parlor Bunny Pattern
Component 1: The Foundation Legs (Make 2)
Start with Antique Cream and 2.25mm hook.
➡️ Rnd 1: 6 sc in a magic ring.
➡️ Rnd 2: Inc in each st around (12).
➡️ Rnd 3: (Sc 1, inc) x 6 (18).
➡️ Rnd 4: (Sc 2, inc) x 6 (24).
➡️ Rnd 5: BLO Sc around (24) to create the sole edge.
➡️ Rnd 6–8: Sc around (24).
➡️ Rnd 9: Sc 6, dec 6, sc 6 (18) to shape the toe.
➡️ Rnd 10: Sc 6, dec 3, sc 6 (15).
➡️ Rnd 11–25: Sc around (15). Stuff the foot firmly and the leg moderately.
➡️ Fasten off the first leg. Do not fasten off the second leg; ch 3 and join to the first leg to begin the body.
Component 2: The Body & Head (One Piece)
➡️ Rnd 26: Sc 15 (leg 1), sc 3 (on chain), sc 15 (leg 2), sc 3 (on other side of chain) (36).
➡️ Rnd 27: (Sc 5, inc) x 6 (42).
➡️ Rnd 28–35: Sc around (42) for the hip section.
➡️ Rnd 36: (Sc 5, dec) x 6 (36).
➡️ Rnd 37–45: Sc around (36).
➡️ Rnd 46: (Sc 4, dec) x 6 (30).
➡️ Rnd 47–50: Sc around (30).
➡️ Rnd 51: (Sc 3, dec) x 6 (24).
➡️ Rnd 52: (Sc 2, dec) x 6 (18). Stuff the body firmly.
➡️ Rnd 53: (Sc 1, dec) x 6 (12) – The Neck.
➡️ Rnd 54: Sc around (12).
➡️ Rnd 55: Inc in each st around (24) – Beginning the Head.
➡️ Rnd 56: (Sc 3, inc) x 6 (30).
➡️ Rnd 57: (Sc 4, inc) x 6 (36).
➡️ Rnd 58: (Sc 5, inc) x 6 (42).
➡️ Rnd 59: (Sc 6, inc) x 6 (48).
➡️ Rnd 60: (Sc 7, inc) x 6 (54).
➡️ Rnd 61–72: Sc around (54).
➡️ Insert Safety Eyes between Rnds 66 and 67, roughly 10 stitches apart.
➡️ Rnd 73: (Sc 7, dec) x 6 (48).
➡️ Rnd 74: (Sc 6, dec) x 6 (42).
➡️ Rnd 75: (Sc 5, dec) x 6 (36).
➡️ Rnd 76: (Sc 4, dec) x 6 (30).
➡️ Rnd 77: (Sc 3, dec) x 6 (24).
➡️ Rnd 78: (Sc 2, dec) x 6 (18). Stuff head firmly.
➡️ Rnd 79: (Sc 1, dec) x 6 (12).
➡️ Rnd 80: Dec around (6). Close hole.
Component 3: The Drooping Ears (Make 2)
Use Antique Cream.
➡️ Rnd 1: 6 sc in magic ring.
➡️ Rnd 2: Inc in each st (12).
➡️ Rnd 3: (Sc 1, inc) x 6 (18).
➡️ Rnd 4–8: Sc around (18).
➡️ Rnd 9: (Sc 2, inc) x 6 (24).
➡️ Rnd 10–20: Sc around (24).
➡️ Rnd 21: (Sc 2, dec) x 6 (18).
➡️ Rnd 22–30: Sc around (18).
➡️ Rnd 31: (Sc 1, dec) x 6 (12).
➡️ Flatten the opening and sc across to close. Do not stuff.
Component 4: The Arms (Make 2)
➡️ Rnd 1: 5 sc in magic ring.
➡️ Rnd 2: Inc in each st (10).
➡️ Rnd 3–20: Sc around (10).
➡️ Flatten top and sc across. Lightly stuff the hand only.
Component 5: The Vintage Dress
Using 2.75mm hook and Antique Cream. Worked top-down.
➡️ Row 1: Ch 25. Sc in 2nd ch from hook and across (24).
➡️ Row 2: (Sc 3, inc) x 6 (30).
➡️ Row 3: (Sc 4, inc) x 6 (36).
➡️ Row 4: Sc 5, ch 6 (skip 8 sts for armhole), sc 10, ch 6 (skip 8 sts), sc 5 (32).
➡️ Row 5–8: Sc across (32). Join to work in rounds from here.
➡️ Rnd 9: Ch 2 (counts as dc), dc in same st, 2 dc in each st around (64).
➡️ Rnd 10–20: Dc around (64).
➡️ The Rose Hem: Switch to Dusty Pink. In one stitch make (sc, hdc, 3 dc, hdc, sc) to form a petal cluster, skip 1 st, sl st in next. Repeat around.
Component 6: The Rose Cardigan
Using Dusty Pink. Worked flat.
➡️ Row 1: Ch 25, sc across (24).
➡️ Row 2: (Sc 2, inc) x 8 (32).
➡️ Row 3: Sc 5, ch 6 (skip 6), sc 10, ch 6 (skip 6), sc 5 (32).
➡️ Row 4–8: Sc across (32).
➡️ Edging: Work sc evenly around the entire perimeter.
➡️ Embroider small bullion knots or french knots on the lapels in darker pink to simulate rosebuds.
Component 7: Accessories (Hat & Bag)
The Hat (Cream):
➡️ Rnd 1–5: Follow Head pattern Rnd 1–5 (30).
➡️ Rnd 6: (Sc 4, inc) x 6 (36).
➡️ Rnd 7–11: Sc around (36).
➡️ Rnd 12: FLO (Sc 2, inc) around for the brim ruffle.
➡️ Rnd 13: Sc around. Add a pink chain band and a large crocheted rose (strip of 20 dc rolled up).
The Bag (Sage Green):
➡️ Ch 10, sc around the chain (20). Work in rounds for 8 rows. Add a small flap and sew a pink bead or embroidered rose to the front.
Artisan’s Notes
To achieve the “Lattice” look on the dress bodice shown in the vision, use a tapestry needle and the cream yarn to embroider diagonal ‘X’ shapes across the chest area after the dress is complete. This texture adds that essential layer of depth.
[📸 PASTE IMAGE 3 HERE: Detail/Variation B]
Assembly & Final Touches
- Sew the ears low on the head, roughly at eye level, so they frame the face sweetly.
- Attach arms to the body at Rnd 52.
- Embroider a simple ‘Y’ shape nose with pink thread between the eyes.
- Apply a dusting of pink blush to the cheeks using real makeup or fabric pastel.
- Dress the bunny: Shoes first, then dress, then cardigan.
- Stitch the hat in place if you wish, or leave it removable for play.
Tips & FAQs
Q: My head is wobbling. How do I fix this? A: A wobbling head breaks the illusion. Insert a rolled tube of felt or a craft wire inside the neck column before closing the head. Stuff the neck incredibly firmly.
Q: Can I brush the yarn? A: Absolutely. If you use a natural fiber, a gentle brushing with a pet slicker brush will give the bunny a soft, vintage “halo” of fuzz.
A Final Word
There she sits, a quiet companion ready for tea. The magic of the Peony Parlor Bunny is not in the complexity of her stitches, but in the harmony of her colors and the intention of your hands. May she bring grace to whoever holds her.
Yours in creation,
Patricia
Welcome back to the worktable. There is a profound silence that falls when we work with such delicate shades of cream and rose—a quiet reverence for the beauty we are bringing into the world. This bunny is not merely a toy; she is a memory kept in cotton, waiting to sit upon a shelf and watch generations grow.
About This Creation & The Heirloom Angle
The Peony Parlor Bunny captures the essence of a bygone era, where afternoons were spent sipping tea in sunlit parlors. We are focusing here on “Heirloom Construction.” Unlike quick market makes, this project utilizes tight tension, structural integrity in the neck, and removable clothing layers. This elevates the final piece from a simple craft to a premium gift or a high-value item for your boutique. She is designed to be dressed, posed, and cherished.
Project Snapshot
📊 Difficulty: Intermediate (Requires garment shaping and embroidery)
⏰ Est. Time: 15–18 Hours of dedicated craftsmanship
📏 Size: Approx. 28cm (11 inches) standing
“We do not rush the rose; we allow it to bloom stitch by stitch.” — Patricia
Materials & Tools Needed
🧶 Yarn: 100% Cotton DK or Sport Weight. Colors: Antique Cream (100g), Dusty Rose (50g), Sage Green (20g), Walnut Brown (scraps).
🪡 Hook: 2.25mm (for the doll) and 2.75mm (for clothing).
✨ Other Materials: 10mm Safety Eyes, Polyester Fiberfill, Tapestry Needle, Stitch Markers, small oval piece of plastic (for shoe soles), small metal craft clasp (for bag, optional).
Abbreviations & Stitches Used
ch: chain
sl st: slip stitch
sc: single crochet
hdc: half double crochet
dc: double crochet
inc: increase (2 sc in one st)
dec: decrease (invisible decrease preferred)
BLO: back loops only
FLO: front loops only
Bobble: 4-dc bobble stitch
The Complete Peony Parlor Bunny Pattern
Component 1: The Foundation Legs (Make 2)
Start with Antique Cream and 2.25mm hook.
➡️ Rnd 1: 6 sc in a magic ring.
➡️ Rnd 2: Inc in each st around (12).
➡️ Rnd 3: (Sc 1, inc) x 6 (18).
➡️ Rnd 4: (Sc 2, inc) x 6 (24).
➡️ Rnd 5: BLO Sc around (24) to create the sole edge.
➡️ Rnd 6–8: Sc around (24).
➡️ Rnd 9: Sc 6, dec 6, sc 6 (18) to shape the toe.
➡️ Rnd 10: Sc 6, dec 3, sc 6 (15).
➡️ Rnd 11–25: Sc around (15). Stuff the foot firmly and the leg moderately.
➡️ Fasten off the first leg. Do not fasten off the second leg; ch 3 and join to the first leg to begin the body.
Component 2: The Body & Head (One Piece)
➡️ Rnd 26: Sc 15 (leg 1), sc 3 (on chain), sc 15 (leg 2), sc 3 (on other side of chain) (36).
➡️ Rnd 27: (Sc 5, inc) x 6 (42).
➡️ Rnd 28–35: Sc around (42) for the hip section.
➡️ Rnd 36: (Sc 5, dec) x 6 (36).
➡️ Rnd 37–45: Sc around (36).
➡️ Rnd 46: (Sc 4, dec) x 6 (30).
➡️ Rnd 47–50: Sc around (30).
➡️ Rnd 51: (Sc 3, dec) x 6 (24).
➡️ Rnd 52: (Sc 2, dec) x 6 (18). Stuff the body firmly.
➡️ Rnd 53: (Sc 1, dec) x 6 (12) – The Neck.
➡️ Rnd 54: Sc around (12).
➡️ Rnd 55: Inc in each st around (24) – Beginning the Head.
➡️ Rnd 56: (Sc 3, inc) x 6 (30).
➡️ Rnd 57: (Sc 4, inc) x 6 (36).
➡️ Rnd 58: (Sc 5, inc) x 6 (42).
➡️ Rnd 59: (Sc 6, inc) x 6 (48).
➡️ Rnd 60: (Sc 7, inc) x 6 (54).
➡️ Rnd 61–72: Sc around (54).
➡️ Insert Safety Eyes between Rnds 66 and 67, roughly 10 stitches apart.
➡️ Rnd 73: (Sc 7, dec) x 6 (48).
➡️ Rnd 74: (Sc 6, dec) x 6 (42).
➡️ Rnd 75: (Sc 5, dec) x 6 (36).
➡️ Rnd 76: (Sc 4, dec) x 6 (30).
➡️ Rnd 77: (Sc 3, dec) x 6 (24).
➡️ Rnd 78: (Sc 2, dec) x 6 (18). Stuff head firmly.
➡️ Rnd 79: (Sc 1, dec) x 6 (12).
➡️ Rnd 80: Dec around (6). Close hole.
Component 3: The Drooping Ears (Make 2)
Use Antique Cream.
➡️ Rnd 1: 6 sc in magic ring.
➡️ Rnd 2: Inc in each st (12).
➡️ Rnd 3: (Sc 1, inc) x 6 (18).
➡️ Rnd 4–8: Sc around (18).
➡️ Rnd 9: (Sc 2, inc) x 6 (24).
➡️ Rnd 10–20: Sc around (24).
➡️ Rnd 21: (Sc 2, dec) x 6 (18).
➡️ Rnd 22–30: Sc around (18).
➡️ Rnd 31: (Sc 1, dec) x 6 (12).
➡️ Flatten the opening and sc across to close. Do not stuff.
Component 4: The Arms (Make 2)
➡️ Rnd 1: 5 sc in magic ring.
➡️ Rnd 2: Inc in each st (10).
➡️ Rnd 3–20: Sc around (10).
➡️ Flatten top and sc across. Lightly stuff the hand only.
Component 5: The Vintage Dress
Using 2.75mm hook and Antique Cream. Worked top-down.
➡️ Row 1: Ch 25. Sc in 2nd ch from hook and across (24).
➡️ Row 2: (Sc 3, inc) x 6 (30).
➡️ Row 3: (Sc 4, inc) x 6 (36).
➡️ Row 4: Sc 5, ch 6 (skip 8 sts for armhole), sc 10, ch 6 (skip 8 sts), sc 5 (32).
➡️ Row 5–8: Sc across (32). Join to work in rounds from here.
➡️ Rnd 9: Ch 2 (counts as dc), dc in same st, 2 dc in each st around (64).
➡️ Rnd 10–20: Dc around (64).
➡️ The Rose Hem: Switch to Dusty Pink. In one stitch make (sc, hdc, 3 dc, hdc, sc) to form a petal cluster, skip 1 st, sl st in next. Repeat around.
Component 6: The Rose Cardigan
Using Dusty Pink. Worked flat.
➡️ Row 1: Ch 25, sc across (24).
➡️ Row 2: (Sc 2, inc) x 8 (32).
➡️ Row 3: Sc 5, ch 6 (skip 6), sc 10, ch 6 (skip 6), sc 5 (32).
➡️ Row 4–8: Sc across (32).
➡️ Edging: Work sc evenly around the entire perimeter.
➡️ Embroider small bullion knots or french knots on the lapels in darker pink to simulate rosebuds.
Component 7: Accessories (Hat & Bag)
The Hat (Cream):
➡️ Rnd 1–5: Follow Head pattern Rnd 1–5 (30).
➡️ Rnd 6: (Sc 4, inc) x 6 (36).
➡️ Rnd 7–11: Sc around (36).
➡️ Rnd 12: FLO (Sc 2, inc) around for the brim ruffle.
➡️ Rnd 13: Sc around. Add a pink chain band and a large crocheted rose (strip of 20 dc rolled up).
The Bag (Sage Green):
➡️ Ch 10, sc around the chain (20). Work in rounds for 8 rows. Add a small flap and sew a pink bead or embroidered rose to the front.
Artisan’s Notes
To achieve the “Lattice” look on the dress bodice shown in the vision, use a tapestry needle and the cream yarn to embroider diagonal ‘X’ shapes across the chest area after the dress is complete. This texture adds that essential layer of depth.
Assembly & Final Touches
- Sew the ears low on the head, roughly at eye level, so they frame the face sweetly.
- Attach arms to the body at Rnd 52.
- Embroider a simple ‘Y’ shape nose with pink thread between the eyes.
- Apply a dusting of pink blush to the cheeks using real makeup or fabric pastel.
- Dress the bunny: Shoes first, then dress, then cardigan.
- Stitch the hat in place if you wish, or leave it removable for play.
Tips & FAQs
Q: My head is wobbling. How do I fix this? A: A wobbling head breaks the illusion. Insert a rolled tube of felt or a craft wire inside the neck column before closing the head. Stuff the neck incredibly firmly.
Q: Can I brush the yarn? A: Absolutely. If you use a natural fiber, a gentle brushing with a pet slicker brush will give the bunny a soft, vintage “halo” of fuzz.
A Final Word
There she sits, a quiet companion ready for tea. The magic of the Peony Parlor Bunny is not in the complexity of her stitches, but in the harmony of her colors and the intention of your hands. May she bring grace to whoever holds her.
Yours in creation,
Patricia