A note from Patricia: My dear artisan, you are about to handle the cloud-like wonder that is velvet yarn. It can be slippery, yes, but the result is a creature of pure comfort. We are not just making a doll; we are sculpting a hug. Keep your tension tight, your heart open, and let us bring Willa to life.
About This Creation & The Velvet Advantage
We are leaning entirely into the “squish factor” for Willa. Unlike stiff cotton amigurumi, velvet yarn hides stitches and creates a seamless, fabric-like finish. This project is engineered specifically for bulky chenille-style yarn. We have adjusted the stitch counts to ensure she remains chubby and stable, avoiding the common “wobbly neck” issue that plagues velvet dolls.
The commercial appeal here is undeniable—velvet toys are currently dominating craft fairs because they feel as expensive as they look. Willa is designed with a low center of gravity and an exaggerated “toddler” proportion (large head, small body) to maximize that “aww” reaction from your audience.
Project Snapshot
📊 Difficulty: Intermediate (Working with velvet requires feeling stitches rather than seeing them)
⏰ Est. Time: 4 – 6 Hours
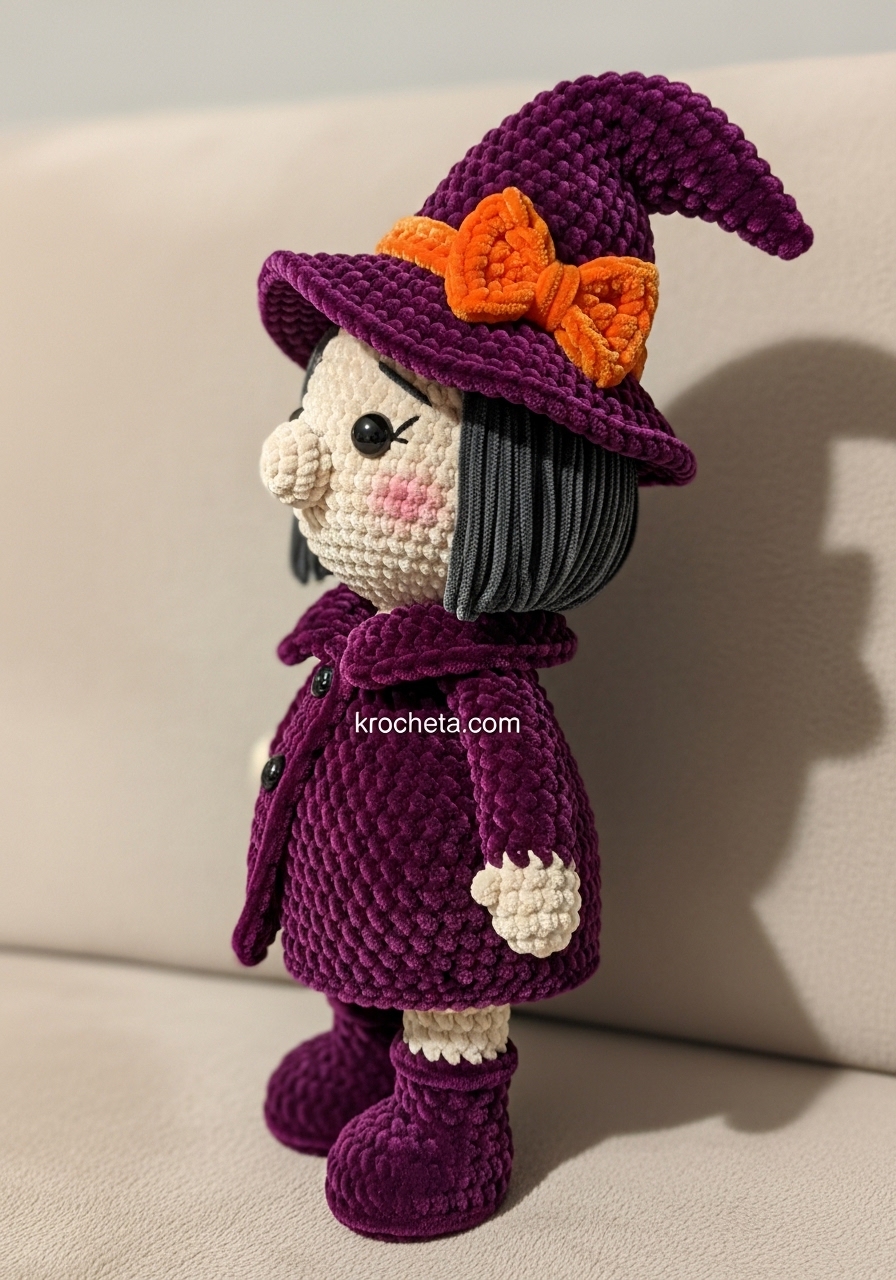
📏 Size: Approx. 9 inches (23 cm) tall using Super Bulky yarn
“Velvet yarn is forgiveness in a skein; it hides your mistakes but demands your trust.” — Patricia Poltera
Materials & Tools Needed
🧶 Yarn: Super Bulky (Category 6) Chenille/Velvet Yarn. colors: Deep Plum (Coat/Hat), Porcelain or Beige (Skin), Charcoal Grey (Hair), Pumpkin Orange (Bow).
🪡 Hook: 4.5mm or 5.0mm (Go smaller than the yarn band suggests to prevent holes).
✨ Other Materials: 14mm or 16mm Safety Eyes (larger eyes for cuteness). Polyester Fiberfill (stuff firmly!). Yarn needle with a large eye. Stitch markers (essential for velvet). Pink blush for cheeks.

Abbreviations & Stitches Used
ch: chain
sl st: slip stitch
sc: single crochet
inc: increase (2 sc in one st)
dec: decrease (invisible decrease preferred)
BLO: back loop only
FLO: front loop only
The Complete Willa Pattern
Component 1: The Chubby Boots & Legs (Make 2) We start with the oversized boots to give her a stable standing base.
Round 1: (Deep Plum) Start 6 sc in a magic ring. (6)
Round 2: inc in each st around. (12)
Round 3: (1 sc, inc) x 6. (18)
Round 4: (BLO) sc in each st around. (18)
Round 5–6: sc in each st around. (18)
Round 7: 5 sc, 4 dec, 5 sc. (14) Shaping the toe
Round 8: 5 sc, 2 dec, 5 sc. (12)
Round 9: (FLO) sc in each st around. Fasten off Plum. (This creates the boot cuff).
Round 9b: (Attach Skin Color in the back loops of Round 8 inside the boot): sc in each st around. (12)
Round 10–12: sc in each st around. (12)
Fasten off the first leg. Make the second leg but DO NOT fasten off.
Component 2: The Body Continuing from the second leg to join.
Round 13: ch 3, join to the first leg with a sc. sc around the first leg (12), sc across the ch-3 (3), sc around the second leg (12), sc across the other side of ch-3 (3). (30)
Round 14: (4 sc, inc) x 6. (36) Widening the hips
Round 15–19: sc in each st around. (36) The chubby tummy
Round 20: (Change to Deep Plum for the coat) (BLO) sc in each st around. (36) The front loops will be used for the skirt later.
Round 21: sc in each st around. (36)
Round 22: (4 sc, dec) x 6. (30)
Round 23: sc in each st around. (30)
Round 24: (3 sc, dec) x 6. (24)
Round 25: sc in each st around. (24)
Round 26: (2 sc, dec) x 6. (18)
Round 27: (Change to Skin Color) (BLO) sc in each st around. (18) Leaving front loops for the collar.
Round 28: sc in each st around. (18)
Stuff the body very firmly here.
Component 3: The Oversized Head Continuing directly from the neck. Do not fasten off.
Round 29: (2 sc, inc) x 6. (24)
Round 30: (3 sc, inc) x 6. (30)
Round 31: (4 sc, inc) x 6. (36)
Round 32: (5 sc, inc) x 6. (42)
Round 33: (6 sc, inc) x 6. (48) Maximum chubbiness achieved
Round 34–44: sc in each st around. (48) Building the forehead height
Insert Safety Eyes between Rounds 38 and 39, roughly 7 stitches apart. Ensure they are low on the face.
Round 45: (6 sc, dec) x 6. (42)
Round 46: (5 sc, dec) x 6. (36)
Round 47: (4 sc, dec) x 6. (30)
Round 48: (3 sc, dec) x 6. (24)
Round 49: (2 sc, dec) x 6. (18)
Round 50: (1 sc, dec) x 6. (12)
Round 51: dec x 6. (6)
Fasten off and weave in the end.
Component 4: Coat Skirt & Collar
The Skirt: Join Deep Plum yarn to the FLO of Round 20 (on the waist). Row 1: ch 2, dc inc in every st around. Join with sl st. Row 2: ch 2, dc in each st around. Join. Fasten off and weave in ends.
The Collar: Join Deep Plum yarn to the FLO of Round 27 (neck). Row 1: (sl st, ch 2, dc in next, ch 2, sl st in next) repeat around to create small scallops.
Component 5: The Arms (Make 2)
Round 1: (Skin Color) 6 sc in MR. (6)
Round 2: (1 sc, inc) x 3. (9)
Round 3–4: sc in each st around. (9)
Round 5: (Change to Deep Plum) sc in each st around. (9)
Round 6–10: sc in each st around. (9)
Round 11: Fold opening flat and sc through both sides to close. (4) Fasten off, leaving a tail for sewing.
Component 6: The Crooked Witch Hat
Round 1: (Deep Plum) 4 sc in MR. (4)
Round 2: (1 sc, inc) x 2. (6)
Round 3: sc in each st around. (6)
Round 4: (1 sc, inc) x 3. (9)
Round 5: sc in each st around. (9)
Round 6: (2 sc, inc) x 3. (12)
Round 7: sc in each st around. (12)
Round 8: (3 sc, inc) x 3. (15)
Round 9: sc in each st around. (15)
Round 10: (4 sc, inc) x 3. (18)
Round 11: (2 sc, inc) x 6. (24)
Round 12: (3 sc, inc) x 6. (30)
Round 13: (4 sc, inc) x 6. (36)
Round 14: (5 sc, inc) x 6. (42)
Round 15: (6 sc, inc) x 6. (48) This matches the head width
Round 16: (FLO) (7 sc, inc) x 6. (54) Brim starts
Round 17: (8 sc, inc) x 6. (60)
Round 18: sc in each st around. (60)
Fasten off.
Artisan’s Note: To get the “crooked” look, you can dampen the tip of the hat and pin it in a bent shape until it dries, or simply tack it down with a single stitch of purple yarn.
Assembly & Final Touches
- Sew Arms: Attach arms at Round 26 of the body, slightly angled forward so she looks like she is asking for a hug.
- Hair: Cut 10-inch strands of Charcoal Grey velvet. Larkshead knot them onto the top of the head (Rounds 50–51) and down the back. Leave the front face clear. Give her a messy bob cut.
- The Bow: Chain 10 with Pumpkin Orange. dc in 3rd ch from hook and across. Fasten off. Wrap yarn tightly around the center to cinch it. Sew to the hat band.
- Blush: Use a real makeup brush and pink blush to gently color her cheeks. Velvet takes pigment beautifully.
Tips & FAQs
- My neck is wobbly! Velvet is heavy. If the head flops, insert a spare crochet hook handle or a tightly rolled tube of felt inside the neck before closing the head.
- The yarn is shedding. This happens with chenille. Singe the ends of the yarn with a lighter (carefully!) before sewing to stop the fluff from sliding off the core string.
A Final Word
There you have it—a little pocket of magic. Willa is more than a pattern; she is a testament to the warmth of our craft. May she bring a smile to whoever is lucky enough to hold her.
Patricia Poltera.