My Dearest Creator,
There is a profound quiet that settles over the workspace when we begin a project meant to mark a life transition. This doll is not merely loops of yarn; it is a witness to years of study, late nights, and the triumph of completion. We are sculpting pride today. Let us work with intention, ensuring every stitch holds the weight of this celebration.
About This Creation & The Heirloom Angle
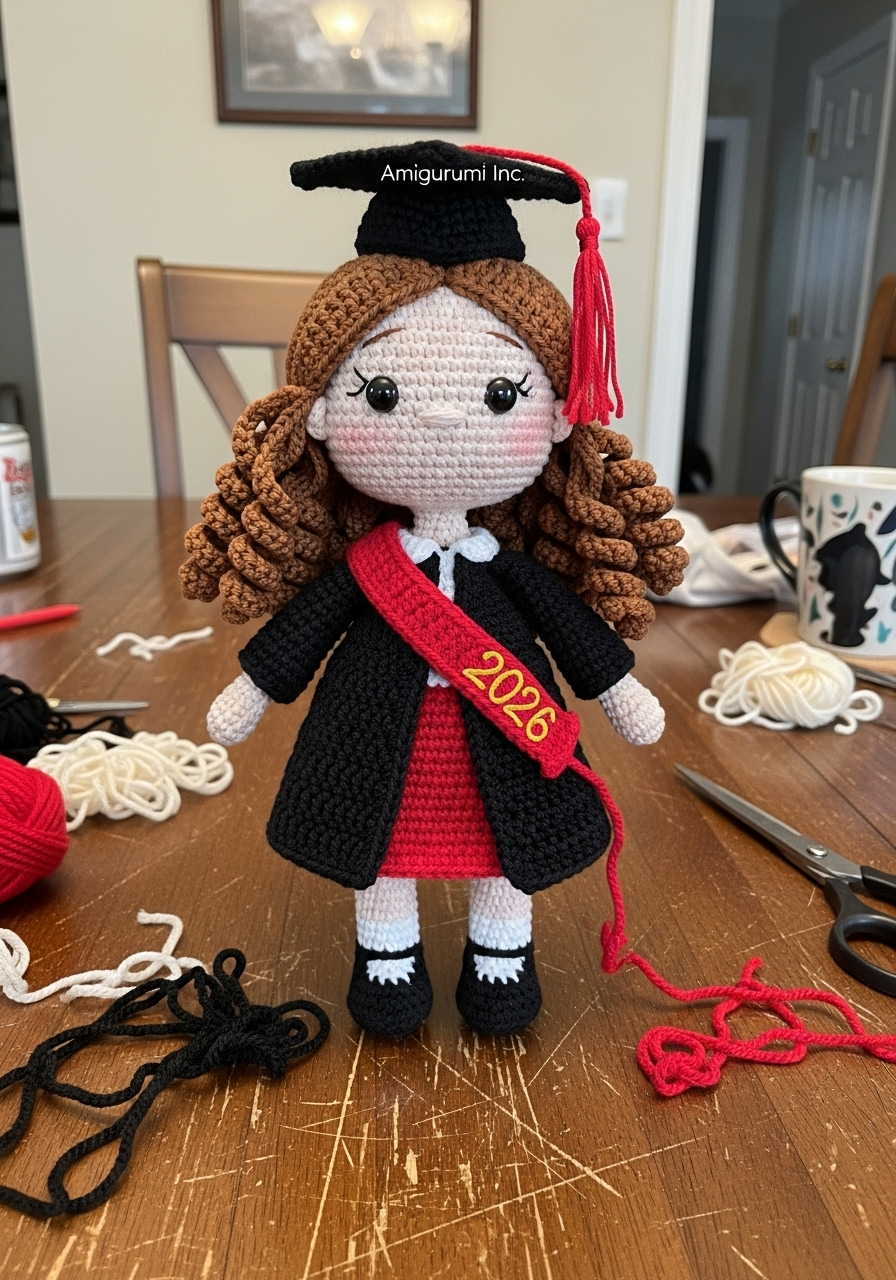
We often search for gifts that speak louder than a greeting card. In the world of amigurumi, “The Valedictorian” serves a dual purpose: it is a display piece for the party and a sentimental anchor for the graduate’s future shelf. By using high-definition stitch work for the curls and a structured, removable wardrobe, we elevate this from a simple toy to a collector’s item. The commercial value here lies in customization—changing the sash colors to match specific universities makes this a highly sought-after commission piece.
Project Snapshot
📊 Difficulty: Intermediate to Advanced (Focus on hair and garment construction)
⏰ Est. Time: 12–15 Hours
📏 Size: Approximately 24cm tall
“We do not rush the tassel, nor do we rush the stitch. Excellence takes time.” — Patricia
Materials & Tools Needed
🧶 Yarn:
- DK or Sport Weight Cotton in Skin Tone (Beige/Fair/Dark), Jet Black (Gown/Cap), Scarlet Red (Dress/Sash), and Chocolate Brown (Hair).
- Gold or Yellow Embroidery Floss (Sash details).
🪡 Hook: 2.25mm or 2.5mm (to keep stitches tight).
✨ Other Materials:
- 10mm Safety Eyes.
- Cardboard or plastic canvas (for Mortarboard structure).
- Fiberfill stuffing.
- Tapestry needle.
- Blush for cheeks.

Abbreviations & Stitches Used
MR: Magic Ring ch: chain sl st: slip stitch sc: single crochet inc: increase (2 sc in one st) dec: decrease (invisible method preferred) hdc: half double crochet BLO: back loop only
The Complete “Valedictorian” Pattern
Component 1: The Legs & Body (The Foundation)
We begin with the shoes, transitioning seamlessly into the legs and torso. Stuff firmly as you go.
Legs (Make 2): Start with Black yarn. R1: 6 sc in MR (6) R2: (inc) x 6 (12) R3-R5: sc around (12) Change to Skin Tone. R6: BLO sc around (12) R7-R20: sc around (12) — Fasten off the first leg. Do not fasten off the second leg.
Joining the Body: R21: From second leg, ch 3, join to first leg with sl st. sc 12 (first leg), sc 3 along chain, sc 12 (second leg), sc 3 along other side of chain. (30) R22-R30: sc around (30) R31: (sc 3, dec) x 6 (24) R32-R35: sc around (24) R36: (sc 2, dec) x 6 (18) R37: sc around (18) — Begin stuffing the body firmly. R38: (sc 1, dec) x 6 (12) R39-R40: sc around (12) — Neck formed. Do not fasten off; continue to Head.
Component 2: The Head (The Gaze of Innocence)
Continued from neck. We expand rapidly to create the “Echo of Youth” proportions.
R41: (inc) x 12 (24) R42: (sc 3, inc) x 6 (30) R43: (sc 4, inc) x 6 (36) R44: (sc 5, inc) x 6 (42) R45: (sc 6, inc) x 6 (48) R46-R55: sc around (48) — Insert safety eyes between R50 and R51, roughly 8 stitches apart. R56: (sc 6, dec) x 6 (42) R57: (sc 5, dec) x 6 (36) R58: (sc 4, dec) x 6 (30) R59: (sc 3, dec) x 6 (24) R60: (sc 2, dec) x 6 (18) — Finish stuffing. R61: (sc 1, dec) x 6 (12) R62: dec x 6 (6) Close hole and weave in end.
Component 3: The Arms (Make 2)
Start with Skin Tone. R1: 5 sc in MR (5) R2: inc x 5 (10) R3-R15: sc around (10) Lightly stuff the hand only. Flatten the top and sc across both sides to close. Leave tail for sewing.
Component 4: The Red Shift Dress (Removable)
Using Red Yarn. Worked in rows first, then joined.
R1: ch 25 (fits around neck/shoulders). R2: sc in 2nd ch from hook and across (24). R3: (sc 2, inc) x 8 (32). R4: (sc 3, inc) x 8 (40). R5 (Armholes): sc 6, ch 4, skip 8, sc 12, ch 4, skip 8, sc 6. R6: sc across, working into chains (32). R7-R15: sc around (32). R16: (sc 3, inc) x 8 (40). R17-R20: sc around (40). Fasten off. Use a small button or snap fastener for the back closure.
Component 5: The Coiffure (Wig Cap & Curls)
Using Brown Yarn. This requires patience, my friend.
Wig Cap: R1: 6 sc in MR (6) R2: inc x 6 (12) R3: (sc 1, inc) x 6 (18) R4: (sc 2, inc) x 6 (24) R5: (sc 3, inc) x 6 (30) R6: (sc 4, inc) x 6 (36) R7: (sc 5, inc) x 6 (42) R8: (sc 6, inc) x 6 (48)
The Curls: Do not cut yarn. We will work strands directly off the edge of the cap. Strand 1-20: ch 45. Start in 2nd ch from hook, sc 2 in each ch all the way back to the cap. sl st into the next stitch on the cap edge. Repeat around. Artisan’s Note: For the fuller look seen in the vision, add a second layer of curls by surface slip stitching a round higher up on the wig cap and repeating the curl process.
Component 6: The Graduation Gown
Using Black Yarn. Worked in rows.
R1: ch 28. R2: sc across (27). R3 (Raglan Split): sc 4, inc, sc 4, inc, sc 9, inc, sc 4, inc, sc 4. R4: sc across. R5 (Sleeves): sc 5, ch 6 (loose), skip 6, sc 11, ch 6, skip 6, sc 5. R6: sc across including chains. R7-R18: sc across. R19 (Hem): ch 3, sl st in next st repeat across to create the decorative texture.
Sleeves: Join black yarn to the armhole. sc around for 10 rounds. Finish with the same ch 3, sl st border.
Component 7: The Mortarboard & Regalia
The Cap: Top: Make two squares. (Row 1: ch 11, sc 10. Repeat for 10 rows). Sandwich a piece of cardboard between them and sc around the edges to seal. Skullcap: Follow Head pattern R1-R5. Sew this to the underside of the square. Tassel: Cut 10 strands of Red yarn (10cm). Fold in half, tie at top, wrap neck. Attach to center of square.
The Sash: R1: With Red, ch 40. R2: hdc in 3rd ch from hook and across. Fasten off. Use Gold floss to embroider the year (e.g., “2 0 2 6”) vertically on the sash tips.
Assembly & Final Touches
- Sew Arms: Attach arms to the body at R38.
- Hair: Sew the wig cap onto the head. Arrange curls so they frame the face; you may tack down a few front curls with a tiny stitch to keep them out of the eyes.
- Face: Embroider a small nose between the eyes using Skin color. Apply blush generously to the cheeks.
- Dressing: Put on the red dress, then the black gown. Place the sash over the shoulders.
- Cap: You may sew the cap to the hair for stability, or use a pin to keep it removable.
Tips & FAQs
Q: How do I make the curls tighter? A: Use a hook one size smaller for the curls than you did for the body. The tension creates the spring.
Q: Can I change the gown size? A: If using thicker yarn, skip the increase rows on the dress/gown to ensure it doesn’t become too bulky.
A Final Word
You have stitched a memory. When this doll is gifted, it will stand as a reminder of resilience and achievement. Take a moment to admire the texture of the hair and the drape of the gown—you have done magnificent work.
With admiration, Patricia