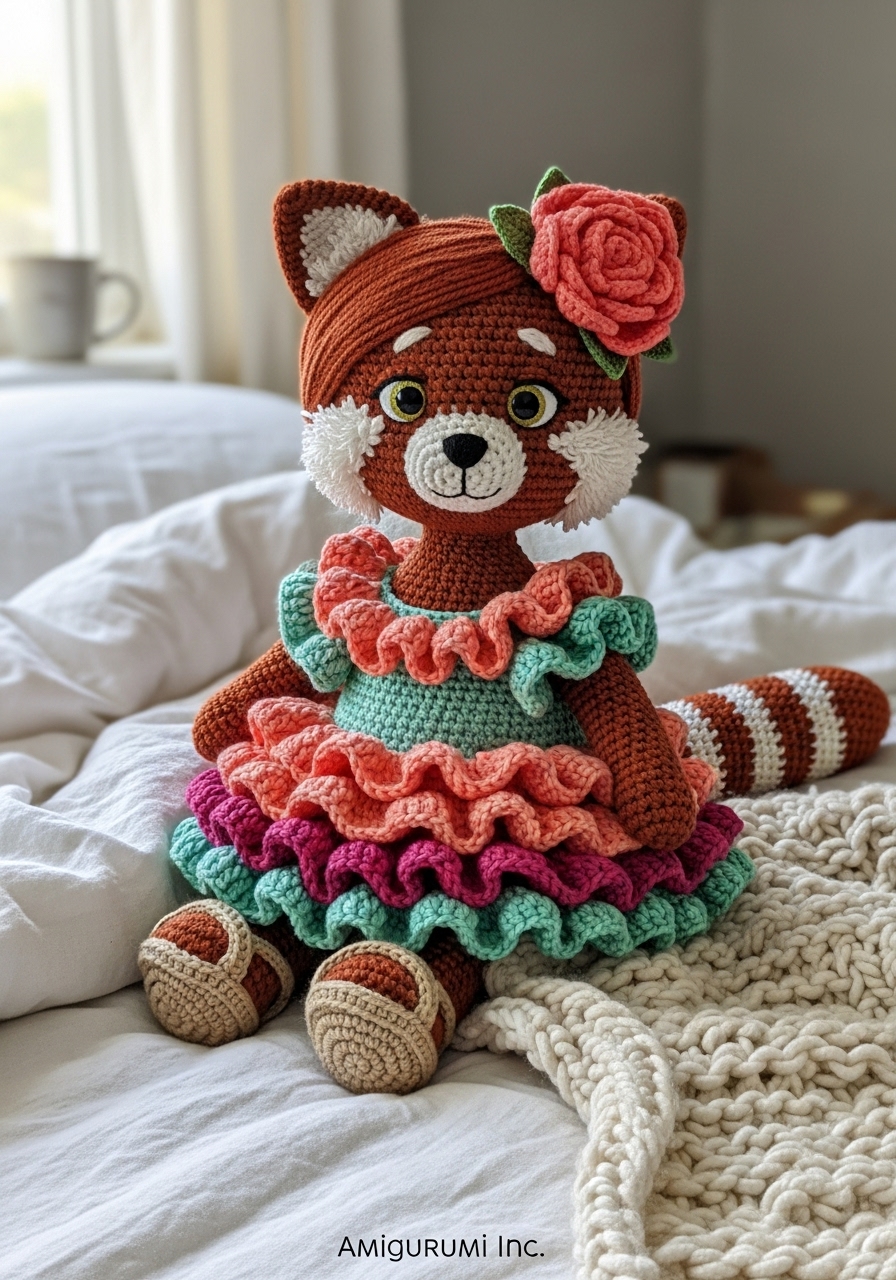
It brings me immense joy to see you pick up your hook for such a charismatic muse. Rosie is not merely a toy; she is a celebration of texture and color, designed to evoke a smile from anyone who meets her gaze. We shall build her with patience, ensuring her ruffles cascade perfectly and her expression remains soft and inviting.
About This Creation & The Artisan’s Angle
We are departing from the standard bear or bunny to embrace the Red Panda—a creature of natural wonder. The “Artisan Angle” here is the marriage of organic animal shaping with high-fashion crochet techniques. Specifically, we are focusing on “The Cascade Effect” in the skirt. By working in specific loops, we create a dress that feels voluminous and alive, rather than stiff. This project is perfect for using up scrap yarn for the flower and dress tiers, making it as economical as it is beautiful.
Project Snapshot:
📊 Difficulty: Intermediate (Focus on color changes and ruffle attachment)
⏰ Est. Time: 12–15 Hours of dedicated crafting
📏 Size: Approximately 28cm (11 inches) tall
“The soul of the amigurumi lives in the eyes; place them with intention.” — Patricia
Materials & Tools Needed
🧶 Yarn: Sport or DK Weight Cotton. Colors: Rust Orange (Main), Cream (Mask/Ears), Dark Brown (Legs/Ears), Coral (Dress Main), Mint Green (Ruffle Accent), Deep Pink (Ruffle Accent).
🪡 Hook: 2.50mm (or size needed for tight tension)
✨ Other Materials: 12mm Safety Eyes (Black) Fiberfill stuffing Tapestry needle Stitch markers Small amount of black embroidery thread

Abbreviations & Stitches Used
ch: chain
sl st: slip stitch
sc: single crochet
inc: increase (2 sc in one st)
dec: decrease (invisible decrease preferred)
BLO: back loop only
FLO: front loop only
hdc: half double crochet
dc: double crochet
The Complete Rosie the Red Panda Pattern
The Head (The Seat of Expression)
Work in Rust Orange. We focus on a “Baby Schema” shape—wide and low.
Round 1: 6 sc in a magic ring (6)
Round 2: inc in all 6 st (12)
Round 3: (1 sc, inc) x 6 (18)
Round 4: (2 sc, inc) x 6 (24)
Round 5: (3 sc, inc) x 6 (30)
Round 6: (4 sc, inc) x 6 (36)
Round 7: (5 sc, inc) x 6 (42)
Round 8: (6 sc, inc) x 6 (48)
Round 9: (7 sc, inc) x 6 (54)
Round 10: (8 sc, inc) x 6 (60)
Round 11–16: sc in all 60 st (60)
Color Change Note: We will now introduce Cream for the face mask. Change colors on the last loop of the previous stitch.
Round 17: 24 sc (Rust), 12 sc (Cream), 24 sc (Rust) (60)
Round 18: 23 sc (Rust), 14 sc (Cream), 23 sc (Rust) (60)
Round 19–21: 22 sc (Rust), 16 sc (Cream), 22 sc (Rust) (60)
Cheek Shaping Round
Round 22: 12 sc, (inc, 1 sc) x 3, 5 sc, 16 sc (Cream), 5 sc (Rust), (1 sc, inc) x 3, 13 sc (66)
Round 23–25: Maintain color pattern. sc in all 66 st (66)
Round 26: (9 sc, dec) x 6 (60) Switch back to fully Rust Orange here
Round 27: (8 sc, dec) x 6 (54)
Round 28: (7 sc, dec) x 6 (48)
Round 29: (6 sc, dec) x 6 (42)
Insert safety eyes between Rounds 19 and 20, spaced about 9 stitches apart (within the Cream section).
Round 30: (5 sc, dec) x 6 (36)
Round 31: (4 sc, dec) x 6 (30)
Round 32: (3 sc, dec) x 6 (24)
Fasten off, leaving a long tail for sewing. Stuff firmly, emphasizing the cheeks.
The Ears (Make 2)
Start with Dark Brown.
Round 1: 6 sc in magic ring (6)
Round 2: (1 sc, inc) x 3 (9)
Round 3: (2 sc, inc) x 3 (12)
Round 4: (3 sc, inc) x 3 (15)
Round 5: (4 sc, inc) x 3 (18)
Round 6–8: sc in all 18 st (18)
Change to Rust Orange.
Round 9–10: sc in all 18 st (18)
Fold flat and sc across the opening to close. Do not stuff.
The Legs & Body (Worked as one piece)
Legs (Make 2) – Start with Dark Brown.
Round 1: 6 sc in magic ring (6)
Round 2: inc in all 6 st (12)
Round 3: (1 sc, inc) x 6 (18)
Round 4–6: sc in all 18 st (18)
Round 7: (4 sc, dec) x 3 (15)
Round 8–12: sc in all 15 st (15)
Fasten off first leg. Do not fasten off second leg. Chain 3, join to first leg with a sl st.
Body (Continuing from joined legs) – Switch to Rust Orange.
Round 13: 15 sc (leg 1), 3 sc (chain), 15 sc (leg 2), 3 sc (chain) (36)
Round 14: (5 sc, inc) x 6 (42)
Round 15–19: sc in all 42 st (42)
Round 20: (5 sc, dec) x 6 (36)
Round 21–23: sc in all 36 st (36)
Round 24: (4 sc, dec) x 6 (30)
Round 25–26: sc in all 30 st (30)
Round 27: (3 sc, dec) x 6 (24)
Round 28: sc in all 24 st (24)
Fasten off. Stuff firmly.
The Arms (Make 2)
Start with Dark Brown.
Round 1: 6 sc in magic ring (6)
Round 2: (1 sc, inc) x 3 (9)
Round 3–12: sc in all 9 st (9)
Switch to Rust Orange.
Round 13–15: sc in all 9 st (9)
Fold flat and sc across opening.
The Tail (The Signature)
Start with Rust Orange. We will stripe with Dark Brown every 3 rounds.
Round 1: 6 sc in magic ring (6)
Round 2: inc in all 6 st (12)
Round 3: (1 sc, inc) x 6 (18)
Round 4: (2 sc, inc) x 6 (24)
Round 5–20: sc in all 24 st, alternating colors every 3 rounds.
Round 21: (2 sc, dec) x 6 (18)
Round 22: (1 sc, dec) x 6 (12)
Stuff lightly.
The Flamenco Dress (Removable)
Use Coral Yarn.
Row 1: ch 25 (measure against doll’s neck), turn.
Row 2: sc in 2nd ch from hook and across (24)
Row 3: (2 sc, inc) x 8 (32)
Row 4: (3 sc, inc) x 8 (40)
Row 5 (Armholes): 6 sc, ch 6 (skip 8 st), 12 sc, ch 6 (skip 8 st), 6 sc (36)
Row 6–10: sc in all 36 st. Join to first st to work in rounds now.
Round 11: (BLO) (2 sc, inc) around (48)
Round 12–15: sc in all 48 st.
The Ruffles (Work in the front loops left exposed or surface crochet)
Ruffle 1 (Bottom Hem): (ch 3, 2 dc in next st, 1 dc in next st) repeat around. This creates a wave.
Ruffle 2 (Attach yarn to Round 11 Front Loops in Mint Green): Repeat Ruffle pattern.
Ruffle 3 (Attach midway up skirt in Deep Pink): Repeat Ruffle pattern.
The Rose Headpiece
Use Pink/Coral.
Row 1: ch 40.
Row 2: dc in 4th ch from hook. ch 1, skip 1 ch, (dc, ch 1, dc) in next ch. Repeat across.
Row 3: 5 dc in the ch-1 space, sl st in the space between V-stitches. Repeat across.
Coil the strip into a flower shape and stitch the base securely.
Assembly & Final Touches
- 🧵 The Face: Embroider a small triangle nose in Dark Brown between the eyes. Use white thread to add a small line under the eyes for brightness.
- 🧵 The Limbs: Sew arms to Round 27 of the body. Sew legs securely if not using the continuous method (though our pattern joined them!).
- 🧵 The Tail: Attach the tail to the lower back, ensuring Rosie can sit using the tail as a tripod support.
- 🧵 The Dress: Slide the dress onto Rosie. Adjust the ruffles so they lay overlapping.
Tips & FAQs
❓ My head is wobbling. Ensure you stuff the neck area very firmly, almost to the point of resistance. You can also use a shortened pipe cleaner inside the neck for stability.
❓ The ruffles are curling too much. Wet blocking is your friend here. Pin the ruffles flat and spray with water, letting them dry overnight.
A Final Word There she stands—Rosie, a vision in ruffles and rust. I hope this project brought a sense of playfulness to your hands. Remember, the beauty of the handmade lies in the small imperfections that say, “I was made with love.” Until we meet again in the atelier.