
Welcome back to the worktable. There is a hush in the room today, a reverent quiet as we prepare to bring a classic story to life. This project is dear to my heart because it captures that specific moment of childhood where magic feels tangible. She is not just a doll; she is a keeper of stories.
About This Creation & The Heirloom Angle
We often crochet for the joy of the process, but the Orchard Princess is designed with “Legacy” in mind. By combining the Gaze of Innocence (low, wide-set eyes) with premium cotton yarn, we move beyond simple toys into the category of display-worthy art.
The commercial value here lies in the “Gift of Nostalgia.” Whether for a new baby or a collector, this design triggers an immediate emotional connection. The structure is robust, using a continuous body-to-head technique that ensures her head stays perky and proud for years, avoiding the dreaded “wobbly neck” syndrome common in lesser patterns.
Project Snapshot:
📊 Difficulty: Intermediate (Color changes & hair assembly)
⏰ Est. Time: 8–10 Hours
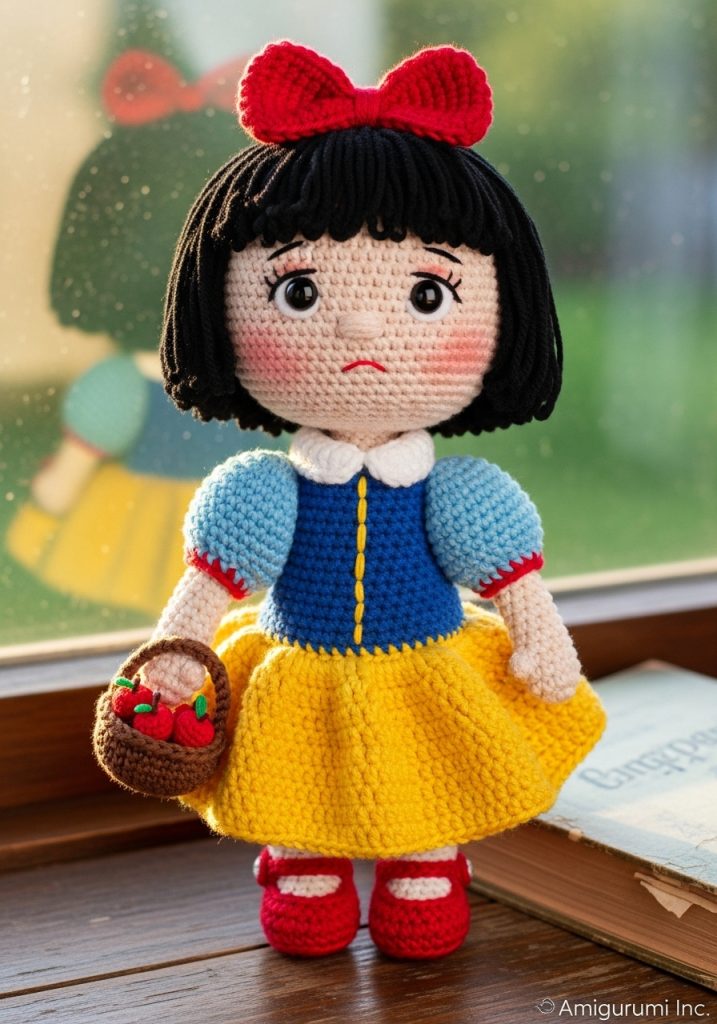
📏 Size: Approx. 14cm tall (using sport weight yarn)
“The soul of the doll is in the eyes. Place them with intention, not by calculation alone.” — Patricia
Materials & Tools Needed
🧶 Yarn: High-quality Sport or DK Weight Cotton.
- Skin Tone (Milky Cream)
- Midnight Black (Hair)
- Royal Blue (Bodice)
- Buttercup Yellow (Skirt)
- Ruby Red (Bow, Apples, Shoes)
- Snow White (Collar)
- Espresso Brown (Basket)
🪡 Hook: 2.0mm or 2.25mm (we want a dense fabric with no gaps)
✨ Other Materials:
- 8mm or 9mm Safety Eyes
- Fiberfill Stuffing (high loft)
- Yarn Needle
- Stitch Markers
- Pink Blush or Fabric Paint (for cheeks)
- Small piece of cardboard (for basket base)
Abbreviations & Stitches Used
ch: chain
sl st: slip stitch
sc: single crochet
inc: increase (2 sc in one st)
dec: decrease (invisible decrease preferred)
hdc: half double crochet
dc: double crochet
BLO: back loop only
FLO: front loop only
The Complete Orchard Princess Pattern
Component 1: The Royal Head (Skin Tone)
Shape note: We are creating a “Baby Schema” shape—wide at the bottom, slightly flatter at the top.
🧶 Round 1: 6 sc in a magic ring (6)
🧶 Round 2: inc in all 6 st (12)
🧶 Round 3: (1 sc, inc) x 6 (18)
🧶 Round 4: (2 sc, inc) x 6 (24)
🧶 Round 5: (3 sc, inc) x 6 (30)
🧶 Round 6: (4 sc, inc) x 6 (36)
🧶 Round 7: (5 sc, inc) x 6 (42)
🧶 Round 8: (6 sc, inc) x 6 (48)
🧶 Rounds 9–18: sc in all 48 st (10 rounds for forehead height)
🧶 Round 19: (The Cheeks) 12 sc, (inc, 1 sc) x 6, 6 sc, (inc, 1 sc) x 6, 6 sc (60) — This creates the chubby cheek profile.
🧶 Rounds 20–24: sc in all 60 st (5 rounds)
Insert safety eyes between Rounds 19 and 20, roughly 9 stitches apart. Position them in the “indent” before the cheek increases start.
🧶 Round 25: (8 sc, dec) x 6 (54)
🧶 Round 26: (7 sc, dec) x 6 (48)
🧶 Round 27: (6 sc, dec) x 6 (42)
🧶 Round 28: (5 sc, dec) x 6 (36)
🧶 Round 29: (4 sc, dec) x 6 (30)
🧶 Round 30: (3 sc, dec) x 6 (24)
🧶 Round 31: (2 sc, dec) x 6 (18)
Stuff firmly, focusing on pushing stuffing into the cheeks.
Component 2: The Legs & Body (Start with Red for Shoes)
Make 2 Legs
🧶 Round 1: (Red) 6 sc in magic ring (6)
🧶 Round 2: inc in all st (12)
🧶 Round 3: (1 sc, inc) x 6 (18)
🧶 Round 4: BLO sc in all 18 st (sole definition)
🧶 Round 5: sc in all 18 st
🧶 Round 6: 5 sc, 4 dec, 5 sc (14) — Toe shaping
🧶 Round 7: (Change to Skin Tone) BLO 5 sc, 2 dec, 5 sc (12)
🧶 Rounds 8–14: sc in all 12 st (7 rounds)
Change to White (Undergarments) for the second leg joining.
Join Legs: crochet 3 ch between legs, join to start of first leg.
🧶 Round 15: sc around both legs and chains (30 sc total)
🧶 Rounds 16–18: sc in all 30 st
🧶 Round 19: (Change to Yellow) BLO sc in all 30 st (Leave front loops for skirt later)
🧶 Rounds 20–22: sc in all 30 st
🧶 Round 23: (Change to Royal Blue) sc in all 30 st
🧶 Round 24: (BLO) sc in all 30 st
🧶 Round 25: sc in all 30 st
🧶 Round 26: (3 sc, dec) x 6 (24)
🧶 Rounds 27–29: sc in all 24 st
🧶 Round 30: (2 sc, dec) x 6 (18)
Stuff body firmly.
Component 3: The Ballgown Skirt (Yellow)
Attach yellow yarn to the Front Loops left at Round 19 of the body, creating the skirt downwards.
🧶 Round 1: 3 dc in every loop (creates massive volume)
🧶 Round 2: dc in all st
🧶 Round 3: (2 dc, inc) around
🧶 Rounds 4–10: dc in all st until desired length (approx 14cm total height)
Fasten off and weave in ends.
Component 4: The Puff Sleeves & Arms (Make 2)
Start with Skin Tone
🧶 Round 1: 5 sc in magic ring
🧶 Rounds 2–8: sc in all 5 st
🧶 Round 9: (Change to Light Blue) inc in all 5 st (10)
🧶 Round 10: (inc, 1 sc) x 5 (15)
🧶 Rounds 11–13: sc in all 15 st (The Puff)
🧶 Round 14: (1 sc, dec) x 5 (10)
🧶 Round 15: dec x 5 (5)
Sew onto body at shoulder height.
Component 5: The Iconic Hair (Black)
🧶 Round 1: 6 sc in magic ring
🧶 Round 2: inc in all st (12)
🧶 Round 3: (1 sc, inc) x 6 (18)
…Continue increasing until you reach 48 st (Matches head width).
🧶 Rounds 9–15: sc in all 48 st
Bangs/Front: ch 2, dc in next 10 st, sl st (creates the side sweep).
Sew wig cap to head. Embroider small red teardrops on the sleeves.
Component 6: The Accessories
The Bow (Red): Ch 15, dc in 3rd ch from hook and across. Turn, ch 2, dc across. Repeat for 4 rows. Pinch the center and wrap yarn tightly to create the bow shape. Sew to headband or directly to hair.
The Apple (Red): Standard ball: 6 sc / 12 / 18 / 18 / 18 / 12 / 6. Pull tight. Add a tiny green yarn leaf.
The Basket (Brown): Start with an oval base (ch 6, sc around). Work BLO for the sides to build height. Add a handle (ch 15, sc back along chain).
Assembly & Final Touches
- Head to Body: Use the yarn tail from the neck to sew the head to the body. Keep stitches tight to prevent wobbling.
- Face: Using dark brown thread, embroider eyebrows slightly slanted upwards (the “worried/innocent” look). Apply blush to the cheeks.
- Collar: Surface crochet a line of white sc around the back of the neck (using the white loops from the body change) to create the standing collar.
- Details: Embroider a vertical yellow line down the center of the blue bodice.
Tips & FAQs
❓ My head is wobbling! Ensure you stuff the neck very firmly, almost to the point where it feels too hard. You can also insert a rolled-up piece of felt inside the neck for stability.
❓ The skirt isn’t flaring enough. Blocking helps! Mist the skirt with water and pin it open in a fan shape until dry.
A Final Word
There she sits, a small princess from the orchard, ready to bring charm to a shelf or comfort to a child. You have stitched patience and love into every loop. Stand back and admire your handiwork; you have created a classic.