My Dearest Maker,
There is a quiet magic in creating something that feels as though it has already been loved for generations. Milo is not just a toy; he is a keeper of secrets, a silent friend with eyes full of wonder. I have written this guide to help you capture that specific, fleeting innocence—the kind found in old storybooks and childhood memories. Let your hook move with patience, for we are stitching a soul, not just a shape.
About This Creation
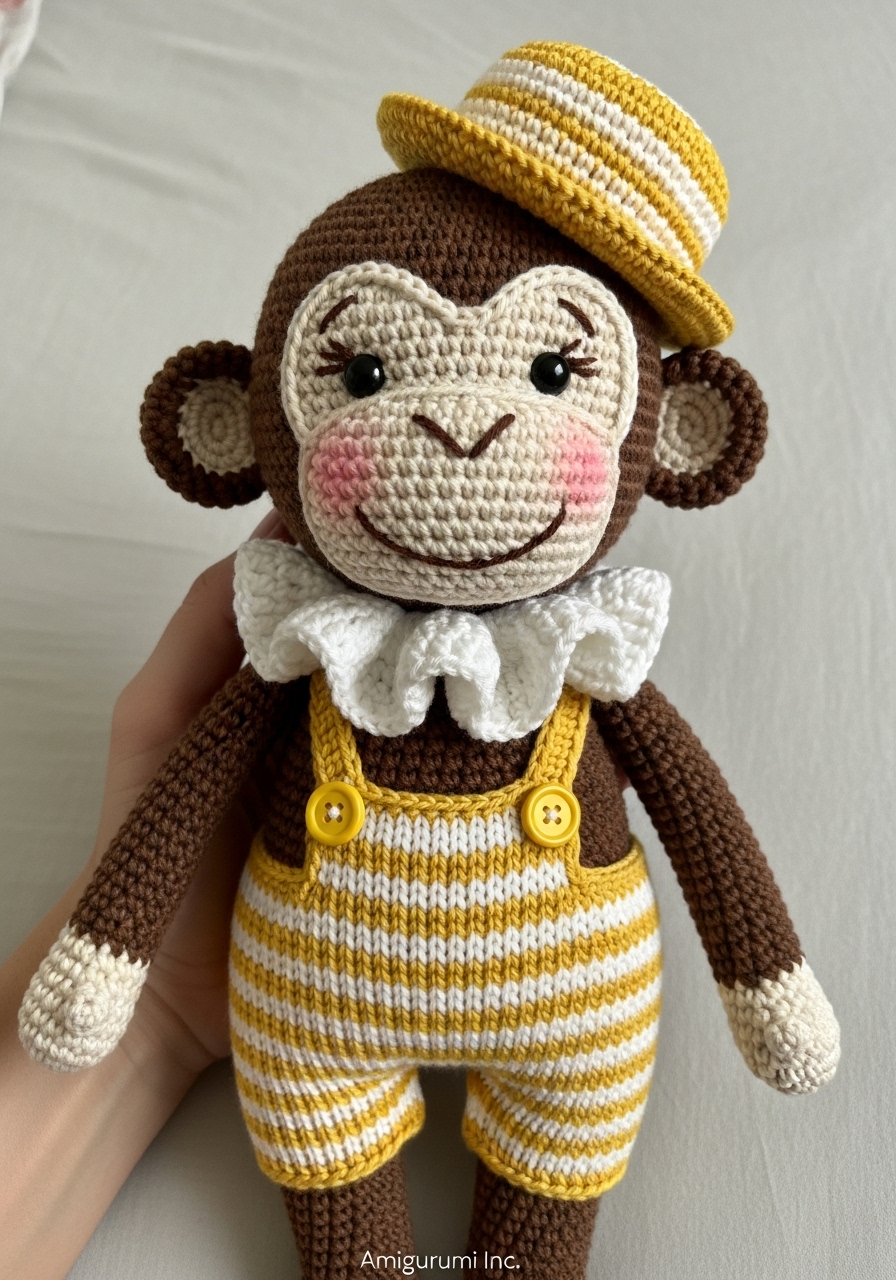
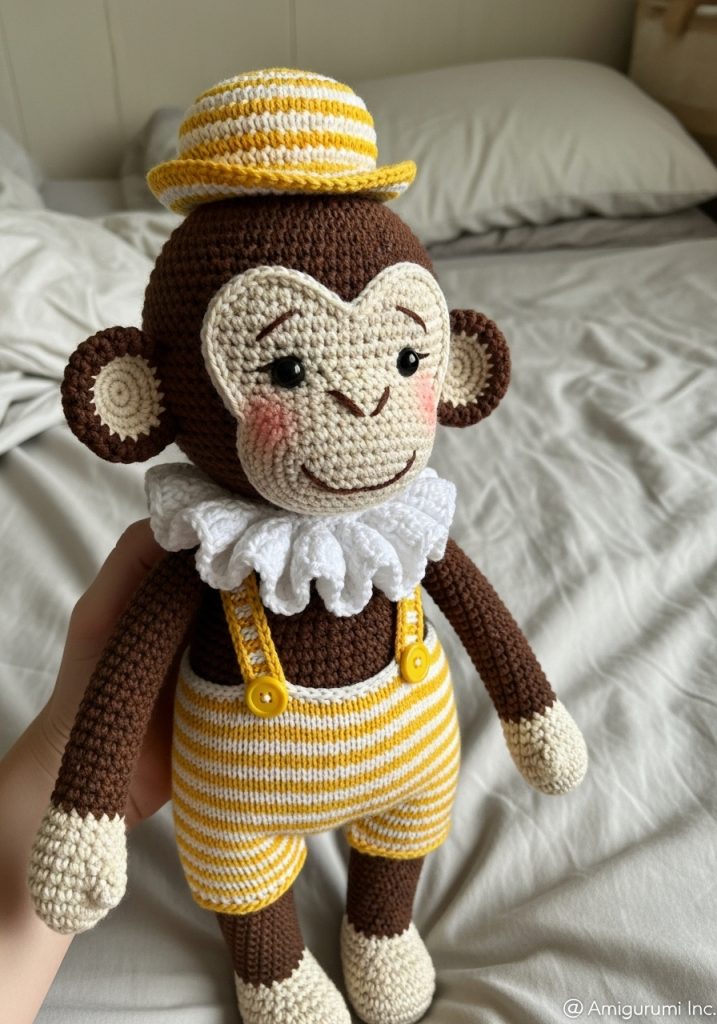
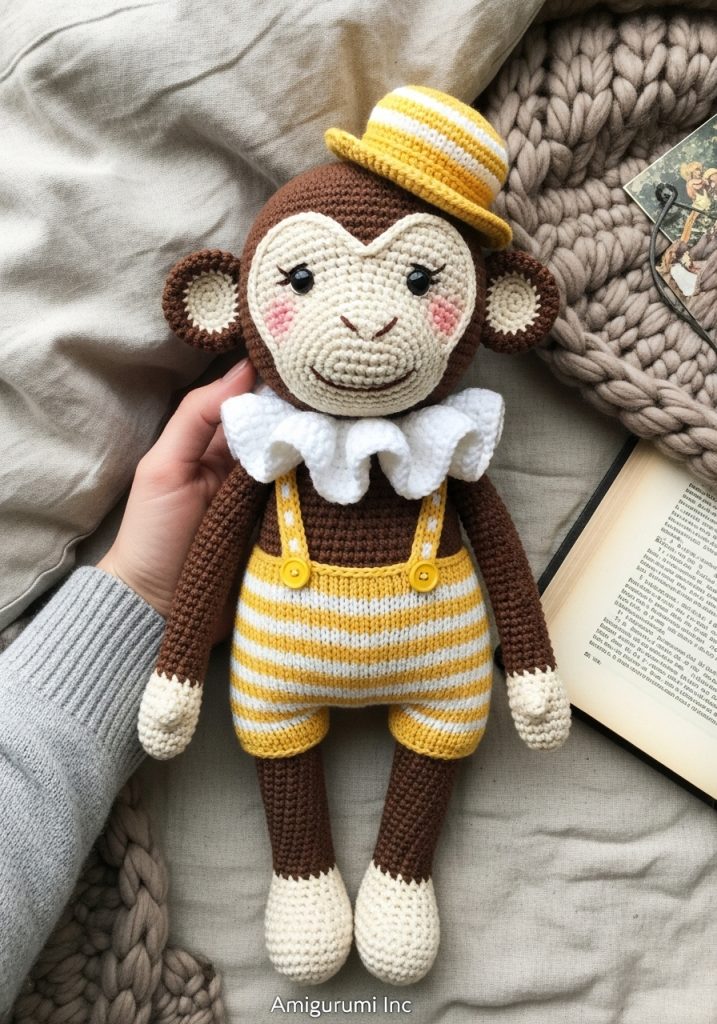
Milo, our Vintage Dreamer, draws inspiration from classic circus memorabilia and the “teddy bear style” of the early 20th century. Unlike modern, hyper-stylized amigurumi, Milo relies on “The Embrace of Softness”—rounded cheeks, low-set eyes, and a pear-shaped body that demands to be held.
We are using a “Face Mask” technique here. Instead of complex color changes within the head rounds, we will crochet a separate heart-shaped face patch. This allows for that distinct, expressive widow’s peak and defined eye placement that gives him his soulful gaze. The wardrobe—a ruffled Pierrot collar and a striped romper—adds texture and color without overwhelming the character’s sweet nature.
Project Snapshot
📊 Difficulty: Intermediate (requires sewing and color work)
⏰ Est. Time: 12–15 Hours
📏 Size: Approx. 25cm (10 inches) tall
“A toy becomes real when it is loved, but first, it must be crafted with love.” — Patricia
Materials & Tools Needed
🧶 Yarn: Sport or DK weight cotton blend.
- Cocoa Brown: 100g (Body, Head, Limbs)
- Cream/Biscuit: 50g (Face, Hands, Feet)
- Mustard Yellow: 50g (Romper, Hat)
- White: 30g (Collar, Stripes)
🪡 Hook: 2.25mm or 2.5mm (to ensure tight stitches)
✨ Other Materials:
- 9mm or 10mm Safety Eyes (Black)
- Fiberfill stuffing
- Tapestry needle (long)
- Pink blush or soft pastel chalk
- Two small yellow buttons (approx. 6mm)
- Stitch markers
Abbreviations & Stitches Used
ch: chain
sl st: slip stitch
sc: single crochet
inc: increase (2 sc in one st)
dec: decrease (invisible decrease preferred)
hdc: half double crochet
dc: double crochet
BLO: back loop only
FLO: front loop only
The Complete Milo Pattern
The Head (Cocoa Brown)
We begin with the cranium, creating a large, gentle sphere.
R1: Start 6 sc in a magic ring (6)
R2: Inc in all 6 sts (12)
R3: (Sc 1, inc) x 6 (18)
R4: (Sc 2, inc) x 6 (24)
R5: (Sc 3, inc) x 6 (30)
R6: (Sc 4, inc) x 6 (36)
R7: (Sc 5, inc) x 6 (42)
R8: (Sc 6, inc) x 6 (48)
R9: (Sc 7, inc) x 6 (54)
R10: (Sc 8, inc) x 6 (60)
R11–R22: Sc in each st around (60) [12 rounds for a deep forehead]
R23: (Sc 8, dec) x 6 (54)
R24: (Sc 7, dec) x 6 (48)
R25: (Sc 6, dec) x 6 (42)
R26: (Sc 5, dec) x 6 (36)
R27: (Sc 4, dec) x 6 (30)
R28: (Sc 3, dec) x 6 (24)
Start stuffing firmly here, shaping it to be round and full.
R29: (Sc 2, dec) x 6 (18)
Fasten off, leaving a long tail for sewing.
The Face Mask (Cream/Biscuit)
This piece creates the monkey’s facial features. We work in rows and rounds to create a heart shape.
R1: Ch 11, start in 2nd ch from hook. Sc 9, 3 sc in last ch. Turn to work other side of ch: Sc 8, inc in last st (22)
R2: Inc, sc 8, (inc) x 3, sc 8, (inc) x 2 (28)
R3: Sc 1, inc, sc 8, (sc 1, inc) x 3, sc 8, (sc 1, inc) x 2 (34)
R4: Sc 2, inc, sc 8, (sc 2, inc) x 3, sc 8, (sc 2, inc) x 2 (40)
R5: Sc 3, inc, sc 8, (sc 3, inc) x 3, sc 8, (sc 3, inc) x 2 (46)
R6–R8: Sc around (46)
R9: Creating the widow’s peak: Sc 15, hdc 2, dc 4, sl st, dc 4, hdc 2, sc 18. (This forms the top curves of the heart).
Fasten off. Leave a very long tail for sewing. Insert safety eyes into this mask between R6 and R7, roughly 10 stitches apart, before sewing to the head.
The Ears (Make 2)
Inner Ear (Cream): R1: 6 sc in MR (6) R2: Inc around (12) Fasten off.
Outer Ear (Brown): R1: 6 sc in MR (6) R2: Inc around (12) R3: (Sc 1, inc) x 6 (18) Do not cut yarn. Place Inner Ear against Outer Ear (wrong sides facing). R4: Crochet through both layers with Brown: (Sc 2, inc) x 6 (24). Fasten off, leave tail for sewing.
The Body (Cocoa Brown)
R1: 6 sc in MR (6)
R2: Inc around (12)
R3: (Sc 1, inc) x 6 (18)
R4: (Sc 2, inc) x 6 (24)
R5: (Sc 3, inc) x 6 (30)
R6: (Sc 4, inc) x 6 (36)
R7: (Sc 5, inc) x 6 (42)
R8: (Sc 6, inc) x 6 (48)
R9–R15: Sc around (48) [7 rounds for a chubby tummy]
R16: (Sc 6, dec) x 6 (42)
R17–R18: Sc around (42)
R19: (Sc 5, dec) x 6 (36)
R20–R21: Sc around (36)
R22: (Sc 4, dec) x 6 (30)
R23: Sc around (30)
R24: (Sc 3, dec) x 6 (24)
R25: (Sc 2, dec) x 6 (18)
Fasten off. Stuff firmly, keeping the belly rounded.
The Arms (Make 2)
Start with Cream (Hands):
R1: 6 sc in MR (6)
R2: (Sc 1, inc) x 3 (9)
R3–R5: Sc around (9)
Change to Brown:
R6–R18: Sc around (9) [Make them long and slender]
R19: Flatten opening and sc through both sides to close.
The Legs (Make 2)
Start with Cream (Feet):
R1: 6 sc in MR (6)
R2: Inc around (12)
R3–R5: Sc around (12)
Change to Brown:
R6–R15: Sc around (12)
R16: (Sc 2, dec) x 3 (9)
R17: Flatten opening and sc through both sides to close.
The Tail (Cocoa Brown)
R1: 6 sc in MR (6) R2–R25: Sc around (6). Stuff lightly only at the tip. Flatten opening and sc to close.
The Pierrot Collar (White)
R1: Ch 20 (ensure this fits loosely around the neck), sl st to join.
R2: Ch 2, 3 dc in each ch around. Sl st.
R3: Ch 2, 2 dc in each st around. Sl st. (This creates a very dense ripple).
R4: Ch 1, (sc, ch 2, sc) in each st for a picot edge. Fasten off.
The Striped Romper (Yellow & White)
Work in joined rounds. Start with Yellow.
R1: Ch 48, join to form a circle.
R2 (Yellow): Sc around (48)
R3 (White): Sc around (48)
R4 (Yellow): Sc around (48)
R5 (White): Sc around (48)
R6 (Yellow): Sc around (48)
R7 (White): Sc around (48)
R8 (Yellow): Leg Division: Sc 24, skip remaining sts, join to first st to form first leg hole.
R9 (Yellow): Sc around the 24 sts of the first leg.
R10 (White): Sc around (24).
R11 (Yellow): Sc around (24). Fasten off.
Second Leg: Join Yellow yarn at the remaining 24 stitches of R8. Repeat R9–R11.
Bib: Join Yellow at center front of waist. Work 10 sc across. Turn. Work 4 rows of sc.
Straps: Ch 15 from top corners of bib. Sew to back of waist pants. Attach buttons to front of bib.
The Petite Hat (Yellow & White)
R1 (Yellow): 6 sc in MR (6)
R2 (Yellow): Inc around (12)
R3 (White): (Sc 1, inc) x 6 (18)
R4 (Yellow): BLO Sc around (18) [This turns the edge]
R5 (White): Sc around (18)
R6 (Yellow): Sc around (18)
R7 (Yellow): FLO (Sc 2, inc) x 6 (24) [Brim]
R8 (Yellow): (Sc 3, inc) x 6 (30)
Fasten off.
Assembly & Final Touches
- Face Assembly: Pin the Cream Face Mask onto the Brown Head. It should sit low, giving him a “high forehead” look. Sew in place.
- Eyes: If you haven’t inserted safety eyes, embroider them now or sew on beads.
- Expression: Use thin black thread to embroider a simple nose and a small, straight mouth line on the mask. Apply blush to the cheeks—don’t be shy, the rosy cheeks are his signature!
- Ears: Sew ears to the side of the head, aligned with the eyes.
- Body & Limbs: Sew head to body. Attach arms at the neck seam. Attach legs at the bottom of the body (slightly forward so he can sit). Attach tail to lower back.
- Dressing: Put on the romper (pull gently over legs), button the straps. Tie the collar around the neck. Place the hat on the head (you may stitch it in place if desired).
Tips & FAQs
Q: My face mask looks lumpy. Why?
A: Ensure you are stuffing the head very firmly behind the mask area. The mask itself is flat, but it conforms to the round head. Pinning heavily before sewing is crucial.
Q: Can I use acrylic yarn?
A: You may, but for that true “vintage matte” finish, a cotton or cotton-blend yarn is superior. It reduces fuzz and holds the shape of the tiny fingers and toes better.
A Final Word
And there he sits—Milo. Do you see how the collar frames his face? That is the touch of the artisan. I hope this project brings a quiet hush to your busy day. May his little button eyes watch over your home with kindness.
Until we meet again at the crafting table,
Patricia