
Today, we channel our skills into something delightfully mischievous. While the world may fear this little character, we know that with a crochet hook, even the scariest monsters become precious keepsakes. This project is a wonderful study in contrast—soft yarn meeting jagged scars. Let us begin this spirited journey.
About This Creation
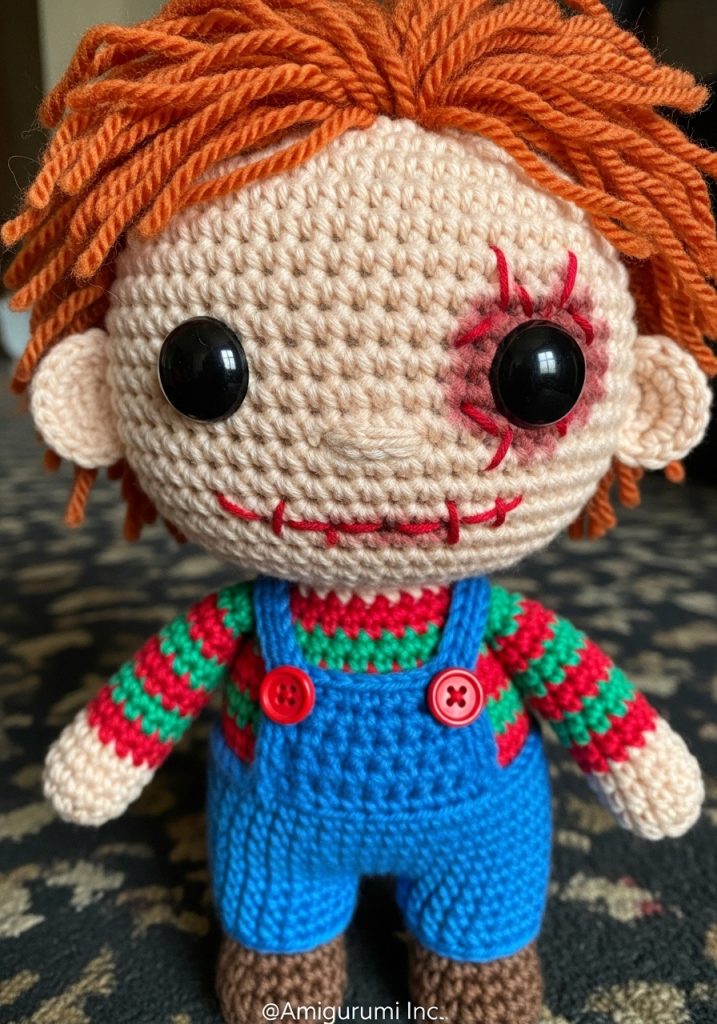
This project is not merely a doll; it is a lesson in character capture. We are crafting “The Patchwork Playmate,” a figure that demands we look closely at details. The true magic here lies in the finishing touches. Many rush the embroidery, but we shall take our time.
By using a specific “split-stitch” technique for his famous scars, we elevate him from a simple toy to a collector’s piece. The striped sweater also offers excellent practice in clean color transitions. He is the perfect companion for Halloween or for anyone who appreciates the darker side of nostalgia.
Project Snapshot
📊 Difficulty: Intermediate (Requires color changing & embroidery)
⏰ Est. Time: 12–15 Hours of joyous crafting
📏 Size: Approx. 20cm (8 inches) tall
“Imperfection is the soul of this character; do not fear a crooked scar, for it only adds to his story.” — Patricia
Materials & Tools Needed
🧶 Yarn: 100% Cotton or Acrylic blend (DK or Worsted weight). Colors: Pale Peach (Skin), Burnt Orange (Hair), Denim Blue (Overalls), Cardinal Red, Forest Green, Royal Blue (Shirt Stripes).
🪡 Hook: 2.5mm or 2.75mm (We want tight stitches so stuffing does not peek through).
✨ Other Materials: Polyester fiberfill, 12mm Black Safety Eyes, Red Embroidery Floss (for scars), Tapestry Needle, Stitch Markers, 2 small Red Buttons (approx 1cm).
Abbreviations & Stitches Used
ch: chain
sl st: slip stitch
sc: single crochet
inc: increase (2 sc in one st)
dec: decrease (invisible decrease preferred)
BLO: back loop only
The Patchwork Playmate Pattern
The Head (Skin Tone)
We begin with the face, the canvas for our embroidery.
➡️ Round 1: 6 sc in Magic Ring (6)
➡️ Round 2: Inc in each st around (12)
➡️ Round 3: 1 sc, inc repeat 6 times (18)
➡️ Round 4: 2 sc, inc repeat 6 times (24)
➡️ Round 5: 3 sc, inc repeat 6 times (30)
➡️ Round 6: 4 sc, inc repeat 6 times (36)
➡️ Round 7: 5 sc, inc repeat 6 times (42)
➡️ Round 8: 6 sc, inc repeat 6 times (48)
➡️ Round 9: 7 sc, inc repeat 6 times (54)
➡️ Round 10–22: Sc in each st around (54) [13 rounds for a high forehead]
Artisan’s Note: Insert safety eyes between Rounds 16 and 17, approximately 9 stitches apart. Do not snap the backs on until you have embroidered the scars, just in case you need to adjust.
➡️ Round 23: 7 sc, dec repeat 6 times (48)
➡️ Round 24: 6 sc, dec repeat 6 times (42)
➡️ Round 25: 5 sc, dec repeat 6 times (36)
➡️ Round 26: 4 sc, dec repeat 6 times (30)
➡️ Round 27: 3 sc, dec repeat 6 times (24)
➡️ Round 28: 2 sc, dec repeat 6 times (18)
Fasten off, leaving a long tail for sewing. Stuff firmly, shaping the cheeks as you go.
The Legs (Make 2)
Start with Skin Tone (Feet).
➡️ Round 1: 6 sc in Magic Ring (6)
➡️ Round 2: Inc in each st around (12)
➡️ Round 3: 1 sc, inc repeat 6 times (18)
➡️ Round 4–6: Sc in each st around (18)
➡️ Change to Denim Blue (Pants)
➡️ Round 7: Sc in each st around (18)
➡️ Round 8: 2 sc, inc repeat 6 times (24)
➡️ Round 9–11: Sc in each st around (24)
Fasten off the first leg. Do not fasten off the second leg.
The Body
Connect the legs to form the torso.
➡️ Round 12: Chain 3 from the second leg, join to the first leg with a sc. Sc 23 around first leg, sc 3 along one side of ch, sc 24 around second leg, sc 3 along other side of ch. (54)
➡️ Round 13–18: Sc in each st around (54) [Creating the “seat” of the overalls]
➡️ Change to Red (Start of Shirt) – Begin Stripe Pattern: 2 Rounds Red, 2 Rounds Green, 2 Rounds Blue. Repeat continuously.
➡️ Round 19: (In Red, BLO) Sc in each st around (54) [The BLO creates a ridge where the overalls end]
➡️ Round 20: Sc in each st around (54)
➡️ Round 21: (Change to Green) 7 sc, dec repeat 6 times (48)
➡️ Round 22: Sc in each st around (48)
➡️ Round 23: (Change to Blue) 6 sc, dec repeat 6 times (42)
➡️ Round 24: Sc in each st around (42)
➡️ Round 25–26: (Red) Sc in each st around (42)
➡️ Round 27: (Green) 5 sc, dec repeat 6 times (36)
➡️ Round 28: (Green) Sc in each st around (36)
➡️ Round 29: (Blue) 4 sc, dec repeat 6 times (30)
➡️ Round 30: (Blue) Sc in each st around (30)
➡️ Round 31: (Red) 3 sc, dec repeat 6 times (24)
➡️ Round 32: (Red) 2 sc, dec repeat 6 times (18)
Fasten off, leaving a tail. Stuff the body firmly.
The Arms (Make 2)
Start with Skin Tone.
➡️ Round 1: 6 sc in Magic Ring (6)
➡️ Round 2: Inc in each st around (12)
➡️ Round 3–4: Sc in each st around (12)
➡️ Change to Shirt Colors (Match the stripe pattern of the body).
➡️ Round 5–15: Sc in each st around (12) [Changing colors every 2 rounds]
➡️ Round 16: 4 sc, dec repeat 2 times (10)
Fasten off. Lightly stuff the lower arm only.
Overalls Bib & Straps (Denim Blue)
➡️ Bib: Join yarn to the front loops left in Round 19 (center of chest). Ch 1, sc 14 across. Turn. Work 6 rows of sc. Fasten off.
➡️ Straps: Ch 25 (measure against your doll to ensure it crosses the shoulder). Starting in 2nd ch from hook, sc across. Sew to back of pants and top of bib corners.
The Wild Hair (Burnt Orange)
This requires patience, my dear.
➡️ Wig Cap: Repeat Rounds 1–9 of the Head pattern. Fasten off. Sew onto head.
➡️ Strands: Cut strands of orange yarn approx 10cm long. Using your hook, loop them through the wig cap stitches (latch hook method). Focus on the hairline and parting. Trim unevenly for that “crazed” look.
Assembly & Final Touches
- Sew Head to Body: Ensure the stripes align nicely.
- Attach Arms: Sew them at Round 31 of the body.
- The Scars: This is the defining moment. Using red floss, stitch a jagged line down the right eye, across the nose, and on the cheek. Add small perpendicular “staple” stitches across the main lines.
- The Details: Sew the two red buttons onto the corners of the bib straps. Embroider a small blue pocket on the chest bib. Add eyebrows in orange yarn—make them slanted for attitude!
Tips & FAQs
- Q: How do I make the stripes look seamless?
- A: When changing colors, use the “invisible join” method or finish the last pull-through of the stitch with the new color.
- Q: My hair looks too neat!
- A: Do not be afraid to trim it with abandon! His hair is meant to look unkempt. Rub the yarn ends between your fingers to fray them slightly.
A Final Word
You have done it. You have taken simple yarn and crafted a character with history and attitude. Place him proudly on your shelf, for he is a testament to your skill and patience. Until our next session in the atelier.