
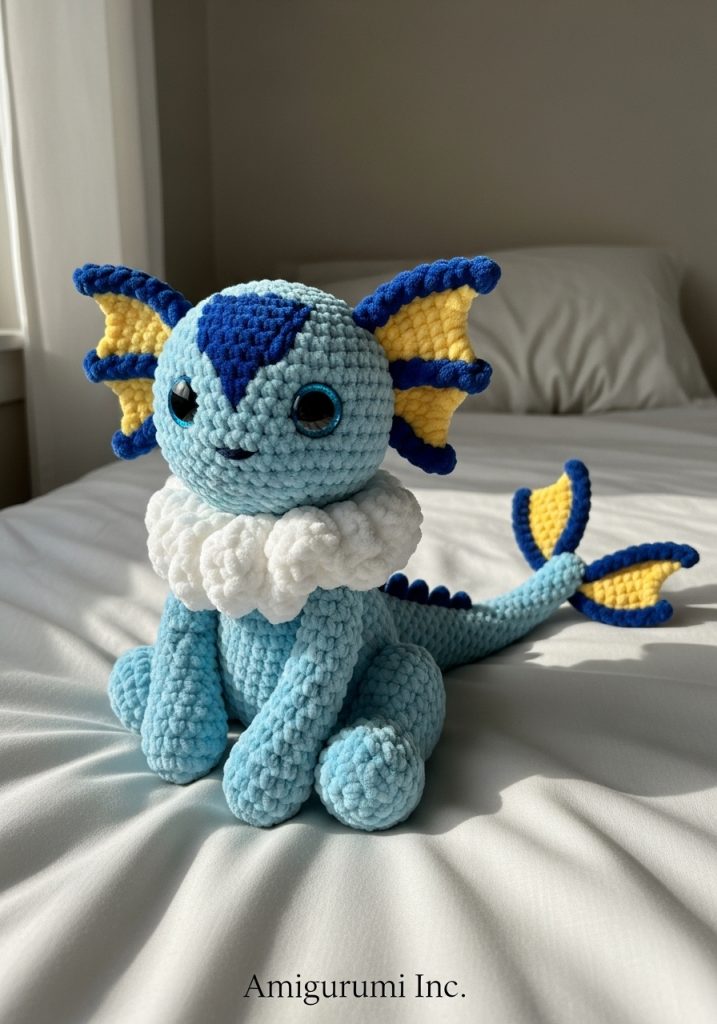
My dearest creator, you have chosen a path of pure texture and charm. This Aqua Guardian is not merely a doll; it is a study in softness. The velvet yarn behaves differently than cotton—it forgives no mistakes but rewards patience with a finish that feels like a cloud. We shall sculpt this water spirit to sit proudly, gazing up with those shimmering eyes, ready to guard your creative space.
About This Creation & The Velvet Touch
We are focusing on the “Tactile Experience” angle for this project. Many shy away from chenille yarn due to its slippery nature (“worming”), but this guide specifically addresses tension control to ensure your Aqua Guardian remains durable and neat. The color palette draws from the deep ocean and the frothy surf, creating a high-contrast look that pops on camera and on the shelf. This project is perfect for those looking to transition from standard amigurumi to “plush” style collectibles.
Project Snapshot
📊 Difficulty: Intermediate (Color changes & textured yarn)
⏰ Est. Time: 5–7 Hours
📏 Size: Approx. 14cm (seated)
“Texture is the silent language of the artisan. Let your hands listen as you stitch.”
Materials & Tools Needed
🧶 Yarn: Super Bulky Chenille (Size 6). Colors: Ocean Blue (approx. 70g), Midnight Blue (20g), Cloud White (15g), Sunshine Yellow (10g).
🪡 Hook: 4.0mm or 4.5mm (We want tight stitches to prevent gaps).
✨ Other Materials: 18mm Glitter Safety Eyes (Blue or Silver), Polyester fiberfill, Yarn needle (large eye), Stitch markers.
Abbreviations & Stitches Used
ch: chain
sl st: slip stitch
sc: single crochet
inc: increase (2 sc in one st)
dec: decrease (invisible decrease preferred)
BLO: back loop only
FLO: front loop only
The Complete Aqua Guardian Pattern
Component 1: The Head (Colorwork Focus)
Start with Ocean Blue.
➡️ Round 1: 6 sc in a magic ring (6)
➡️ Round 2: inc in all 6 st (12)
➡️ Round 3: (sc, inc) x 6 (18)
➡️ Round 4: (2 sc, inc) x 6 (24)
➡️ Round 5: (3 sc, inc) x 6 (30)
Artisan’s Note: Here we begin the Midnight Blue forehead marking. Keep tension consistent.
➡️ Round 6: Ocean Blue 12 sc, Change to Midnight Blue 6 sc, Change to Ocean Blue 12 sc (30)
➡️ Round 7: Ocean Blue 11 sc, Midnight Blue 8 sc, Ocean Blue 11 sc (30)
➡️ Round 8: Ocean Blue 10 sc, Midnight Blue 10 sc, Ocean Blue 10 sc (30)
➡️ Round 9: Ocean Blue 10 sc, Midnight Blue 10 sc, Ocean Blue 10 sc (30)
➡️ Round 10: Ocean Blue 11 sc, Midnight Blue 8 sc, Ocean Blue 11 sc (30)
➡️ Round 11: Ocean Blue 12 sc, Midnight Blue 6 sc, Ocean Blue 12 sc (30)
Fasten off Midnight Blue. Continue strictly with Ocean Blue.
➡️ Round 12: (3 sc, inc) x 7, 2 sc (37) – Widening the cheeks
➡️ Round 13: sc in each st around (37)
➡️ Round 14: (4 sc, inc) x 7, 2 sc (44)
➡️ Round 15: sc in each st around (44)
➡️ Round 16: sc in each st around (44)
Insert Safety Eyes between Rounds 13 and 14, roughly 9 stitches apart, centered under the dark marking.
➡️ Round 17: (4 sc, dec) x 7, 2 sc (37)
➡️ Round 18: (3 sc, dec) x 7, 2 sc (30)
➡️ Round 19: (3 sc, dec) x 6 (24)
➡️ Round 20: (2 sc, dec) x 6 (18)
➡️ Round 21: (sc, dec) x 6 (12)
➡️ Round 22: dec x 6 (6)
Fasten off, weave in end.
Component 2: The Body (Seated Posture)
Use Ocean Blue.
➡️ Round 1: 6 sc in a magic ring (6)
➡️ Round 2: inc in all 6 st (12)
➡️ Round 3: (sc, inc) x 6 (18)
➡️ Round 4: (2 sc, inc) x 6 (24)
➡️ Round 5: (3 sc, inc) x 6 (30)
➡️ Round 6: (4 sc, inc) x 6 (36)
➡️ Round 7-11: sc in each st around (36) – 5 rounds for the belly
➡️ Round 12: (4 sc, dec) x 6 (30)
➡️ Round 13: sc in each st around (30)
➡️ Round 14: (3 sc, dec) x 6 (24)
➡️ Round 15: sc in each st around (24)
➡️ Round 16: (2 sc, dec) x 6 (18)
➡️ Round 17: sc in each st around (18)
➡️ Round 18: (sc, dec) x 6 (12)
Fasten off, leaving a long tail for sewing to the head. Stuff firmly, prioritizing the base for stability.
Component 3: Front Legs (Make 2)
Use Ocean Blue.
➡️ Round 1: 5 sc in a magic ring (5)
➡️ Round 2: inc in all 5 st (10)
➡️ Round 3-9: sc in each st around (10)
Stuff lightly. Flatten the top opening and sc across both sides to close. Leave tail for sewing.
Component 4: Back Haunches (Make 2)
Use Ocean Blue.
➡️ Round 1: 6 sc in a magic ring (6)
➡️ Round 2: inc in all 6 st (12)
➡️ Round 3: (sc, inc) x 6 (18)
➡️ Round 4-6: sc in each st around (18)
➡️ Round 7: (sc, dec) x 6 (12)
Stuff firmly. Flatten the top and sc across to close. These create the “seated” look.
Component 5: The Tail
Use Ocean Blue.
➡️ Round 1: 4 sc in a magic ring (4)
➡️ Round 2: (sc, inc) x 2 (6)
➡️ Round 3: sc in each st around (6)
➡️ Round 4: (2 sc, inc) x 2 (8)
➡️ Round 5: sc in each st around (8)
➡️ Round 6: (3 sc, inc) x 2 (10)
➡️ Round 7-15: sc in each st around (10)
Stuff lightly as you go. Fasten off.
Component 6: Tail Flukes (Make 2)
Use Ocean Blue.
➡️ Row 1: ch 5, turn.
➡️ Row 2: Starting in 2nd ch from hook, sc, hdc, dc, dc.
Fasten off. Sew these to the tip of the tail.
Component 7: The Fin Ears (Make 2)
These are worked in two parts sewn together.
Inner Ear (Sunshine Yellow):
➡️ Row 1: ch 2, 3 sc in 2nd ch from hook, ch 1, turn.
➡️ Row 2: inc, sc, inc (5), ch 1, turn.
➡️ Row 3: inc, 3 sc, inc (7). Fasten off.
Outer Ear (Midnight Blue):
➡️ Repeat Rows 1-3 of Inner Ear but do not fasten off.
➡️ Place Inner Ear on top of Outer Ear. crochet around the perimeter in Midnight Blue to join them (sc, ch 1, sc at the tips to make them pointy).
Component 8: The Cloud Ruff
Use Cloud White.
➡️ Row 1: ch 20 (ensure this fits around the neck loosely), sl st to join circle.
➡️ Round 2: (inc) in every st around (40)
➡️ Round 3: sc in next st, skip 1 st, 5 dc in next st (shell made), skip 1 st – repeat around.
This creates a scallop/petal effect. Fasten off.
Assembly & Final Touches
- Body & Head: Sew the head to the body. Ensure the Midnight Blue marking is centered.
- The Ruff: Slide the Cloud Ruff over the head before attaching legs (or sew it in place around the neck seam).
- Legs: Sew the Back Haunches to the lower sides of the body (Rounds 5-8). Sew the Front Legs between the haunches, slightly closer together.
- Tail: Attach the tail to the lower back, centered between the haunches.
- Spine Detail: Using Midnight Blue, surface slip stitch or embroider a line from the back of the head, down the back, and to the tip of the tail.
Tips & FAQs
Q: My chenille yarn is snapping when I pull the magic ring.
A: This is common! Instead of a magic ring, ch 2 and work your starting stitches into the second chain from the hook. It is much stronger.
Q: The eyes are sinking into the fluff.
A: Velvet yarn is plush. Push the safety washer down very firmly, or place a small piece of felt behind the eye before inserting it to keep it visible.
A Final Word
You have brought a drop of magic into the physical world. This Aqua Guardian is a testament to your ability to tame even the most luxurious of fibers. May it bring calm and joy to its new home.