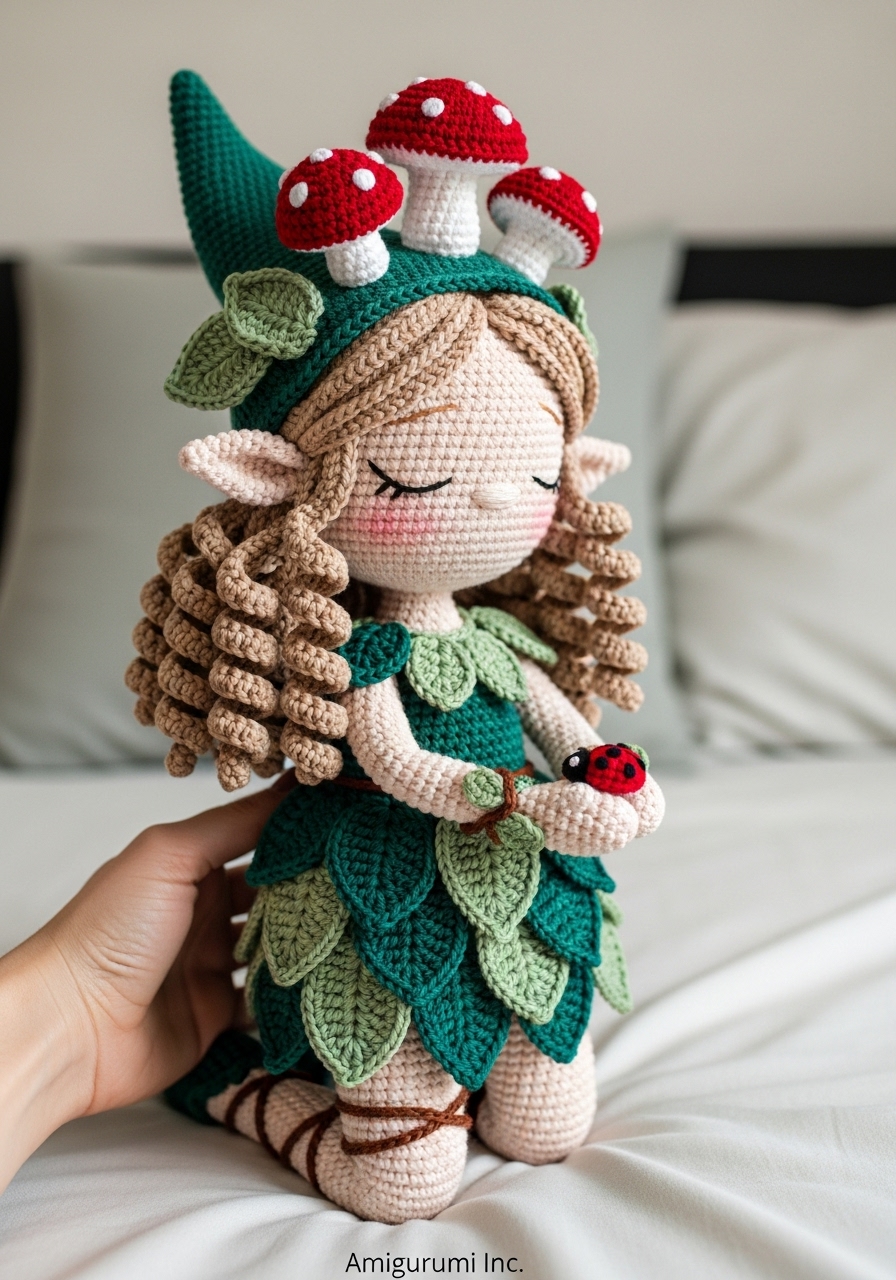
Welcome back to the worktable. There is a quiet magic in today’s project, a stillness that demands we slow our hands and breathe. Elara is not merely a doll; she is a study in texture and patience.
We are moving beyond simple spheres today. We are sculpting knees, defining ankles, and layering individual leaves to create a garment that feels grown rather than sewn. Pour yourself a tea. We have wonderful work to do.
About This Creation: The Art of Organic Layering
Many creators shy away from “messy” textures, preferring clean lines. Elara challenges us to embrace the chaotic beauty of the forest floor.
The commercial angle here is “Heirloom Botanical Amigurumi.” By combining rigid wire armatures with the soft, flowing drape of the leaf dress and spiral hair, you are creating a high-ticket item that appeals to adult collectors and nature lovers alike. This is not a toy for the toybox; it is art for the mantelpiece.
Project Snapshot
📊 Difficulty: Intermediate to Advanced (requires wire work & surface crochet)
⏰ Est. Time: 12–15 Hours
📏 Size: Approx. 9 inches (23 cm) tall when kneeling
“The beauty of the forest lies in its layers. Do not rush the leaves.” — Patricia
Materials & Tools Needed
🧶 Yarn: DK or Sport Weight Cotton.
- Skin Tone: Cream or Porcelain
- Hair: Light Brown or Ginger
- Dress: Forest Green (Dark), Sage Green (Light)
- Details: Chocolate Brown (Vines), Red & White (Mushrooms/Ladybug)
🪡 Hook: 2.25mm (B/1) for tight stitches
✨ Other Materials:
- 12mm Safety Eyes (or black embroidery thread for sleeping eyes)
- Fiberfill stuffing
- Copper craft wire or pipe cleaners (essential for the kneeling pose)
- Blush or soft pastels for cheeks
- Tapestry needle

Abbreviations & Stitches Used
ch: chain
sl st: slip stitch
sc: single crochet
hdc: half double crochet
dc: double crochet
inc: increase (2 sc in one st)
dec: decrease (invisible decrease preferred)
BLO: back loop only
picot: ch 2, sl st in first ch (for leaf tips)
The Complete Elara Pattern
Component 1: The Sculpted Head Worked in skin tone. We focus on a wider lower face for that youthful look.
➡️ Rnd 1: 6 sc in magic ring (6)
➡️ Rnd 2: inc in each st (12)
➡️ Rnd 3: (sc 1, inc) x 6 (18)
➡️ Rnd 4: (sc 2, inc) x 6 (24)
➡️ Rnd 5: (sc 3, inc) x 6 (30)
➡️ Rnd 6: (sc 4, inc) x 6 (36)
➡️ Rnd 7: (sc 5, inc) x 6 (42)
➡️ Rnd 8–16: sc in each st around (42) [9 rounds of height]
➡️ Rnd 17 (Cheek Shaping): sc 12, (inc, sc 1) x 3, sc 6 (nose area), (sc 1, inc) x 3, sc 12 (48)
➡️ Rnd 18–21: sc in each st around (48)
➡️ Rnd 22: (sc 6, dec) x 6 (42)
➡️ Rnd 23: (sc 5, dec) x 6 (36)
➡️ Rnd 24: (sc 4, dec) x 6 (30)
➡️ Rnd 25: (sc 3, dec) x 6 (24)
➡️ Rnd 26: (sc 2, dec) x 6 (18)
➡️ Rnd 27: (sc 1, dec) x 6 (12). Fasten off, leaving a long tail. Stuff firmly, emphasizing the cheeks.
Component 2: Pointed Ears (Make 2) Worked in skin tone.
➡️ Rnd 1: 4 sc in magic ring (4)
➡️ Rnd 2: (sc 1, inc) x 2 (6)
➡️ Rnd 3: sc around (6)
➡️ Rnd 4: (sc 2, inc) x 2 (8)
➡️ Rnd 5: (sc 3, inc) x 2 (10)
➡️ Rnd 6: sc around (10)
➡️ Rnd 7: dec, sc 3, dec, sc 3 (8). Fold flat and stitch to the sides of the head at eye level.
Component 3: The Spiral Hair Cap Worked in light brown/ginger. This requires patience.
➡️ Base: Create a standard wig cap matching Head Rnds 1–7 (42 sts).
➡️ The Curls: Do not fasten off. Sl st into first st of wig cap. Chain 35. Start in 2nd ch from hook, sc 2 in each ch all the way back to the cap. Sl st into next st on cap.
➡️ Repeat this process around the rim of the cap for the lower layer. For the crown, create shorter curls (Chain 20) randomly spaced on top to create volume.
Component 4: Articulated Body & Legs We start with legs to join them. Stuff as you go. Insert wire before closing torso.
➡️ Legs (Make 2): Start with Skin Tone.
➡️ Rnd 1: 6 sc in magic ring (6)
➡️ Rnd 2: inc around (12)
➡️ Rnd 3–5: sc around (12)
➡️ Rnd 6 (Heel): Ch 1, turn. sc 6. Turn. sc 6. Turn. sc 2, dec, sc 2. Resume working in rounds around the entire opening (12).
➡️ Rnd 7–14: sc around (12). Stuff lower leg.
➡️ Rnd 15 (Knee): dec x 2, sc 8 (10).
➡️ Rnd 16: inc x 2, sc 8 (12).
➡️ Rnd 17–24: sc around (12). Fasten off first leg. Do not cut yarn on second leg.
➡️ Join: Chain 3 from second leg, join to first leg. sc 30 around both legs and chain.
➡️ Torso: Work 10 rounds even (30). Change to Dark Green (Undergarment).
➡️ Waist: (sc 3, dec) x 6 (24). Work 5 rounds even.
➡️ Chest: (sc 2, dec) x 6 (18).
➡️ Neck: Change to Skin Tone. (sc 1, dec) x 6 (12). Work 2 rounds even. Fasten off.
Artisan Note: Twist two pipe cleaners together, fold in half, and insert into legs and up through the neck before the neck opening becomes too narrow.
Component 5: The Leaf Dress (The Foliage) Make 8–10 individual leaves in mixed greens.
➡️ Leaf Pattern: Ch 10. sc in 2nd ch, hdc, dc 2, tr 2, dc 2, hdc, (sc, ch 2, sc) in last ch (tip). Rotate to work down other side: hdc, dc 2, tr 2, dc 2, hdc, sc. Sl st to join.
➡️ Assembly: Sew leaves in overlapping tiers around the waist, pointing downwards. Sew 2 leaves on the chest as a bodice.
Component 6: Arms (Make 2) Skin tone.
➡️ Rnd 1: 5 sc in magic ring (5)
➡️ Rnd 2–18: sc around (5). These are very slender; use a pipe cleaner inside instead of stuffing.
Component 7: Mushroom Crown
➡️ Cap (Red): 6 sc in MR, inc around (12), (sc 1, inc) around (18). Work 2 rounds even. Stuff lightly.
➡️ Stem (White): 6 sc in MR, work 3 rounds. Sew to cap. Embroider white French knots on red cap. Make 3. Attach to top of head amidst curls.
Component 8: The Lucky Beetle
➡️ Body (Red): 6 sc in MR, inc around (12). Work 3 rounds even. dec around (6). Close.
➡️ Head (Black): 5 sc in MR. Sew to body.
➡️ Spots: Embroider small black dots or use black felt circles.
Assembly & Final Touches
We assemble with intention. Pin everything first.
1️⃣ Facial Features: Before attaching the hair, embroider the sleeping eyes using a single thread of dark brown floss. They should sit low, on Rnd 15–16. Apply blush heavily to the nose and cheeks.
2️⃣ The Vines: With chocolate brown yarn, surface slip stitch or wrap long chains around the calves (criss-cross sandal style) and forearms.
3️⃣ Hair: Sew the wig cap to the head. Arrange the curls so they tumble over the shoulders, framing the face.
4️⃣ Pose: Bend the wired knees so she sits on her heels. Bend the arms so her hands come together to cradle the beetle.
Tips & FAQs
Q: My curls are twisting the wrong way. A: This is the nature of the stitch. Twist them manually with your fingers clockwise to “set” the memory of the yarn.
Q: Can I skip the wire? A: Without the wire, she will not hold the kneeling pose or cradle the beetle. The armature is the skeleton of this piece; do not omit it.
A Final Word
You have stitched a guardian, a keeper of small secrets. When you place her on your shelf, adjust her leaves and tilt her head just so. She is listening to the earth.
I am eager to see your interpretation of Elara.