My Dearest Creator,
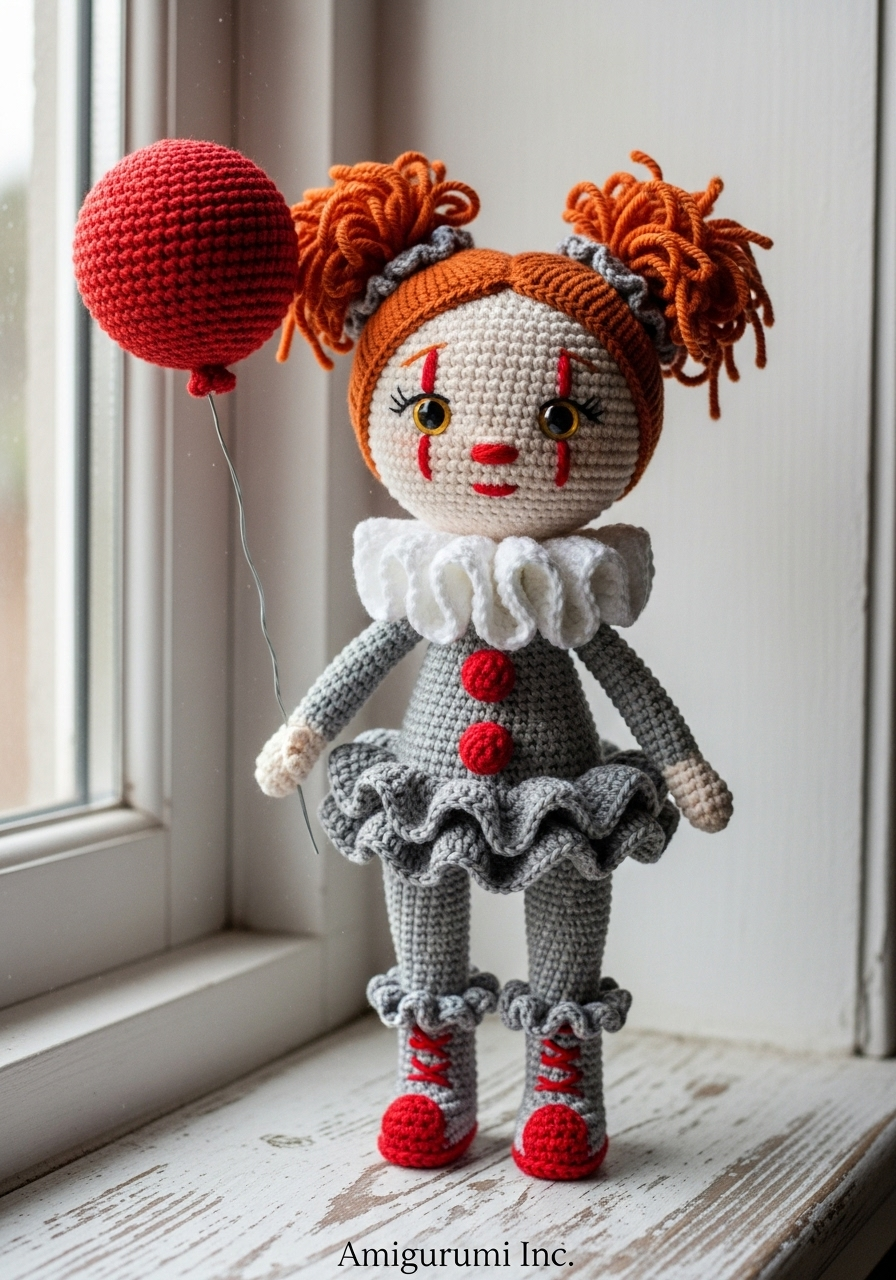
There is a singular joy in crafting something that balances on the edge of sweet and spooky. Today, we channel that energy into Penny. She is not a creature of nightmares, but a curious little soul dressed for the carnival. We shall pay close attention to her ruffled collar and that iconic balloon, for it is in these small touches that a project transforms from a toy into a keepsake. Take your time with her expression; those amber eyes should hold a world of stories.
About This Creation & The Art of Costume
This project is more than just a doll; it is a study in texture and layering. Many makers struggle with clothing that feels integrated rather than bulky. With Penny, we are focusing on “The Structural Costume”—crocheting the bodice and boots directly into the form while adding the skirt and collar as applied layers. This technique ensures she remains posable and lightweight, perfect for collectors who value a clean silhouette.
Project Snapshot:
📊 Difficulty: Intermediate to Advanced (Color changes, surface crochet)
⏰ Est. Time: 12–15 Hours of focused joy
📏 Size: Approx. 22cm (8.5 inches) standing
“Shadows are only defined by the light that casts them; let your stitches be the light.” — Patricia
Materials & Tools Needed
🧶 Yarn: Sport or DK weight cotton. Colors: Stark White (Skin), Charcoal Grey (Suit), Burnt Orange (Hair), Crimson Red (Balloon/Details), and Jet Black (Soles).
🪡 Hook: 2.5mm (or size needed for tight tension)
✨ Other Materials: 10mm Safety Eyes (Amber/Yellow), Fiberfill, Tapestry Needle, Stitch Markers, Craft Wire (for balloon stem), Fabric Glue (optional for hair placement).

Abbreviations & Stitches Used
ch: chain
sl st: slip stitch
sc: single crochet
inc: increase (2 sc in one st)
dec: invisible decrease
BLO: back loop only
FLO: front loop only
dc: double crochet
bobble: 4-dc bobble stitch (for buttons)
The Complete Penny Pattern
Component 1: The Expressive Head (White)
R1: Magic ring, 6 sc (6)
R2: Inc in all st (12)
R3: (Sc 1, inc) x 6 (18)
R4: (Sc 2, inc) x 6 (24)
R5: (Sc 3, inc) x 6 (30)
R6: (Sc 4, inc) x 6 (36)
R7: (Sc 5, inc) x 6 (42)
R8: (Sc 6, inc) x 6 (48)
R9–19: Sc in each st around (48) Note: This creates the smooth canvas for her face.
R20: (Sc 6, dec) x 6 (42)
R21: (Sc 5, dec) x 6 (36)
Insert safety eyes between R15 and R16, approx. 9 stitches apart. Embroider vertical curved red lines above and below eyes now.
R22: (Sc 4, dec) x 6 (30)
R23: (Sc 3, dec) x 6 (24)
R24: (Sc 2, dec) x 6 (18)
Stuff firmly, focusing on the cheeks to ensure they are round and youthful.
Fasten off, leaving a long tail for sewing.
Component 2: The Messy Bun Wig (Burnt Orange)
Wig Cap:
R1–R7: Repeat R1–R7 of Head (42).
R8–12: Sc in each st around. Try on head; it should fit snugly. Fasten off.
The Buns (Make 2):
R1: Magic ring, 6 sc (6)
R2: Inc in all st (12)
R3: (Sc 1, inc) x 6 (18)
R4–6: Sc in each st around (18)
R7: (Sc 1, dec) x 6 (12)
Stuff lightly. Do not close. Sew these to the top of the wig cap. Pull strands of orange yarn around the buns to create a “messy” texture.
Component 3: The Boots & Legs (Make 2, Start with Black)
R1: Ch 6. Start in 2nd ch from hook. Sc 4, 3 sc in last ch. Rotate. Sc 3, inc (12)
R2: Inc, sc 3, inc x 3, sc 3, inc x 2 (18)
R3: BLO sc in each st around (18) Creates the sole definition.
Change to Grey
R4–5: Sc in each st around (18)
R6: Sc 5, dec x 4, sc 5 (14) Shaping the toe.
R7: Sc 5, dec x 2, sc 5 (12)
R8–12: Sc in each st around (12)
Ruffle Detail (White): Join white yarn to FLO of R12. (Ch 2, dc in same st, sl st in next) around.
Leg Continuation (Grey):
R13: Working in BLO of R12 (behind ruffle), sc in each st (12)
R14–18: Sc in each st around (12)
Fasten off first leg. Do not fasten off second leg.
Component 4: The Body (Grey)
R19: From second leg, ch 3, join to first leg with sc. Sc remaining 11 on first leg, sc 3 along ch, sc 12 on second leg, sc 3 along other side of ch (30)
R20–24: Sc in each st around (30)
R25: (Sc 3, dec) x 6 (24)
R26: BLO sc in each st around (24) This loop is for the skirt later.
R27–29: Sc in each st around (24)
Front Detail: In R28, sc to center chest, switch to Red for bobble st (button), switch back to Grey.
R30: (Sc 2, dec) x 6 (18)
Front Detail: In R30, align second Red bobble button above the first.
R31: Sc in each st around (18)
R32: (Sc 1, dec) x 6 (12)
Fasten off. Stuff body firmly.
Component 5: The Peplum Skirt (Grey)
Join Grey yarn to the front loops left at R26 of the body, creating the skirt so it hangs down.
R1: Ch 2, 2 dc in each st around. Sl st to join.
R2: Ch 2, (dc, 2 dc in next st) around. Sl st.
R3: Ch 1, (sc, ch 2, sc in same st) in each st around for a ruffled edge. Fasten off.
Component 6: The Arms (Make 2, Start with White)
R1: Magic ring, 6 sc (6)
R2: (Sc 2, inc) x 2 (8)
R3: Sc in each st (8)
Change to Grey
R4: BLO sc in each st (8) Wrist definition.
R5–10: Sc in each st (8)
Fasten off.
Wrist Cuff: Join White to FLO of R4. (Ch 2, sl st in next) around.
Component 7: The Grand Ruff (White)
This piece is made separately and placed around the neck.
R1: Ch 20 (ensure this fits loosely around the doll’s neck). Join to first ch.
R2: Ch 2, 3 dc in every chain stitch around. Join.
R3: Ch 2, 2 dc in every stitch around. Join. This creates the dense, wavy ruffle.
Fasten off.
Component 8: The Red Balloon (Red)
R1: Magic ring, 6 sc (6)
R2: Inc in all st (12)
R3: (Sc 1, inc) x 6 (18)
R4–7: Sc in each st around (18)
R8: (Sc 1, dec) x 6 (12)
R9: Dec x 6 (6)
Insert wire stem. Stuff lightly.
R10: Sc in each st (6)
Close hole.
Assembly & Final Touches
- Head & Body: Sew the head to the body securely. The neck should be firm to support the large head.
- Wig: Place the wig cap on the head. Secure with pins, then sew or glue in place.
- Face: Embroider the small red button nose in the center. Ensure the vertical eye makeup lines are symmetrical.
- Arms: Sew arms to R31 of the body, angled slightly forward.
- The Ruff: Place the ruff around the neck. Tack it down with a few stitches so it doesn’t spin.
- Boots: Embroider black “X” laces on the front of the grey boots. Sew a small red pom-pom (or french knot) to the toe of each boot.
- Balloon: Insert the wire of the balloon into the doll’s hand (bend the wire inside the hand so it stays) or wrap the hand around the wire and sew shut.
Tips & FAQs
Q: How do I make the eyes look “sunken” like the photo? A: When you sew the head, use your yarn needle to pull a thread from the back of the neck, through the eye placement, around a stitch, and back to the neck. Pull slightly to indent the eye socket before inserting the safety eye.
Q: My ruff isn’t wavy enough. A: The secret is increasing aggressively. If it lies too flat, do 4 dc in each stitch instead of 3.
A Final Word
And there she stands—Penny. Not a monster, but a masterpiece of your own making. I hope this project challenged you to look at “costume” construction differently. Every stitch you placed was a choice, and looking at her now, I trust you made the right ones.
Until we meet again in the atelier,
Patricia