
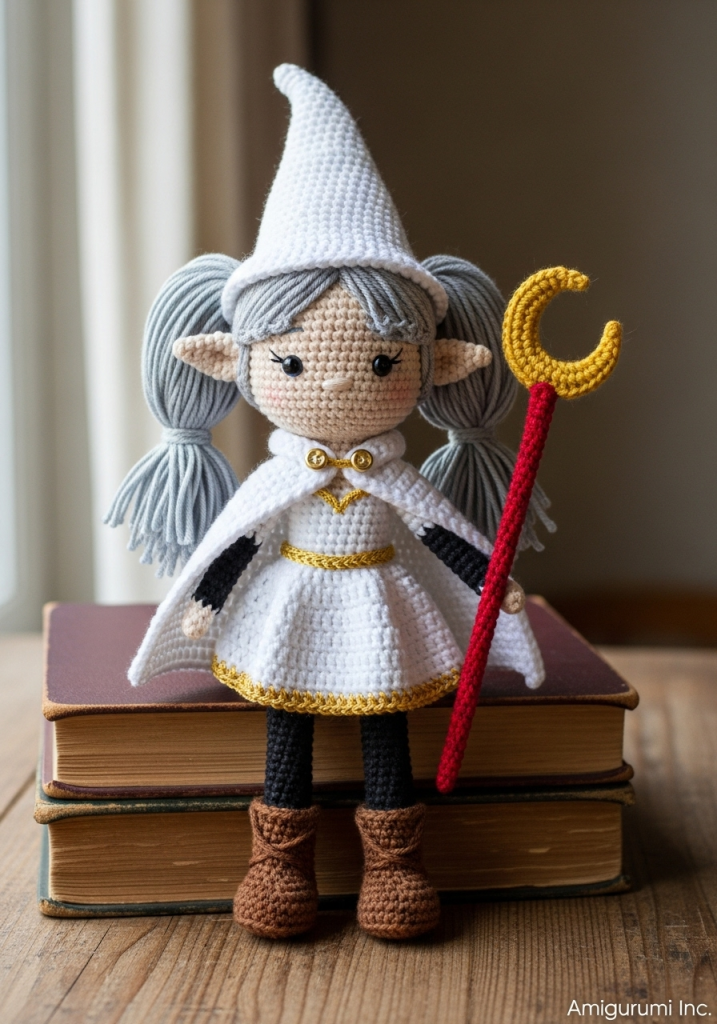
To hold a legend in one’s hands is a rare privilege, yet that is precisely what we shall do today. We are capturing the stillness of a thousand-year journey in loops of yarn, focusing on the quiet dignity of our mage. This project demands patience, particularly in the hair and the delicate gold filigree of her attire, but the result is a keepsake worthy of the ages.
About This Creation & The Layering Technique
This project is more than a doll; it is a study in structure. Unlike simple plushies, we are building a “wardrobe” directly onto the figure. We focus heavily on surface slip-stitching for the gold trim—a technique that provides clean, sharp lines without the bulk of color changes. We also utilize a wire armature for the staff, giving it the rigidity needed to command magic.
Project Snapshot:
📊 Difficulty: Intermediate to Advanced (Colorwork, small details)
⏰ Est. Time: 12–15 Hours
📏 Size: Approx. 22cm (8.5 inches) tall
“Quality is not an act, but a habit. Take your time with the gold trim; it is the signature of her rank.” — Patricia
Materials & Tools Needed
🧶 Yarn: Sport Weight (100% Cotton recommended for definition).
- Skin Tone (Beige/Fair)
- Pristine White (Dress/Cape)
- Antique Gold (Trim)
- Silver/Pale Grey (Hair)
- Midnight Black (Tights/Belt)
- Cocoa Brown (Boots)
- Crimson Red (Details)
🪡 Hook: 2.25mm (B/1) or 2.5mm depending on tension.
✨ Other Materials:
- Fiberfill stuffing
- 10mm Safety Eyes (Black)
- 12cm Floral Wire (for staff and neck support)
- 2 Red Teardrop Beads (Earrings)
- 1 Red Round Bead (Staff tip)
- Fabric glue
- Tapestry needle
Abbreviations & Stitches Used
ch: chain
sl st: slip stitch
sc: single crochet
inc: increase (2 sc in one st)
dec: decrease (invisible decrease preferred)
hdc: half double crochet
BLO: back loop only
FLO: front loop only
The Complete Eternity Mage Pattern
Component 1: The Boots & Legs (Make 2)
Start with Cocoa Brown.
🧶 Round 1: 6 sc in magic ring (6)
🧶 Round 2: inc in each st (12)
🧶 Round 3: (1 sc, inc) x 6 (18)
🧶 Round 4: BLO sc in each st (18)
🧶 Rounds 5–7: sc in each st (18)
🧶 Round 8: (4 sc, dec) x 3 (15)
🧶 Rounds 9–11: sc in each st (15)
🧶 Round 12: FLO sc in each st (15) — This creates the cuff base.
🧶 Fasten off Brown. Attach Midnight Black inside the leg at Round 11 (the unused back loops).
🧶 Rounds 13–20: sc in each st (15)
➡️ Stuff boots firmly. Do not fasten off the second leg; ch 3 and join to the first leg to begin the body.
Component 2: The Body & Dress Base
Continue with Midnight Black.
🧶 Round 21: sc 15 (leg 1), sc 3 along chain, sc 15 (leg 2), sc 3 along chain (36)
🧶 Rounds 22–24: sc in each st (36)
Change to Pristine White.
🧶 Round 25: BLO sc in each st (36) — We will attach the skirt here later.
🧶 Rounds 26–30: sc in each st (36)
🧶 Round 31: (4 sc, dec) x 6 (30)
🧶 Rounds 32–35: sc in each st (30)
🧶 Round 36: (3 sc, dec) x 6 (24)
Change to Skin Tone.
🧶 Round 37: (2 sc, dec) x 6 (18)
🧶 Round 38: sc in each st (18) — Stuff body firmly. Insert neck support wire if using.
Component 3: The Head
Continue from Body with Skin Tone.
🧶 Round 39: (2 sc, inc) x 6 (24)
🧶 Round 40: (3 sc, inc) x 6 (30)
🧶 Round 41: (4 sc, inc) x 6 (36)
🧶 Round 42: (5 sc, inc) x 6 (42)
🧶 Round 43: (6 sc, inc) x 6 (48)
🧶 Round 44: (7 sc, inc) x 6 (54)
🧶 Rounds 45–56: sc in each st (54) — Insert safety eyes between Rounds 50 and 51, 10 stitches apart.
🧶 Round 57: (7 sc, dec) x 6 (48)
🧶 Round 58: (6 sc, dec) x 6 (42)
🧶 Round 59: (5 sc, dec) x 6 (36)
🧶 Round 60: (4 sc, dec) x 6 (30)
🧶 Round 61: (3 sc, dec) x 6 (24)
➡️ Stuff head very firmly to achieve the round “Echo of Youth” shape.
🧶 Round 62: (2 sc, dec) x 6 (18)
🧶 Round 63: (1 sc, dec) x 6 (12)
🧶 Round 64: dec x 6 (6). Close hole.
Component 4: The Skirt
Attach Pristine White to the FLO of Round 25 on the body, holding the doll upside down.
🧶 Round 1: ch 2 (counts as hdc), hdc in same st, 2 hdc in each st around (72)
🧶 Rounds 2–8: hdc in each st (72)
Change to Antique Gold.
🧶 Round 9: sc in each st (72)
🧶 Fasten off.
➡️ Artisan’s Note: Pinch the skirt manually to create vertical pleats. You may use a tiny amount of fabric glue on the inside to hold the pleat structure if desired.
Component 5: The Arms (Make 2)
Start with Skin Tone.
🧶 Round 1: 6 sc in magic ring (6)
🧶 Round 2: (2 sc, inc) x 2 (8)
Change to Pristine White.
🧶 Round 3: BLO inc in each st (16) — Creates the wide sleeve puff.
🧶 Rounds 4–8: sc in each st (16)
🧶 Round 9: (2 sc, dec) x 4 (12)
🧶 Rounds 10–14: sc in each st (12)
Change to Antique Gold.
🧶 Round 15: sc in each st (12). Fasten off, leave tail for sewing.
Component 6: The Capelet
Use Pristine White. Work in rows.
🧶 Row 1: ch 19, start in 2nd ch from hook. sc 18. ch 1, turn.
🧶 Row 2: (2 sc, inc) x 6 (24). ch 1, turn.
🧶 Row 3: (3 sc, inc) x 6 (30). ch 1, turn.
🧶 Rows 4–6: sc in each st (30).
Change to Antique Gold.
🧶 Row 7: sc along the entire bottom edge and up the sides.
➡️ Sew a small red button or bead to the center front of the capelet.
Component 7: The Hair Structure
Use Silver/Pale Grey.
Wig Cap:
🧶 Create a basic hemisphere following Rounds 1–44 of the Head pattern (stopping at 54 sts).
Strands:
🧶 Bangs: ch 8, start in 2nd ch, sl st 7. Repeat x 4.
🧶 Twin Tails (Make 2): ch 25, start in 2nd ch, hdc 24. Repeat x 6 for each tail to create volume.
➡️ Sew the wig cap to the head. Attach the tails low behind the ears. Frame the face with the bangs.
Component 8: The Staff
🧶 Wrap a 12cm wire with Crimson Red yarn. Use a dab of glue at the start and end.
🧶 Create the crescent: Using Antique Gold, ch 12, sl st back down the chain to make a thick curve. Insert a wire inside to hold the “C” shape.
🧶 Attach the crescent to the top of the red staff.
🧶 Glue the Red Round Bead into the center of the crescent.
Assembly & Final Touches
- Face: Embroider small eyebrows using Grey yarn, 2 rows above the eyes. Add a tiny nose (horizontal stitch) between the eyes. Apply blush to cheeks.
- Ears: Crochet 2 small triangles (ch 4, sc, hdc, dc) and sew them to the sides of the head at eye level. Add the red bead earrings.
- Belt: Wrap a strand of Black yarn around the waist; embroider a small gold square for the buckle.
- Arms: Sew arms to the body at Round 36.
- Cape: Place the capelet over the shoulders and tack it down with a few stitches so it doesn’t shift.
- Staff: Stitch the staff to one hand or use a clear elastic band to hold it in place.
Tips & FAQs
Q: My staff is too floppy. A: Ensure you are using a sturdy floral wire (18 or 20 gauge) inside the yarn wrapping.
Q: Can I brush the hair? A: If you use acrylic yarn, you can brush it out to make it fluffy (using a pet slicker brush), but for this mage, the defined strands look cleaner and more anime-accurate.
A Final Word
You have stitched more than a doll; you have crafted a companion for the journey. Observe how the gold catches the light and how her expression holds that gentle stoicism. She is ready for the shelf, or perhaps, a new adventure.
Patricia