
My dearest maker, welcome back to the worktable. There is a specific hush that falls over the room when we work with the colors of the earth—sage, terracotta, and unbleached cotton. Today, we channel that quiet grounding into Bijou. She is not merely a doll; she is an observer of the natural world, and through her, we shall refine our own eye for detail. Let us pick up our hooks and breathe life into this gentle soul.
About This Creation & The Nature of Texture
Bijou represents a shift from the bold, primary colors of her predecessor to something more organic and enduring. We are moving into the “Cottagecore” aesthetic, which celebrates a return to traditional skills and natural pacing.
Commercially, this project serves a dual purpose. First, it introduces Intermediate Textures. Many amigurumi projects rely solely on single crochet; Bijou challenges you to incorporate the Linen Stitch for her ears to mimic woven fabric, and Puff Stitches for her beret to create volume. Second, she taps into the high-value “Heirloom Gift” market. The palette is timeless, designed to sit on a collector’s shelf or be hugged by a child for a generation.
Project Snapshot
📊 Difficulty: Intermediate (Requires focus on tension and color changes)
⏰ Est. Time: 10–12 Hours
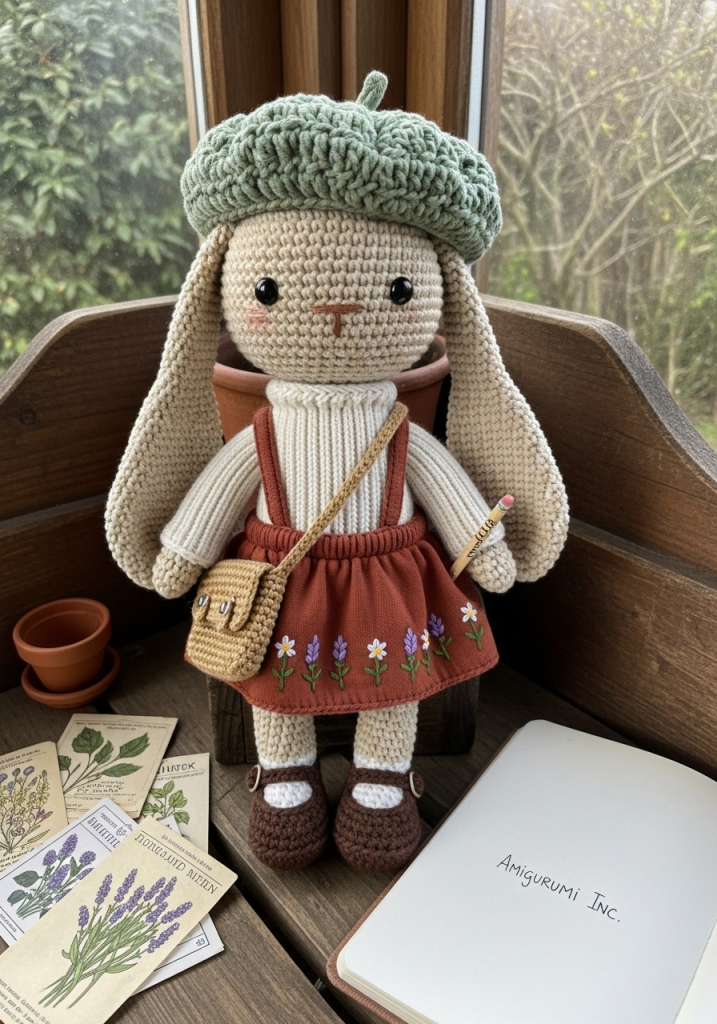
📏 Size: Approx. 25cm (From shoes to beret tip)
“The true beauty of amigurumi lies not in the speed of the stitch, but in the personality sculpted by the tension.” — Patricia
Materials & Tools Needed
🧶 Yarn: Sport Weight (Fine/2) or DK Cotton. ➡️ Color A: Oatmeal/Sandy Beige (Skin/Fur) ➡️ Color B: Cream (Sweater) ➡️ Color C: Terracotta/Rust (Pinafore Skirt) ➡️ Color D: Sage Green (Beret) ➡️ Color E: Dark Brown (Shoes)
🪡 Hook: 2.5mm (or size needed to obtain tight fabric)
✨ Other Materials: ➡️ 10mm Safety Eyes (Black) ➡️ Dark Brown Embroidery Floss (Nose/Mouth) ➡️ Lavender and Yellow Embroidery Floss (Flowers) ➡️ Fiberfill stuffing (firm density) ➡️ Tapestry needle, stitch markers, pins ➡️ A small piece of cardboard (for shoe soles)
Abbreviations & Stitches Used
ch: chain sl st: slip stitch sc: single crochet inc: increase (2 sc in one st) dec: invisible decrease hdc: half double crochet BLO: back loop only FLO: front loop only puff st: (yarn over, insert hook, pull up loop) x3, yarn over and pull through all loops on hook.
The Complete Bijou Pattern
Component 1: The Expressive Head
Worked in Color A (Oatmeal). We shape the cheeks to give her that sweet, low gaze.
Rnd 1: 6 sc in magic ring (6) Rnd 2: inc in each st around (12) Rnd 3: (sc 1, inc) x 6 (18) Rnd 4: (sc 2, inc) x 6 (24) Rnd 5: (sc 3, inc) x 6 (30) Rnd 6: (sc 4, inc) x 6 (36) Rnd 7: (sc 5, inc) x 6 (42) Rnd 8: (sc 6, inc) x 6 (48) Rnd 9: (sc 7, inc) x 6 (54) Rnd 10: (sc 8, inc) x 6 (60) Rnd 11–18: sc in each st around (60) Rnd 19 (Cheek Shaping): sc 18, (inc, sc 1) x 6, sc 12, (inc, sc 1) x 6, sc 6 (72) — This widens the face at eye level. Rnd 20–24: sc in each st around (72) Rnd 25: sc 18, (dec, sc 1) x 6, sc 12, (dec, sc 1) x 6, sc 6 (60) Rnd 26: (sc 8, dec) x 6 (54) Rnd 27: (sc 7, dec) x 6 (48) Rnd 28: (sc 6, dec) x 6 (42) Insert safety eyes between Rnd 19 and 20, spaced about 11 stitches apart (centered on the face). Rnd 29: (sc 5, dec) x 6 (36) Rnd 30: (sc 4, dec) x 6 (30) Start stuffing firmly, emphasizing the cheek bumps. Rnd 31: (sc 3, dec) x 6 (24) Rnd 32: (sc 2, dec) x 6 (18) Rnd 33: (sc 1, dec) x 6 (12) Rnd 34: dec x 6 (6) Fasten off and weave in end.
Component 2: The Legs & Body (Seamless)
We begin with the shoes in Color E (Dark Brown).
Legs (Make 2): Rnd 1: Ch 6. Start in 2nd ch from hook. sc 4, 3 sc in last ch. Turn and work other side: sc 3, inc (12) Rnd 2: inc, sc 3, inc x 3, sc 3, inc x 2 (18) Rnd 3: sc 1, inc, sc 3, (sc 1, inc) x 3, sc 3, (sc 1, inc) x 2 (24) Rnd 4: BLO sc in each st around (24) — Creates the sole rim. Rnd 5–6: sc in each st around (24) Insert cardboard sole here. Rnd 7: sc 6, dec x 6, sc 6 (18) Rnd 8: sc 6, dec x 3, sc 6 (15) Change to Color A (Skin). Rnd 9: BLO sc in each st around (15) Rnd 10–14: sc in each st around (15) Rnd 15 (Knee): sc 4, dec, sc 4, inc x 3, sc 2 (17) — Creates a slight bend. Rnd 16: sc 4, inc, sc 4, dec x 3, sc 2 (15) Rnd 17–24: sc in each st around (15) Fasten off first leg. Do not fasten off second leg. Ch 3 and join to first leg.
Body: Rnd 25: sc 15 (leg 1), sc 3 (chain), sc 15 (leg 2), sc 3 (chain) (36) Rnd 26: (sc 5, inc) x 6 (42) Rnd 27–31: sc in each st around (42) — Hips section. Change to Color B (Cream) for the Sweater. Rnd 32: BLO sc in each st around (42) Rnd 33–36: sc in each st around (42) Rnd 37: (sc 5, dec) x 6 (36) Rnd 38–42: sc in each st around (36) Rnd 43: (sc 4, dec) x 6 (30) Rnd 44–46: sc in each st around (30) Rnd 47: (sc 3, dec) x 6 (24) Rnd 48: (sc 2, dec) x 6 (18) Rnd 49 (Neck): sc in each st around (18) Stuff firmly. Fasten off leaving a long tail for sewing head.
Component 3: The Linen Stitch Ears (Make 2)
Worked in Color A. The linen stitch (sc, ch 1, skip 1) gives a dense, woven texture.
Row 1: Ch 2, 2 sc in 2nd ch from hook. Turn. (2) Row 2: Ch 1, inc, inc. Turn. (4) Row 3: Ch 1, sc 1, ch 1, sk 1, sc 2. Turn. Row 4: Ch 1, inc, [sc 1 in ch-space, ch 1, sk 1], inc. Turn. Continue working linen stitch pattern, increasing at ends every other row until ear is 12 stitches wide. Work plain linen stitch rows for 15 rows. Decrease at ends every row until 4 stitches remain. Fasten off.
Component 4: The Terracotta Pinafore
Worked in Color C. We work in rows for the skirt panel, then join.
Waistband: Row 1: Ch 43. sc in 2nd ch from hook and across. (42) Row 2: sc across. Join to form a circle (careful not to twist). Rnd 3: (sc 6, inc) x 6 (48) Rnd 4–10: sc in each st around (48) Rnd 11 (Hem): (sk 1, 5 dc in next st, sk 1, sl st) repeat around. Straps: Attach yarn to front waist. Ch 18, cross over back, attach to back waist. Repeat for second strap. Embroidery: Using embroidery floss, stitch tiny lazy-daisy flowers on the front skirt panel.
Component 5: The Puff Stitch Beret
Worked in Color D (Sage Green).
Rnd 1: 6 sc in magic ring (6) Rnd 2: inc in each st (12) Rnd 3: (sc 1, inc) x 6 (18) Rnd 4: (puff st, ch 1) in each st around (18 puffs) Rnd 5: (puff st in gap, 2 puff st in next gap) around (27 puffs) Rnd 6: Work 1 puff st in each gap around (27 puffs) Rnd 7: sc in each st around (tighten tension) (27 sc) Rnd 8: (sc 1, dec) around (18 sc) Fasten off leaving tail to tack onto head.
Component 6: The Satchel
Worked in Color E (Tan/Leather tone). Row 1: Ch 11, sc in 2nd ch across (10). Row 2–20: sc across. Fold bottom up to row 8 to form pocket. Sew sides. Add a long chain for the strap.
Assembly & Final Touches
- Head Placement: Pin the head to the neck. Ensure the “cheek increases” align with the shoulders. Sew firmly.
- Ear Attachment: Sew the ears low on the head, approximately at Rnd 14, drooping downwards for that calm, loppy look.
- Face Details: Embroider a “Y” shape nose with Brown floss between the eyes. Add a single horizontal stitch for eyebrows to create a “surprised” or “innocent” expression.
- Dressing: Slide the Pinafore onto the body. Tack the Beret to the side of the head (jaunty angle). Place the Satchel over one shoulder.
Artisan’s Tips
➡️ The Eyes Have It: Do not place the eyes too high. The “cute factor” comes from a large forehead. Keep them low, aligned with the nose.
➡️ Beret Volume: If your beret looks flat, push the puff stitches out from the inside with your thumb before tacking it down.
➡️ Stance: Because the legs are joined, Bijou should stand on her own if you stuffed the feet firmly and used the cardboard soles.
A Final Word
There is a quiet dignity in Bijou. She reminds us that creativity does not always need to be loud or bright; it can be soft, observant, and deeply rooted in nature. I hope she brings a sense of calm to your space as you stitch her. Until our next project, keep your tension even and your heart open.