A Note from Patricia: My dear friend, there is something truly magical about working with velvet yarn. It forgives our little tension mistakes and reflects light in a way that brings our creations to life. Pip is designed to be the ultimate comfort project—soft to the touch and heartwarming to behold. I hope this little wanderer brings a quiet joy to your hook today.
About This Creation & The Velvet Touch We are stepping away from traditional cotton for the body to embrace the luxury of chenille-style velvet. This choice transforms a simple kitten design into a premium, gift-quality plush. However, to ensure our creation feels authentic and handcrafted, we are pairing this softness with a rugged, textured cotton for the accessories. This mix of textures—the cloud-like fur against the sturdy satchel—is what gives Pip his sophisticated, artisanal charm.
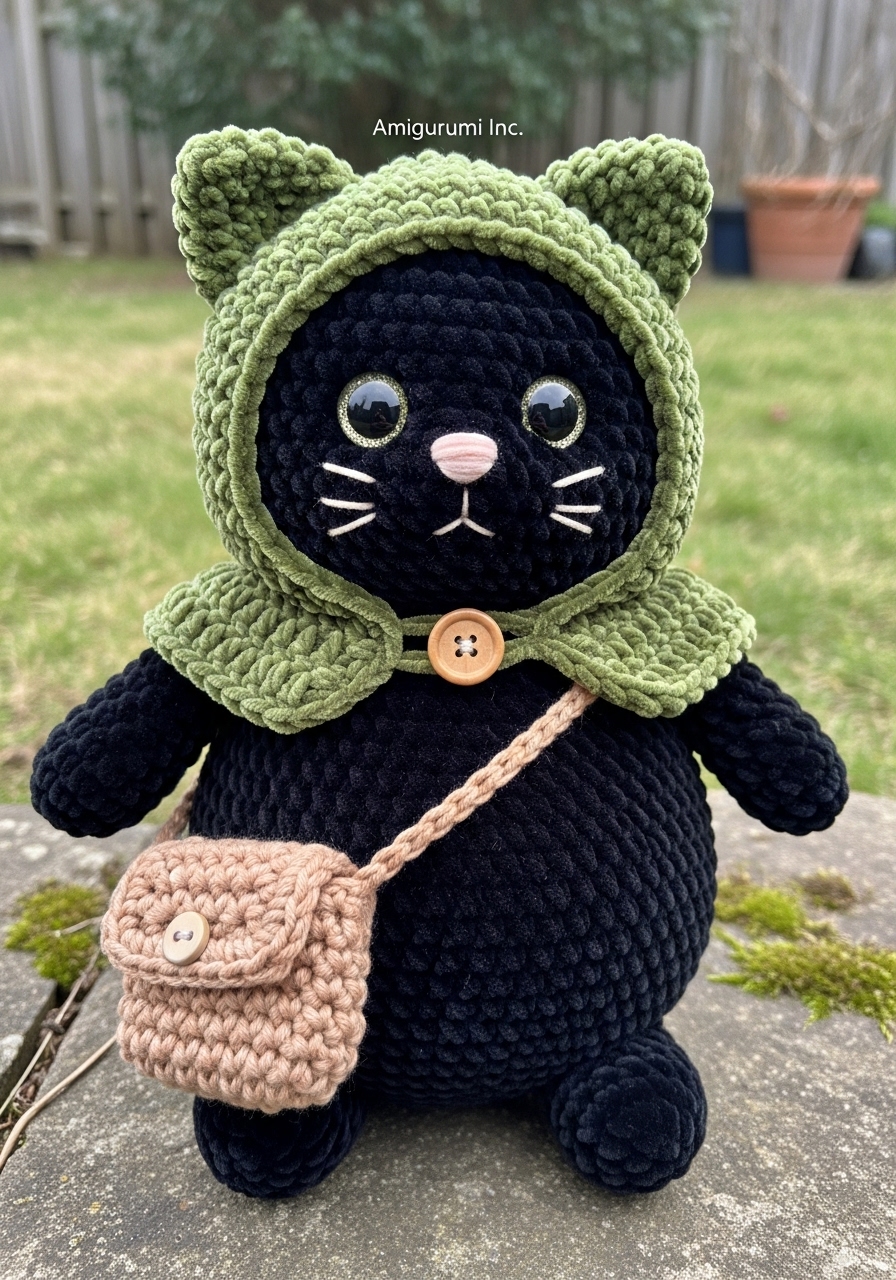
Project Snapshot: 📊 Difficulty: Intermediate (Working with velvet requires feeling stitches more than seeing them) ⏰ Est. Time: 4–6 Hours 📏 Size: Approx. 16cm tall (including ears) “The contrast between the plush velvet and the matte cotton satchel creates a rich, tactile experience.” — Patricia
Materials & Tools Needed: 🧶 Yarn A (Body/Hood): Super Bulky (Size 6) Velvet Yarn in Jet Black (1 skein) and Moss Green (1/2 skein). 🧶 Yarn B (Satchel): Worsted Weight (Size 4) Cotton or Jute in Tan/Biscuit (held double if needed for stiffness). 🪡 Hook: 5.0mm (H) hook for velvet; 4.0mm (G) hook for satchel. ✨ Accessories: 14mm Safety Eyes (Gold or Green iris), Polyester fiberfill, Yarn needle (metal with large eye), 1 inch wooden button.
Abbreviations & Stitches Used: ch: chain sl st: slip stitch sc: single crochet inc: increase (2 sc in one st) dec: decrease (sc 2 together) hdc: half double crochet BLO: back loop only
The Complete Pip Project
Component 1: The Oversized Head (Worked in Black Velvet using 5.0mm hook) We begin with the crown. Do not pull your magic ring too tight, or the velvet may snap.
Round 1: 6 sc in a magic ring (6)
Round 2: inc in each st around (12)
Round 3: 🧶 sc in next st, inc in next 🧶 repeat around (18)
Round 4: sc in next 2 st, inc in next (24)
Round 5: sc in next 3 st, inc in next (30)
Round 6: 🧶 sc in next 4 st, inc in next 🧶 repeat around (36)
Round 7: sc in next 5 st, inc in next (42)
Round 8: sc in next 6 st, inc in next (48)
Round 9: sc in next 7 st, inc in next (54)
Rounds 10–21: sc in each st around (54) [12 rounds for a nice spherical shape]
Round 22: sc in next 7 st, dec in next (48)
Round 23: 🧶 sc in next 6 st, dec in next 🧶 repeat around (42)
Round 24: sc in next 5 st, dec in next (36)
Insert safety eyes between Rounds 16 and 17, approximately 9 stitches apart.
Round 25: sc in next 4 st, dec in next (30)
Round 26: sc in next 3 st, dec in next (24)
Stuff the head firmly but gently to avoid stretching the velvet gaps.
Round 27: 🧶 sc in next 2 st, dec in next 🧶 repeat around (18)
Fasten off, leaving a long tail for sewing.
Component 2: The Cream Muzzle (Worked in Cream Velvet using 5.0mm hook)
Round 1: 6 sc in a magic ring (6)
Round 2: inc in each st around (12)
Round 3: sc in next st, inc in next (18)
Round 4: sc in each st around (18)
Fasten off. Leave tail to sew onto the face between the eyes.

Component 3: The Chubby Body (Worked in Black Velvet using 5.0mm hook)
Round 1: 6 sc in a magic ring (6)
Round 2: inc in each st around (12)
Round 3: sc in next st, inc in next (18)
Round 4: 🧶 sc in next 2 st, inc in next 🧶 repeat around (24)
Round 5: sc in next 3 st, inc in next (30)
Round 6: sc in next 4 st, inc in next (36)
Rounds 7–12: sc in each st around (36)
Round 13: sc in next 4 st, dec in next (30)
Round 14: sc in each st around (30)
Round 15: 🧶 sc in next 3 st, dec in next 🧶 repeat around (24)
Round 16: sc in next 2 st, dec in next (18)
Fasten off. Stuff the body firmly, shaping it to be round and pear-like.
Component 4: The Arms (Make 2) (Worked in Black Velvet using 5.0mm hook)
Round 1: 5 sc in a magic ring (5)
Round 2: inc in each st around (10)
Rounds 3–7: sc in each st around (10)
Round 8: dec, sc in next 8 st (9)
Fasten off. Lightly stuff the bottom half only.
Component 5: The Legs (Make 2) (Worked in Black Velvet using 5.0mm hook)
Round 1: 6 sc in a magic ring (6)
Round 2: inc in each st around (12)
Round 3: 🧶 sc in next st, inc in next 🧶 repeat around (18)
Rounds 4–6: sc in each st around (18)
Round 7: sc in next 4 st, dec, dec, sc in next 10 st (16) [Shapes the foot]
Round 8: sc in each st around (16)
Fasten off. Stuff firmly.
Component 6: The Tail (Worked in Black Velvet using 5.0mm hook)
Round 1: 4 sc in a magic ring (4)
Round 2: inc in each st around (8)
Rounds 3–10: sc in each st around (8)
Fasten off. Do not stuff; the yarn itself provides enough volume.
Component 7: The Hooded Capelet (Worked in Moss Green Velvet using 5.0mm hook)
Row 1: Ch 25 (measure around your doll’s neck loosely). Sc in 2nd ch from hook and across. (24)
Row 2: Ch 2 (counts as hdc), turn. Hdc in next 3, inc repeat across. (30)
Row 3: Ch 2, turn. Hdc in each st across. (30)
Now we join to work in rounds for the hood part.
Round 4: Join to first st with sl st. Ch 1. Sc in each st around. (30)
Round 5: Sc in next 4, inc repeat around. (36)
Rounds 6–14: Sc in each st around. (36) [Try it on the head; add rounds if needed to cover well]
Round 15: Sc in next 4, dec repeat around. (30)
Round 16: Sc in next 3, dec repeat around. (24)
Divide into two ear sections to close the top. Flatten the top opening. You will crochet through both layers to close it, but we will make peaks for ears.
Row 17 (Closing): Sl st through both layers for 4 sts. Ch 3, dc in same sp, ch 3, sl st in same sp (Ear 1 made). Sl st across next 4 sts. Ch 3, dc in same sp, ch 3, sl st in same sp (Ear 2 made). Sl st to end.
Component 8: The Textured Satchel (Worked in Tan Cotton/Jute using 4.0mm hook) We use BLO (Back Loop Only) here to create horizontal ridges, ensuring the bag looks distinctly crocheted and rugged against the smooth velvet.
Row 1: Ch 7. Sc in 2nd ch from hook and next 5 ch. (6)
Rows 2–10: Ch 1, turn. Sc in BLO across. (6)
Fold the bottom up to row 7 to form a pouch. Sl st up the sides to close them. Strap: Join yarn to one side of the bag. Ch 35 (or length to cross body). Join to other side of bag with sl st.
Assembly & Final Touches ➡️ Face: Sew the cream muzzle centered between the eyes. Using a thin black thread, embroider a small “Y” shape for the nose and mouth on the muzzle. ➡️ Body: Sew the head to the body securely. Use plenty of pins to keep it centered. ➡️ Limbs: Attach legs to the bottom front of the body so Pip creates a sitting tripod shape with his tail. Sew arms to the sides, slightly angled forward. ➡️ Dressing: Place the hood over the head. Sew the button onto one corner of the neck opening and use a gap in the stitches on the opposite side as the buttonhole. Place the cotton satchel over the shoulder.
Tips & FAQs
- Q: My velvet yarn is “worming” (loops coming loose). Why?
- A: This usually happens if your hook is too small or your tension is too loose. Try tightening your grip slightly or moving up half a hook size if the yarn is snagging.
- Q: Why cotton for the bag?
- A: Velvet on velvet can look undefined. The cotton provides a structural contrast that highlights the “handmade” quality of the satchel.
A Final Word I trust Pip will be a delightful addition to your collection. There is a special peace found in working with such plush materials, a softness that soothes the soul as we stitch. May your velvet wanderer bring smiles to all who meet him.