
There is a quiet magic in transformation. We often look at a skein of yarn and see only potential, but today we shall turn that potential into a legend. By dressing our innocent Chibi Fox in the armor of a dragon, we are not hiding his sweet nature; we are giving him the courage of a guardian. This project is a labor of love, requiring patience for the textured scales and the structural wings, but the result is a keepsake that speaks of bravery and imagination. Let us pick up our hooks and begin this grand adventure together.
About The Chibi Fox (Dragon Guardian Edition)
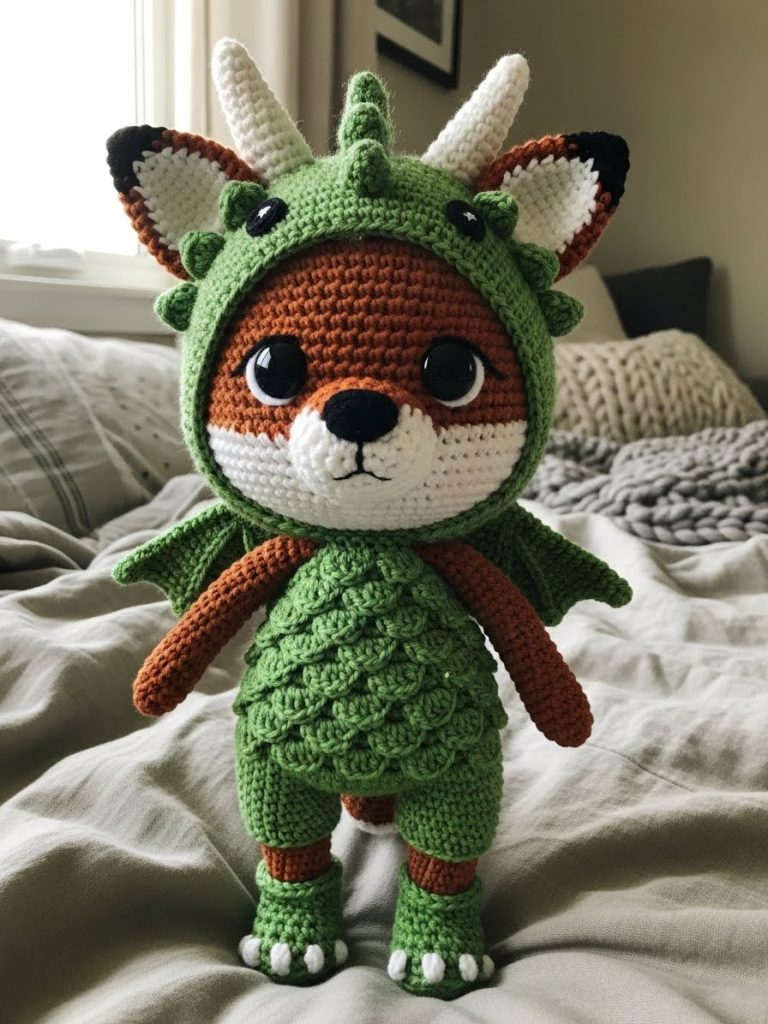
This is not merely a doll; it is a story of dualities. Beneath the fearsome (yet adorable) dragon regalia lies our sweet, wide-eyed Chibi Fox. The costume is designed to be removable, allowing the character to shift between his forest home and his mythic duties. The “Dragon Suit” utilizes textured bobble stitches to mimic impenetrable scales, while the hood features curved ivory horns that frame his massive, innocent eyes. He stands as a protector of your creative space.
Project Snapshot
📊 Difficulty: Intermediate (Requires focus for texture stitches)
⏰ Est. Time: 6-8 Hours of dedicated crafting
📏 Size: Approx 20cm (Standing from toes to horn-tips)
“The smallest heart often holds the fiercest courage.” — Patricia Poltera
Materials & Tools Needed
🧶 Yarn A (The Fox): Matte Cotton DK weight in Vibrant Fox Orange.
🧶 Yarn B (The Fluff): Textured Eyelash or Mohair yarn in White (for the muzzle/chest).
🧶 Yarn C (The Dragon Skin): Mercerized Cotton in Forest Green or Deep Teal.
🧶 Yarn D (Accents): Gold or Mustard Yellow (for belly and spikes).
🧶 Yarn E (Horns/Claws): Ivory or Cream cotton.
🪡 Hook: 2.5mm (or size needed for tight tension).
✨ Other Materials: 12mm Safety Eyes, Polyester Fiberfill, Tapestry Needle, Stitch Markers, Pipe Cleaners (for wing structure).
Abbreviations & Stitches Used
ch: chain
sl st: slip stitch
sc: single crochet
hdc: half double crochet
dc: double crochet
inc: increase (2 sc in one st)
dec: decrease (sc 2 together)
Bobble: (Yarn over, insert hook into st, pull up loop, yarn over, pull through 2 loops) x4, yarn over and pull through all loops on hook.
The Complete Chibi Fox Pattern
Part 1: The Chibi Head (Yarn A – Fox Orange)
Work in continuous spirals.
➡️ R1: 6 sc in magic ring.
➡️ R2: inc in each st around (12).
➡️ R3: (sc 1, inc) x6 (18).
➡️ R4: (sc 2, inc) x6 (24).
➡️ R5: (sc 3, inc) x6 (30).
➡️ R6: (sc 4, inc) x6 (36).
➡️ R7: (sc 5, inc) x6 (42).
➡️ R8: (sc 6, inc) x6 (48).
➡️ R9: (sc 7, inc) x6 (54).
➡️ R10: (sc 8, inc) x6 (60).
➡️ R11-20: sc in each st around (60) Place eyes between R16 and R17, approx 11 stitches apart.
➡️ R21: (sc 8, dec) x6 (54).
➡️ R22: (sc 7, dec) x6 (48).
➡️ R23: (sc 6, dec) x6 (42).
➡️ R24: (sc 5, dec) x6 (36).
➡️ R25: (sc 4, dec) x6 (30).
➡️ R26: (sc 3, dec) x6 (24).
➡️ R27: (sc 2, dec) x6 (18).
➡️ Fasten off, leaving a long tail for sewing. Stuff firmly until spherical.
Part 2: The Fluffy Muzzle Patch (Yarn B – White Fluff)
Work in rows to create a heart/diamond shape.
➡️ R1: Ch 2, 2 sc in 2nd ch from hook, ch 1, turn (2).
➡️ R2: inc in both stitches, ch 1, turn (4).
➡️ R3: inc, sc 2, inc, ch 1, turn (6).
➡️ R4: inc, sc 4, inc, ch 1, turn (8).
➡️ R5-6: sc across, ch 1, turn (8).
➡️ R7: dec, sc 4, dec, ch 1, turn (6).
➡️ R8: dec, sc 2, dec, ch 1, turn (4).
➡️ Fasten off. Sew this patch onto the lower center of the face (R17-R24) before attaching the nose.
Part 3: The Stubby Body (Yarn A – Fox Orange)
➡️ R1: 6 sc in magic ring.
➡️ R2: inc in each st around (12).
➡️ R3: (sc 1, inc) x6 (18).
➡️ R4: (sc 2, inc) x6 (24).
➡️ R5: (sc 3, inc) x6 (30).
➡️ R6-10: sc in each st around (30).
➡️ R11: (sc 3, dec) x6 (24).
➡️ R12: (sc 2, dec) x6 (18).
➡️ Fasten off. Stuff and sew to head.
Part 4: The Dragon Scale Romper (Yarn C – Green)
The outfit is worked from the bottom up. We use Bobble Stitches to create the scales.
➡️ R1: Ch 30, sl st to join (ensure it fits over the fox’s hips).
➡️ R2: sc in each st around (30).
➡️ R3 (Scale Row): (sc 2, Bobble Stitch) repeat around.
➡️ R4: sc in each st around.
➡️ R5 (Scale Row): sc 1, (Bobble Stitch, sc 2) repeat around Offsetting the scales.
➡️ R6: sc in each st around.
➡️ R7: (sc 3, dec) x6 (24).
➡️ R8 (Scale Row): (sc 2, Bobble Stitch) repeat around.
➡️ R9: sc in each st around.
➡️ R10: Split for armholes: sc 6, ch 4 (skip 4), sc 4, ch 4 (skip 4), sc 6.
➡️ R11: sc around including chains.
➡️ Fasten off.
Part 5: The Dragon Hood (Yarn C – Green)
➡️ R1: 6 sc in magic ring.
➡️ R2: inc in each st around (12).
➡️ R3: (sc 1, inc) x6 (18).
➡️ R4: (sc 2, inc) x6 (24).
➡️ R5: (sc 3, inc) x6 (30).
➡️ R6: (sc 4, inc) x6 (36).
➡️ R7: (sc 5, inc) x6 (42).
➡️ R8-14: sc in each st around.
➡️ R15: (Scale Row): (sc 3, Bobble Stitch) repeat around for a textured rim.
➡️ Fasten off.
Artisan’s Note: Make two “Ear Slits” in R10 by chaining 3 and skipping 3 stitches if you want the fox ears to poke through.
Part 6: Horns, Wings, & Spikes
Horns (Make 2 in Ivory):
➡️ R1: 4 sc in magic ring.
➡️ R2: sc around.
➡️ R3: (sc 1, inc) x2 (6).
➡️ R4-5: sc around. Sew to top of Hood.
Webbed Wings (Make 2 in Green/Gold):
➡️ R1: Ch 10.
➡️ R2: sc across.
➡️ R3: In the next row, work 3 distinct “points” by chaining 3 and slip stitching back down at intervals.
➡️ Critical Step: Insert a small pipe cleaner into the top edge of the wing and sew shut to allow for posing. Sew to the back of the Romper.
Dorsal Spikes (Yarn D – Gold):
➡️ Surface crochet a line of small triangles (ch 3, sl st in 2nd ch, sc in base) down the back of the hood and romper.
Assembly & Final Touches
- The Face: Sew the fluffy white patch to the face. Place the safety nose in the center of the patch.
- The Suit: Dress the body in the romper first. It should be a snug fit.
- The Hood: Place the hood over the head. Adjust so the fox’s ears align with the slits (if made) or sit comfortably under the fabric.
- The Wings: Ensure the pipe cleaners are secure and not poking through the yarn. Shape them to look “open” and ready for flight.
Tips & FAQs
Q: Can I use acrylic yarn?
A: You may, but cotton provides that crisp, high-definition stitch definition that makes the “scales” pop.
Q: The hood is too tight!
A: Amigurumi tension varies. If R15 is too tight, add one more round of increases before starting the straight rows.
A Final Word
You have done it. You have crafted a guardian. Look at him standing there, brave in his scales, yet soft in his heart. May he guard your creativity from the dragons of doubt.
Patricia.