There are certain icons who transcend time, whose style is so distinct that even a silhouette tells the whole story. Today, we are capturing that electric energy in the softest way possible. We are trading the stage for the craft table and sequins for stitches.
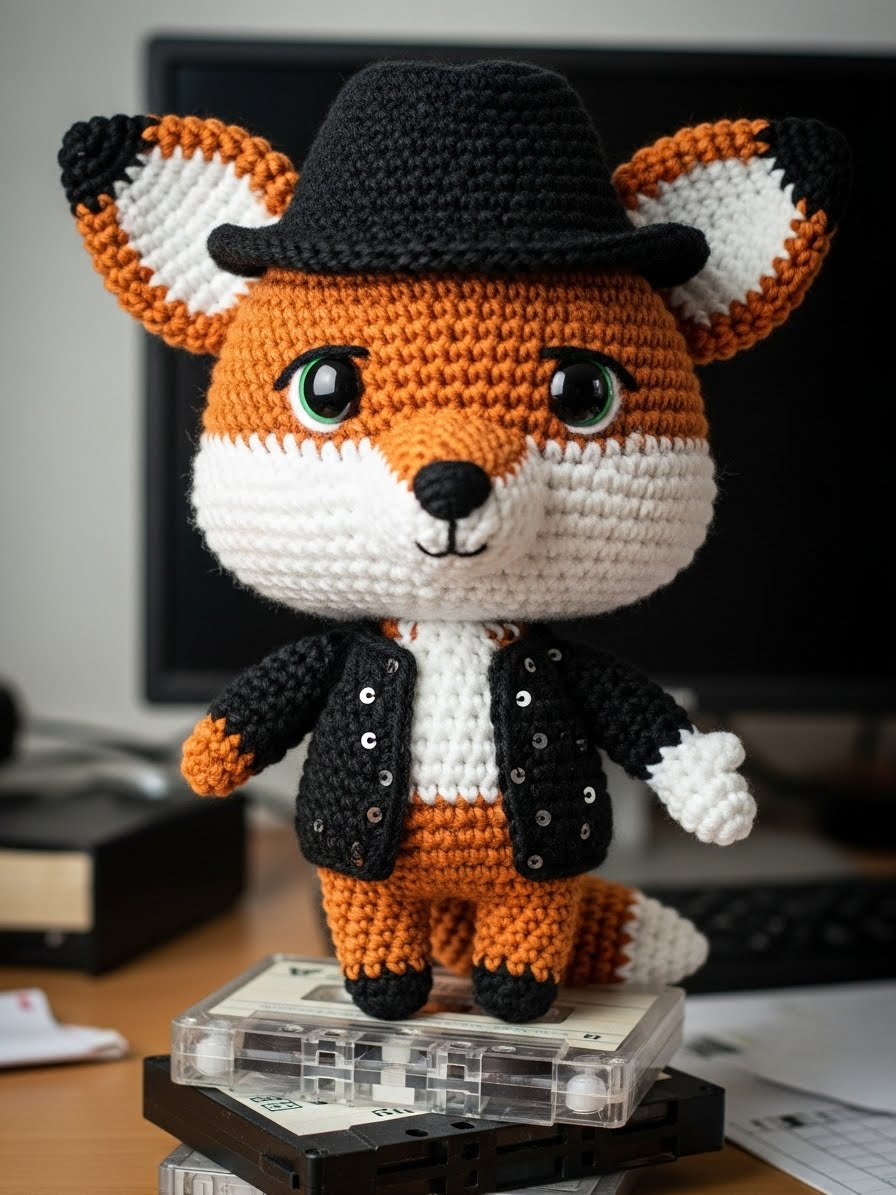
This project is a joyful challenge. It combines the rustic charm of our woodland fox with the sharp, cool aesthetic of the King of Pop. Watching this little character come to life—from the tip of his black fedora to his sparkling white glove—is guaranteed to make you smile. Let’s get to work; this is going to be a thriller of a project!
With anticipation,
Patricia Poltera
About The Moonwalker Fox
This isn’t just a fox; he’s a performer. While he retains his woodland roots with that vibrant orange yarn and the signature fluffy white chest patch, his soul is on the dance floor. We have styled him in a fully crocheted ensemble inspired by the “Billie Jean” era—slick black suit, the fedora tilted just so, and of course, the single glove. The contrast between the matte cotton of his fur and the structured, detailed clothing creates a wonderful texture profile.
Project Snapshot:
📊 Difficulty: Intermediate (Requires color changes and small accessories)
⏰ Est. Time: 6-8 Hours
📏 Size: 20cm (Standing)
“Great design is about rhythm. Your hook is the beat, and the yarn is the melody.” — Patricia Poltera
Materials & Tools Needed
🧶 Yarn: Matte Cotton DK in Fox Orange, Black (Suit/Hat), White (Socks/Shirt).
🧶 Specialty Yarn: White Fluffy/Eyelash yarn (for the chest/muzzle patch) and a Metallic Silver thread (to carry with white for the glove).
🪡 Hook: 2.5mm (or size needed for tight tension).
✨ Other Materials: 12mm Safety Eyes, Polyfill stuffing, Stitch markers, Tapestry needle.

Abbreviations & Stitches Used
ch: chain
sl st: slip stitch
sc: single crochet
inc: increase (2 sc in one st)
dec: decrease (invisible decrease preferred)
BLO: back loop only
The Complete Chibi Fox Pattern
The Chibi Head (Fox Orange)
We begin with the foundation of cuteness: the oversized head.
➡️ R1: 6 sc in magic ring (6)
➡️ R2: inc in each st around (12)
➡️ R3: (sc 1, inc) x 6 (18)
➡️ R4: (sc 2, inc) x 6 (24)
➡️ R5: (sc 3, inc) x 6 (30)
➡️ R6: (sc 4, inc) x 6 (36)
➡️ R7: (sc 5, inc) x 6 (42)
➡️ R8: (sc 6, inc) x 6 (48)
➡️ R9-R18: sc in each st around (48) Place safety eyes between R13 and R14, approx 9 stitches apart.
➡️ R19: (sc 6, dec) x 6 (42)
➡️ R20: (sc 5, dec) x 6 (36)
➡️ R21: (sc 4, dec) x 6 (30)
➡️ R22: (sc 3, dec) x 6 (24)
➡️ R23: (sc 2, dec) x 6 (18). Fasten off, leaving a long tail for sewing. Stuff firmly.
The Fluffy Muzzle Patch (White Fluffy Yarn)
This defines the face. Work in rows.
➡️ R1: Ch 5, sc in 2nd ch from hook and next 3 ch (4). Turn.
➡️ R2: Inc, sc 2, inc (6). Turn.
➡️ R3: Inc, sc 4, inc (8). Turn.
➡️ R4-5: Sc across (8). Turn.
➡️ R6: Sc 4. Leave remaining stitches unworked. Turn.
➡️ R7: Dec, dec. Fasten off. Join yarn at the center of R6 to work the other side (heart shape top). Repeat R6-7 mirror image. Sew this patch onto the face before placing the nose.
The Body & Legs (Orange & Black)
We work from the feet up. Start with Black for the shoes.
➡️ R1 (Legs x2): 6 sc in magic ring (Black).
➡️ R2: Inc in each st (12).
➡️ R3: BLO sc around (12).
➡️ R4: Change to White (Socks), sc around (12).
➡️ R5: Change to Black (Trousers), sc around (12).
➡️ R6-8: Sc around (12). Fasten off first leg. Do not fasten off second leg.
➡️ R9 (Join): Ch 2, join to first leg with sl st. Sc around both legs and chains (28).
➡️ R10-12: Sc around (28).
➡️ R13: Change to White (Shirt), sc around (28).
➡️ R14: (sc 5, dec) x 4 (24).
➡️ R15: (sc 2, dec) x 6 (18).
➡️ R16: Sc around. Fasten off.
The Iconic Wardrobe (Accessories)
1. The Fedora (Black)
➡️ R1: 6 sc in magic ring.
➡️ R2: Inc around (12).
➡️ R3: (sc 1, inc) around (18).
➡️ R4: (sc 2, inc) around (24).
➡️ R5: BLO sc around (24) Creates the crown edge.
➡️ R6-8: Sc around (24).
➡️ R9: FLO (Front Loop Only) (sc 3, inc) around (30) Creates the brim.
➡️ R10: (sc 4, inc) around (36). Fasten off. Wrap a strand of white yarn around the base of the crown.
2. The Sparkle Jacket (Black)
Worked flat in rows.
➡️ R1: Ch 20. Sc in 2nd ch and across (19).
➡️ R2-8: Sc across (19).
➡️ R9: Split for sleeves: Sc 3, ch 4 (skip 3), sc 7, ch 4 (skip 3), sc 3.
➡️ R10: Sc across, including in chains. Fasten off. Embroider small “V” shapes with silver thread to mimic sequins.
3. The Single Glove (White + Silver Thread)
➡️ R1: 4 sc in magic ring.
➡️ R2: Sc around (4).
➡️ R3: Sc around (4). Fasten off. Place over the right paw.
Artisan’s Notes
When attaching the Fluffy Muzzle Patch, use sewing pins to hold the “heart” shape in place before stitching. The fluff can be slippery! For the Fedora, you may want to stiffen the brim with a little spray starch or diluted glue so it holds that sharp, cool angle.
Assembly & Final Touches
- The Face: Sew the fluffy patch centrally on the lower face. Attach the safety nose in the center of the patch.
- The Head: Sew the head to the neck opening of the body.
- The Jacket: Slip the jacket onto the arms before sewing the arms to the body (it is easier this way).
- The Attitude: Stitch the Fedora slightly tilted over one eye. Secure the single glove on the right hand.
- The Tail: Sew the tail to the lower back, ensuring he can still sit or stand comfortably supported by it.
Tips & FAQs
- Q: Can I use real sequins? A: You can, but for a true amigurumi aesthetic, I prefer embroidering them with metallic thread. It keeps the texture soft and cohesive.
- Q: How do I make him stand? A: Ensure the legs are stuffed very firmly. You can also place a small cardboard circle or a coin in the bottom of the shoes for stability.
A Final Word
And there he is—a little legend in yarn. May his presence on your shelf remind you that creativity has no limits, and that even a little fox can have a lot of soul.