
There is something profoundly grounding about the combination of earth and yarn. Just as a gardener tends to their soil waiting for the first green shoot, we crafters tend to our loops and stitches, waiting for a character to emerge.
Today, we embrace the spirit of growth. Our beloved Chibi Fox is stepping out into the spring sun, dressed not just in yarn, but in the vibrant colors of a blooming garden. This project is a celebration of texture—from the fuzzy softness of his muzzle to the structured stitch-work of his tiny dungarees. It is time to let your creativity blossom.
With anticipation, Patricia
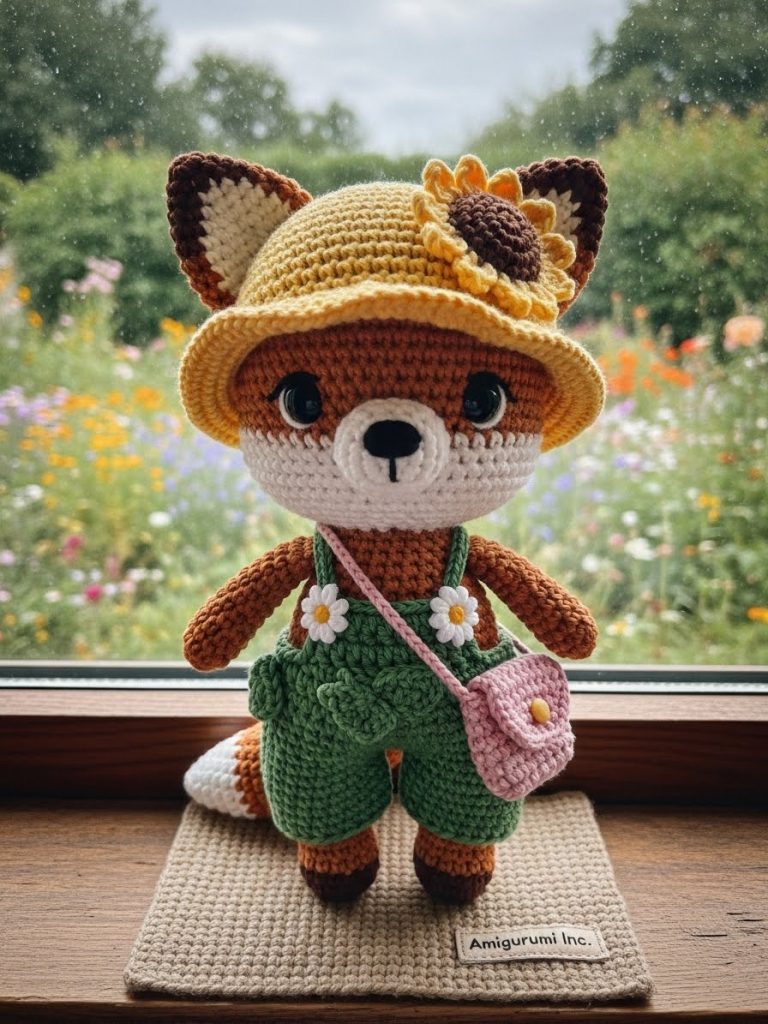
About The Chibi Fox (Garden Edition)
This isn’t just a fox; he is a keeper of the blooms. With his oversized head and innocent, wide-set eyes, he looks upon the world with pure wonder. We have styled him as the “Little Gardener,” equipping him with durable, textured overalls to protect his orange fur, and a wide-brimmed sunflower hat to shield his eyes from the midday sun. Every element you see is created with a hook and yarn—no fabric shortcut here. This ensures that every inch of him offers that comforting, handmade texture we adore.
Project Snapshot
📊 Difficulty: Intermediate (Requires focus on shaping and small details)
⏰ Est. Time: 6-8 Hours of joyful crafting
📏 Size: Approx. 20cm (Standing from hat to boots)
“Every stitch is a seed planted for a beautiful finish.” — Patricia Poltera
Materials & Tools Needed
🧶 Yarn: 100% Matte Cotton (DK or Sport weight).
- Fox: Burnt Orange (2 skeins), Fluffy White (for muzzle/tail tip), Black (nose).
- Outfit: Straw Yellow (hat), Leafy Green (overalls), Chocolate Brown (sunflower center), Petal Pink (pochette), White (daisies).
🪡 Hook: 2.5mm or 2.75mm (keep tension tight to avoid gaps).
✨ Other Materials:
- 12mm–14mm Black Safety Eyes.
- Polyester fiberfill stuffing (pack it firm!).
- Tapestry needle.
- Stitch markers.
Abbreviations & Stitches Used
ch: chain
sl st: slip stitch
sc: single crochet
hdc: half double crochet
dc: double crochet
inc: increase (2 sc in one st)
dec: decrease (sc 2 together)
BLO: back loop only
FLO: front loop only
The Complete Chibi Fox Pattern
Part 1: The Chibi Head (Fox Orange) We start here because the head defines the personality. We need a large, bulbous shape.
R1: Start 6 sc in a magic ring. (6)
R2: Inc in every st. (12)
R3: (Sc 1, inc) x 6. (18)
R4: (Sc 2, inc) x 6. (24)
R5: (Sc 3, inc) x 6. (30)
R6: (Sc 4, inc) x 6. (36)
R7: (Sc 5, inc) x 6. (42)
R8: (Sc 6, inc) x 6. (48)
R9: (Sc 7, inc) x 6. (54)
R10: (Sc 8, inc) x 6. (60)
R11-22: Sc in each st around. (60) This creates the height.
R23: (Sc 8, dec) x 6. (54)
Insert Safety Eyes between R18 and R19, roughly 10 stitches apart.
R24: (Sc 7, dec) x 6. (48)
R25: (Sc 6, dec) x 6. (42)
R26: (Sc 5, dec) x 6. (36)
R27: (Sc 4, dec) x 6. (30)
R28: (Sc 3, dec) x 6. (24)
Stuff the head firmly. It should be very round.
R29: (Sc 2, dec) x 6. (18)
Fasten off, leaving a long tail for sewing.
Part 2: The Fluffy Muzzle Patch (Fluffy White Yarn) This is the secret to his cuteness. Worked flat.
R1: Ch 7. In 2nd ch from hook, sc 6. Turn.
R2: Inc, sc 4, inc. (8). Turn.
R3: Inc, sc 6, inc. (10). Turn.
R4-5: Sc across. (10). Turn.
R6: Dec, sc 6, dec. (8). Turn.
R7: Dec, sc 4, dec. (6). Turn.
R8: Sc across. (6).
Fasten off. Sew this patch onto the lower center of the face, slightly overlapping the eye line. Embroider a small black triangular nose in the center of the patch.
Part 3: The Ears (Make 2 – Fox Orange)
R1: 4 sc in magic ring. (4)
R2: (Sc 1, inc) x 2. (6)
R3: (Sc 2, inc) x 2. (8)
R4: (Sc 3, inc) x 2. (10)
R5: (Sc 4, inc) x 2. (12)
R6: (Sc 5, inc) x 2. (14)
Fasten off. Flatten and sew to the top of the head.
Part 4: The Body (Fox Orange)
R1: 6 sc in magic ring. (6)
R2: Inc in every st. (12)
R3: (Sc 1, inc) x 6. (18)
R4: (Sc 2, inc) x 6. (24)
R5: (Sc 3, inc) x 6. (30)
R6-10: Sc around. (30)
R11: (Sc 3, dec) x 6. (24)
R12-13: Sc around. (24)
R14: (Sc 2, dec) x 6. (18)
Fasten off. Stuff firm.
Part 5: Arms & Legs (Fox Orange)
Legs (Make 2): 6 sc in MR, inc to 12, sc 3 rows. Stuff lightly.
Arms (Make 2): 5 sc in MR, sc 4 rows. Do not stuff.
The “Flower Child” Outfit Pattern
Component A: Leafy Green Overalls Worked from the legs up.
Legs (Make 2): Ch 12, join to form circle. Sc around for 4 rows.
Join Legs: Sc across first leg, ch 2, sc across second leg. Join in round.
Body of Overalls: Sc around the combined legs and chains for 6 rows.
Bib: Identify center 8 stitches on the front. Work back and forth on these 8 stitches for 4 rows.
Straps: Ch 12 (check length against your doll), attach to back of pants. Cross them over the back before sewing to the bib corners.
Component B: Sunflower Sun Hat (Straw Yellow)
R1-6: Follow the same increase pattern as the Head (up to 36 stitches).
R7-10: Sc around. (36)
R11 (Brim): (Sc 2, inc) around in FLO. This makes the brim flare out.
R12: (Sc 3, inc) around.
Fasten off.
Sunflower Appliqué: Using Brown, 6 sc in MR. Change to Yellow, (ch 3, sl st in next st) around to create petals. Sew to hat.
Component C: Petal Pochette (Pink)
Make two flat circles (6 sc in MR, inc to 12).
Sew them together leaving the top open.
Use Green yarn to ch 30 for the strap. Attach to sides.
Assembly & Final Touches
➡️ The Face: Pin the white fluffy muzzle patch securely before sewing. Ensure the nose is centered. The eyes should sit just above the cheeks of the patch.
➡️ The Body: Sew the head to the body. Use extra stitches to prevent the “wobbly head” syndrome common in Chibi dolls.
➡️ Dressing: Put the overalls on the fox. If they are tight, stretch the cotton slightly—it creates a better fit. Place the hat at a jaunty angle.
Tips & FAQs
- Question: My head keeps flopping over!
- Patricia’s Answer: This is the curse of the Chibi! Be sure to stuff the neck extremely firmly. You can also insert a supportive “neck roll” of rolled-up felt inside the stuffing for stability.
- Question: Can I use acrylic yarn?
- Patricia’s Answer: You may, but cotton provides that crisp, matte finish that highlights the stitch definition in the photos. Acrylic often looks a bit too fuzzy for this specific aesthetic.
A Final Word
I hope this little fox brings a seed of happiness to your collection. Watching him come together, stitch by stitch, is a reminder that beautiful things take time, patience, and a little bit of love.
Happy crocheting!