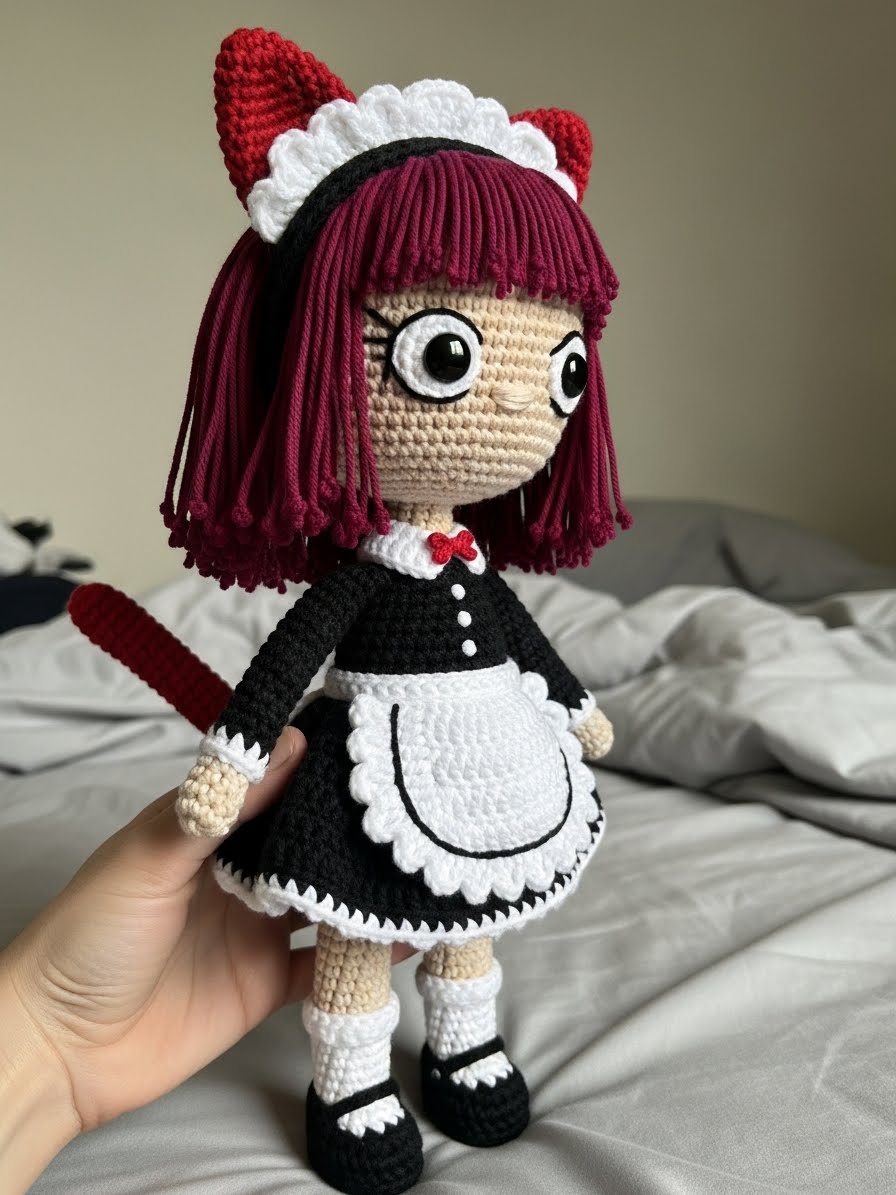
There is a quiet magic in bringing a character to life, stitch by diligent stitch. Today, we turn our hooks toward Miyako, a Neko Maid who balances gothic elegance with undeniable sweetness. She is not merely a doll; she is a study in contrast and personality, waiting for you to give her form. Let us begin this journey together.
About This Creation & The Anime Aesthetic
Miyako captures the beloved “maid café” aesthetic found in anime culture, blending it with the softness of amigurumi. Unlike standard dolls, this project focuses heavily on the “Hime” (princess) cut hairstyle and the architectural layering of her dress. We are moving beyond simple shapes here. The commercial appeal of this project is immense; anime-style amigurumi is a thriving niche on Etsy and at conventions. By mastering Miyako, you add a high-demand, intricate character style to your repertoire that stands out from basic animals.
Project Snapshot
📊 Difficulty: Intermediate to Advanced (requires color changes and hair assembly)
⏰ Est. Time: 12–15 Hours
📏 Size: Approx. 25cm (10 inches) tall
“Attention to the smallest ruffle creates the grandest impact.” — Patricia
Materials & Tools Needed
🧶 Yarn: Sport or DK weight cotton yarn. Colors required:
- Beige/Skin Tone (Head, legs, hands)
- Jet Black (Dress, shoes, sleeves)
- Snow White (Apron, frills, socks, headband)
- Berry/Deep Magenta (Hair)
- Deep Red (Ears, Tail)
🪡 Hook: 2.25mm or 2.5mm (to keep stitches tight)
✨ Other Materials:
- 10mm or 12mm Safety Eyes
- Black embroidery thread (for eyeliner/lashes)
- Fiberfill stuffing
- Wire (optional, for tail poseability)
- Yarn needle, pins, stitch markers
Abbreviations & Stitches Used
ch: chain
sl st: slip stitch
sc: single crochet
inc: increase (2 sc in one st)
dec: decrease (invisible decrease preferred)
hdc: half double crochet
dc: double crochet
BLO: back loop only
FLO: front loop only
The Complete Miyako Pattern

I. The Head (Skin Tone)
Worked in a continuous spiral.
R1: Start 6 sc in a magic ring. (6)
R2: Inc in all 6 st. (12)
R3: (Sc 1, inc) x 6. (18)
R4: (Sc 2, inc) x 6. (24)
R5: (Sc 3, inc) x 6. (30)
R6: (Sc 4, inc) x 6. (36)
R7: (Sc 5, inc) x 6. (42)
R8: (Sc 6, inc) x 6. (48)
R9: (Sc 7, inc) x 6. (54)
R10: (Sc 8, inc) x 6. (60)
R11–23: Sc in each st around. (60) Place safety eyes between R18 and R19, roughly 11 stitches apart. Embroider thick black eyeliner/lashes before securing backs.
R24: (Sc 8, dec) x 6. (54)
R25: (Sc 7, dec) x 6. (48)
R26: (Sc 6, dec) x 6. (42)
R27: (Sc 5, dec) x 6. (36)
R28: (Sc 4, dec) x 6. (30)
R29: (Sc 3, dec) x 6. (24)
R30: (Sc 2, dec) x 6. (18)
Fasten off, leaving a long tail for sewing. Stuff firmly, prioritizing the cheeks.
II. The Legs (Make 2)
Start with Black (Shoes).
R1: Ch 6. Start in 2nd ch from hook. Sc 4, 3 sc in last ch. Turn to other side. Sc 3, inc in last. (12)
R2: Inc, sc 3, inc x 3, sc 3, inc x 2. (18)
R3: BLO Sc in each st around. (18)
R4–5: Sc in each st around. (18)
R6: Sc 5, dec x 4, sc 5. (14)
Change to White (Socks).
R7: BLO Sc in each st around. (14)
R8–12: Sc in each st around. (14)
R13: (FLO) (Ch 3, sl st in next st) repeat around for ruffle.
Change to Skin Tone inside the leg (use back loops of R12).
R14–24: Sc in each st around. (14)
Fasten off first leg. Do not fasten off second leg. Ch 3 to join legs.
III. The Body & Dress Base
Continue from 2nd leg.
R25: Sc 14 (leg 1), sc 3 along chain, sc 14 (leg 2), sc 3 along other side of chain. (34)
Change to Black (Panties/Dress).
R26–28: Sc in each st around. (34)
R29: (Sc 6, inc) around until last few stitches, adjust to end with approx 38 sts. (38)
R30–35: Sc in each st around. (38)
R36: (BLO) Sc in each st around. This ridge is for the skirt later. (38)
R37: (Sc 17, dec) x 2. (36)
R38–42: Sc in each st around. (36)
R43: (Sc 4, dec) x 6. (30)
R44: Sc in each st around. (30)
R45: (Sc 3, dec) x 6. (24)
R46: (Sc 2, dec) x 6. (18)
R47: Sc in each st around. (18)
Fasten off. Stuff body firmly.
IV. The Skirt
Attach Black yarn to the FLO of R36 on the body, holding the doll upside down.
R1: Ch 2 (counts as dc), dc in same st, 2 dc in each st around. Join. (76)
R2: Ch 2, dc in each st around. Join. (76)
R3: (Dc 3, inc dc) repeat around.
R4–8: Dc in each st around until desired length.
Change to White.
R9: (Sc, ch 3, sk 1) repeat around for the frilly hem.
V. The Arms (Make 2)
Start with Skin Tone.
R1: 6 sc in MR. (6)
R2: (Sc 2, inc) x 2. (8)
R3: Sc in each st around. (8)
Change to White (Cuff).
R4: Inc in each st. (16)
R5: (Ch 3, sl st) ruffle edge.
Change to Black (Sleeve).
R6: Work in back loops of R4. Sc in each st. (8)
R7–16: Sc in each st around. (8)
R17: (Sc 1, inc) x 4. (12) Shoulder puff.
R18: Dec x 6. (6)
Close and leave tail for sewing.
VI. The Hair (Wig Cap)
Using Magenta/Berry yarn.
R1: 6 sc in MR. (6)
R2: Inc x 6. (12)
R3: (Sc 1, inc) x 6. (18)
R4: (Sc 2, inc) x 6. (24)
R5: (Sc 3, inc) x 6. (30)
R6: (Sc 4, inc) x 6. (36)
R7: (Sc 5, inc) x 6. (42)
R8: (Sc 6, inc) x 6. (48)
R9–15: Sc in each st around. (48)
Strands:
Bangs: Ch 7, start 2nd ch, sc 6. Sl st to cap. Repeat 4 times for fringe.
Side Locks (Hime Cut): Ch 14, start 2nd ch, sc 13. Sl st to cap. Make one on each side of bangs.
Back Hair: Leave as cap edge or create longer strands if desired (Ch 20, sc 19 down).
VII. Accessories (Apron, Ears, Headband)
Apron (White):
Row 1: Ch 11, sc 10. Turn.
Row 2: Inc, sc 8, inc. (12)
Row 3–6: Sc across. (12)
Ruffle Edge: (Ch 3, sk 1, sc) around the curved bottom edge. Leave long straps to tie at back.
Ears (Red – Make 2):
R1: 4 sc in MR.
R2: (Sc 1, inc) x 2. (6)
R3: (Sc 2, inc) x 2. (8)
R4: (Sc 3, inc) x 2. (10)
Fasten off.
Headband (White):
Ch 30 (measure around head/wig). Work 3 rows of sc. Add a ruffle edge (ch 3, sl st) along the top.
Tail (Red):
R1: 6 sc in MR.
R2–25: Sc in each st around. Insert wire if posing is desired.
Assembly & Final Touches
- Face: Sew the head to the neck securely. Ensure the nose is embroidered centrally between eyes with skin tone yarn (just a horizontal line).
- Hair: Place the wig cap on the head. Pin the bangs and side locks in place. Sew or glue the cap down.
- Dress: Attach the apron to the front of the waist.
- Limbs: Sew arms to the shoulder area (R45 of body).
- Cat Features: Sew the red ears onto the headband, then secure the headband to the hair. Sew the tail to the lower back.
Tips & FAQs
Q: How do I keep the head from wobbling? A: Use a firm stuffing technique in the neck and consider inserting a dowel or a rolled tube of felt inside the neck for stability.
Q: Can I brush the yarn for a fuzzier tail? A: Absolutely. Use a pet slicker brush on the red tail yarn to give it a fluffy, realistic cat texture.
A Final Word
Miyako is now complete, standing poised and polite in her gothic attire. You have not just followed a pattern; you have sculpted character from a simple strand of fiber. May she bring a touch of elegance to your collection.