
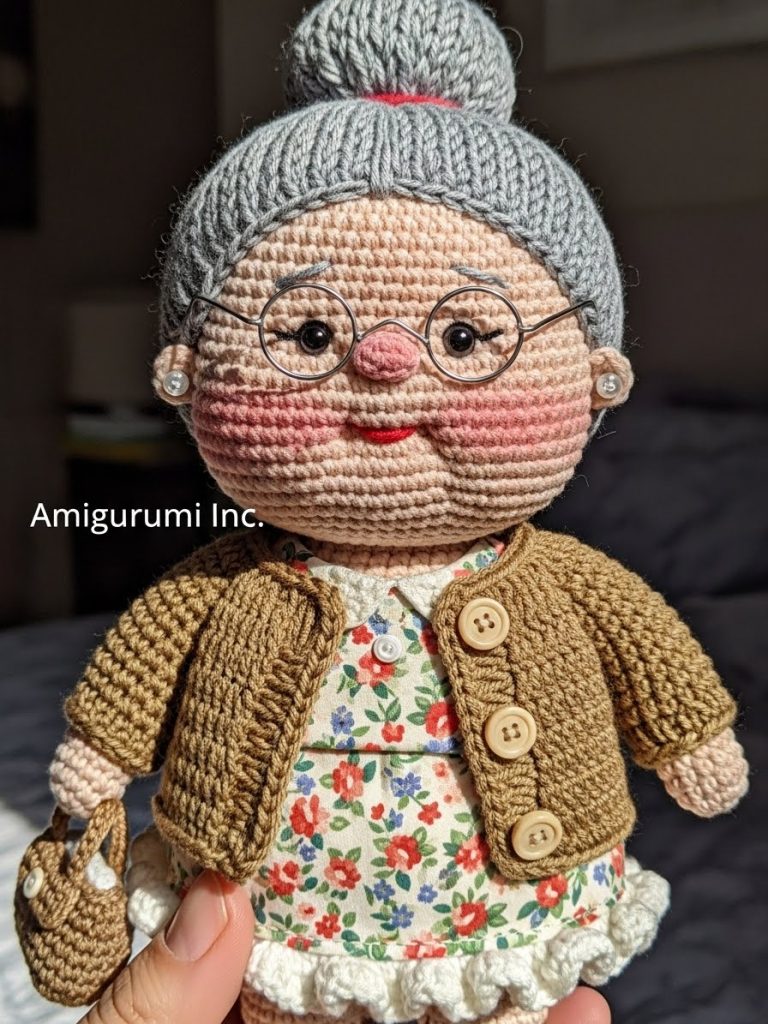
My dearest creators, welcome back to the worktable. Today we are not merely stitching yarn; we are sculpting a memory. Nana Clementine represents that universal warmth of a fresh cookie and a soft hug. She is designed to be substantial, round, and full of character. Let us craft her with the patience she herself would possess.
About This Creation & The Heirloom Appeal
There is a profound beauty in capturing age through the medium of soft fiber. While many amigurumi focus on animals or fantasy creatures, a human figure—especially an elder—demands a different kind of attention. We are focusing here on shape language. Notice the low center of gravity in her design? That anchors her. She sits independently, representing stability.
This project is an exercise in personality. The slight tilt of her head, the positioning of her wire spectacles, and the removable cardigan allow you to style her. She is not a static display piece; she is a character waiting for her story.
Project Snapshot
📊 Difficulty: Intermediate (Requires color changes and garment making)
⏰ Est. Time: 6–8 Hours
📏 Size: Approx. 16cm tall (Sitting)
“Every stitch is a moment of patience captured in time.” — Patricia
Materials & Tools Needed
🧶 Yarn: Cotton or Acrylic blend (DK or Worsted weight). Skin tone (cream/beige), Silver/Grey (hair), Floral color (dress), and a warm Earth tone (cardigan).
🪡 Hook: 2.5mm or 3.0mm (aim for tight tension)
✨ Other Materials: Safety eyes (9mm), Fiberfill, Blush for cheeks, Craft wire (18 or 20 gauge) for glasses, 2 tiny buttons, Stitch markers.
Abbreviations & Stitches Used
ch: chain
sl st: slip stitch
sc: single crochet
inc: increase (2 sc in one st)
dec: decrease (invisible decrease preferred)
blo: back loop only
popcorn: 4 dc in same st, drop loop, insert hook in first dc, pull loop through.
The Complete Nana Clementine Pattern
The Head (Skin Tone)
We begin with the seat of her wisdom. We want a large, slightly flattened shape.
➡️ R1: 6 sc in Magic Ring (6)
➡️ R2: inc in each st (12)
➡️ R3: (sc, inc) x 6 (18)
➡️ R4: (2 sc, inc) x 6 (24)
➡️ R5: (3 sc, inc) x 6 (30)
➡️ R6: (4 sc, inc) x 6 (36)
➡️ R7: (5 sc, inc) x 6 (42)
➡️ R8: (6 sc, inc) x 6 (48)
➡️ R9: (7 sc, inc) x 6 (54)
➡️ R10–18: sc in each st around (54) [9 rounds of even working]
➡️ R19 (Cheek Shaping): 18 sc, (inc, sc) x 3, 6 sc (nose area), (sc, inc) x 3, 18 sc (60)
➡️ R20–22: sc in each st around (60)
➡️ R23: 18 sc, (dec, sc) x 3, 6 sc, (sc, dec) x 3, 18 sc (54)
➡️ R24: (7 sc, dec) x 6 (48)
➡️ R25: (6 sc, dec) x 6 (42)
Insert safety eyes between R18 and R19, centered in the cheek shaping area.
➡️ R26: (5 sc, dec) x 6 (36)
➡️ R27: (4 sc, dec) x 6 (30)
➡️ R28: (3 sc, dec) x 6 (24)
➡️ R29: (2 sc, dec) x 6 (18)
➡️ R30: (sc, dec) x 6 (12)
Fasten off. Leave a long tail for sewing. Stuff firmly, focusing on pushing stuffing into the cheeks.
The Silver Crown (Hair Wig Cap)
Use Grey yarn.
➡️ R1: 6 sc in Magic Ring (6)
➡️ R2: inc in each st (12)
➡️ R3: (sc, inc) x 6 (18)
➡️ R4: (2 sc, inc) x 6 (24)
➡️ R5: (3 sc, inc) x 6 (30)
➡️ R6: (4 sc, inc) x 6 (36)
➡️ R7: (5 sc, inc) x 6 (42)
➡️ R8: (6 sc, inc) x 6 (48)
➡️ R9–13: sc in each st around (48)
➡️ R14: sl st loosely around. Fasten off with long tail for sewing.
The Popcorn Bun
Use Grey yarn.
➡️ R1: 6 sc in Magic Ring (6)
➡️ R2: inc in each st (12)
➡️ R3: (Popcorn st, sc) repeat around. (12)
➡️ R4: sc in each st around (12)
➡️ R5: dec x 6 (6)
Fasten off. Sew this bun to the top center of the Wig Cap.
The Body & Dress
Start with Undergarment color (White/Cream).
➡️ R1: 6 sc in Magic Ring (6)
➡️ R2: inc in each st (12)
➡️ R3: (sc, inc) x 6 (18)
➡️ R4: (2 sc, inc) x 6 (24)
➡️ R5: (3 sc, inc) x 6 (30)
➡️ R6: (4 sc, inc) x 6 (36)
➡️ R7: (5 sc, inc) x 6 (42)
➡️ R8: (6 sc, inc) x 6 (48)
➡️ R9–12: sc in each st around (48)
Change to Dress Color.
➡️ R13: In BLO, sc in each st around (48) [The front loops will be used for the skirt later]
➡️ R14–16: sc in each st around (48)
➡️ R17: (6 sc, dec) x 6 (42)
➡️ R18–19: sc in each st around (42)
➡️ R20: (5 sc, dec) x 6 (36)
➡️ R21–22: sc in each st around (36)
➡️ R23: (4 sc, dec) x 6 (30)
➡️ R24: sc in each st around (30)
➡️ R25: (3 sc, dec) x 6 (24)
➡️ R26: (2 sc, dec) x 6 (18)
➡️ R27: (sc, dec) x 6 (12)
Fasten off. Stuff the body until it is firm and round.
Skirt Frill
Join Dress Color yarn to the FL of R13 of the body.
➡️ R1: ch 2, dc inc in each st around, sl st to join.
➡️ R2: ch 2, (dc, dc inc) around, sl st to join.
➡️ R3: ch 1, sc in each st, sl st to join. Fasten off.
The Cozy Cardigan (Removable)
Use Earth Tone yarn. Worked in rows.
➡️ Row 1: ch 25.
➡️ Row 2: starting 2nd ch from hook, 24 sc. ch 1, turn.
➡️ Row 3: (2 sc, inc) x 8. (32). ch 1, turn.
➡️ Row 4: 5 sc (Front), ch 4, skip 6 (Armhole), 10 sc (Back), ch 4, skip 6 (Armhole), 5 sc (Front).
➡️ Row 5: sc across, working 4 sc into each ch-space. (28 sc total).
➡️ Row 6–10: sc in each st across.
➡️ Row 11: ch 1, turn. sc around the entire edge of the cardigan (sides and bottom) to create a clean border. At the top corner, ch 4 and sl st back into base to create a button loop.
Arms (Make 2)
Start with Skin Tone.
➡️ R1: 5 sc in Magic Ring (5)
➡️ R2: inc in each st (10)
➡️ R3–4: sc in each st around (10)
Change to Cardigan/Dress Color (Sleeves)
➡️ R5–10: sc in each st around (10)
➡️ R11: (3 sc, dec) x 2 (8)
Fasten off. Sew to sides of body near the neck.
Assembly & Final Touches
- Sew Head to Body: Ensure the head is firmly attached. The neck should be short to emphasize cuteness.
- Attach Hair: Sew the Wig Cap onto the head. The hairline should be high on the forehead.
- The Glasses: Cut a 10cm piece of wire. Wrap it around a thick marker or your hook handle to create two circles. Twist the center bridge. Bend the ends back to form the arms of the glasses. Insert the ends into the head near the eyes. Secure with a dab of glue if needed.
- Blush: Apply a generous amount of pink blush to her cheeks. She must look rosy!
- Dress: Put the cardigan on her and sew the button on the opposite side of the loop.
Tips & FAQs
- My glasses keep falling off? A tiny dot of clear fabric glue on the ends of the wire before inserting them into the yarn works wonders.
- Can I brush the bun? If you use wool yarn, you can brush the bun with a pet slicker brush to make it look like fuzzy white hair!
A Final Word
Nana Clementine is now ready to sit upon your shelf or be gifted to someone who needs a reminder of home. There is a quiet dignity in her simple shape. May she bring a sense of peace to your space. Until we meet again at the drafting table, keep your tension even and your heart open.
— Patricia