I am absolutely thrilled to present this pattern to you. We are capturing the spirit of a fierce protector, but softening the edges until he is pure, huggable joy. This Spark-Bunny is not just a toy; he is a little guardian for your shelf, designed with those special, stylish touches you requested. Let us begin this grand adventure.
About This Creation & The Stylish Angle
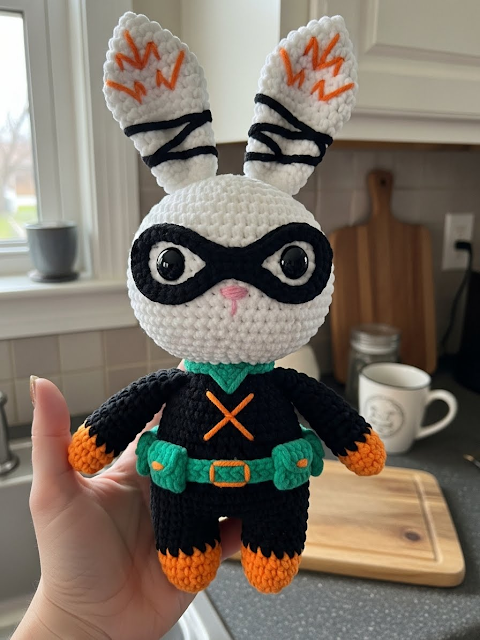
This project balances the “cool” factor with the undeniable cuteness of our Aesthetic Compass. Rather than hiding him under a helmet, we are letting his personality shine through those magnificent ears. By embroidering abstract “sparks” on the ear tips, we give a nod to his explosive power without sacrificing the softness of the silhouette. This design uses the “Baby Schema” ratio—a larger head and smaller, rounded body—to ensure that even with his tactical gear, he remains irresistibly sweet.
Project Snapshot
📊 Difficulty: Intermediate
⏰ Est. Time: 5–6 Hours
📏 Size: Approx. 14cm tall (using Chenille yarn)
“True strength is found in softness.” — Patricia
Materials & Tools Needed
🧶 Yarn: Super Bulky (Size 6) Chenille/Plush yarn. Colors: Cloud White (Skin), Midnight Black (Suit/Mask), Blaze Orange (Armor/Details), Teal or Emerald Green (Belt).
🪡 Hook: 4.0mm or 4.5mm (to keep stitches tight).
✨ Other Materials: 12mm Safety Eyes, Polyester Fiberfill, Yarn Needle, Stitch Markers, Black embroidery thread for mouth.

Abbreviations & Stitches Used
ch: chain
sl st: slip stitch
sc: single crochet
inc: increase (2 sc in one st)
dec: decrease (invisible decrease preferred)
BLO: back loop only
FLO: front loop only
The Complete Spark-Bunny Pattern
Head (Cloud White)
Start with the focal point of our creation. We want a wide, chubby shape.
🧶 R1: 6 sc in a magic ring (6)
🧶 R2: inc in all 6 st (12)
🧶 R3: (sc 1, inc) x 6 (18)
🧶 R4: (sc 2, inc) x 6 (24)
🧶 R5: (sc 3, inc) x 6 (30)
🧶 R6: (sc 4, inc) x 6 (36)
🧶 R7–R12: sc in all 36 st (6 rounds for a chubby face)
Artisan’s Note: Insert safety eyes between R10 and R11, roughly 7 stitches apart. They should sit low on the face.
🧶 R13: (sc 4, dec) x 6 (30)
🧶 R14: (sc 3, dec) x 6 (24)
🧶 R15: (sc 2, dec) x 6 (18)
Fasten off. Leave a tail for sewing. Stuff firmly, focusing on the cheeks.
Stylish Ears (Make 2 – Cloud White)
These are the star of the show. We make them long and floppy.
🧶 R1: 6 sc in a magic ring (6)
🧶 R2: (sc 1, inc) x 3 (9)
🧶 R3–R10: sc in all 9 st (8 rounds)
🧶 R11: (sc 1, dec) x 3 (6)
Fasten off, leaving a long tail. Do not stuff. Flatten the ear.
Styling Step: Using Blaze Orange yarn, embroider 3 small “zig-zag” stitches on the tip of each ear to represent sparks. Using Black yarn, wrap the base of the ear (where it joins the head) twice to create a “bandage” look.
Legs (Make 2 – Midnight Black)
We start with the boots and join them to create the body.
🧶 R1: 6 sc in magic ring (6)
🧶 R2: inc in all 6 st (12)
🧶 R3: BLO sc in all 12 st (defines the boot sole)
🧶 R4: sc in all 12 st
Fasten off the first leg. Make the second leg but DO NOT fasten off.
Body (Midnight Black)
Continuing from the second leg:
🧶 R5: ch 3, join to first leg with a sl st. sc around both legs and chains (30 total stitches)
🧶 R6–R9: sc in all 30 st (4 rounds)
🧶 R10: (sc 3, dec) x 6 (24)
🧶 R11: sc in all 24 st
🧶 R12: (sc 2, dec) x 6 (18)
Fasten off. Stuff the body firmly.
Arms (Make 2 – Begin with White)
🧶 R1: 5 sc in magic ring (White)
🧶 R2: sc in all 5 st (White)
Change to Midnight Black
🧶 R3–R5: sc in all 5 st (Black)
Fasten off. Leave tail for sewing.
Hero Mask (Midnight Black)
Worked flat.
🧶 R1: ch 16. Start in 2nd ch from hook, sc 15.
Check fit against the head; it should span across the eye area. Sew this securely to the face just above the eyes.
Chest Armor ‘X’ (Blaze Orange)
Make two strips.
🧶 Strip 1 & 2: ch 8, start in 2nd ch, sl st 7.
Sew these onto the chest in an ‘X’ shape. Add two small grey or silver French knots on the top right shoulder of the ‘X’ for industrial detail.
Utility Belt (Teal/Green)
🧶 Band: ch 32 (or long enough to wrap waist), sl st to first ch to form ring. sc around. Fasten off and place around the waist.
🧶 Pouches (Make 3 – Orange): ch 3, sc in 2nd ch, sc in next. Fasten off. Sew these small rectangles onto the belt.
Assembly & Final Touches
➡️ Head to Body: Sew the head to the body using the 18 stitches of the neck opening. Ensure the face is centered forward.
➡️ Limbs: Sew arms to the sides of the body at R11.
➡️ Ears: Sew the stylish ears to the top of the head (around R4). They should flop downwards slightly for that relaxed, cool look.
➡️ Face: Embroider a tiny pink nose between the eyes. Use black thread to create a small, serious line for the mouth, or leave it blank for a stoic look.
Tips & FAQs
Q: My chenille yarn is shedding! A: This is common. Lightly singe the tip of the yarn tail with a lighter (carefully!) before starting to stop the fraying.
Q: How do I make the ears stand up? A: If you prefer perky ears, insert a folded pipe cleaner inside before sewing them shut. However, our stylish floppy look adds to the charm!
A Final Word
You have done it! You have taken yarn and fluff and forged a tiny hero. I hope this Spark-Bunny brings a smile to your face every time you see him guarding your creative space. Remember, imperfections are just the fingerprints of the maker.
Patricia Poltera