Welcome to the atelier, my dear creator. Today, we are not just making a toy; we are weaving a dream.
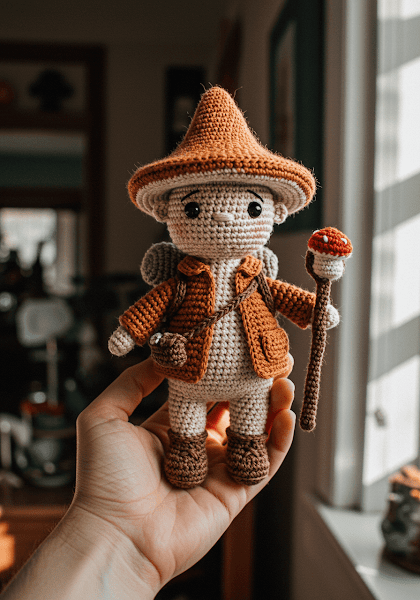
Together, we will breathe life into Milo, the Mushroom Forager, a testament to the joy of a handcrafted journey. His little stitched jacket, his sturdy backpack, his curious gaze… they all tell a story of care and patience.
🎨 About This Creation & Our Angle
From the moment I envisioned this piece, I knew it had to be more than just a pattern. It had to be an heirloom. This is the heart of our “Heirloom Creation” angle—we are crafting a piece for the artisan who finds deep satisfaction in detail.
The thematic core, “A Little Cat on a Grand Adventure,” is woven into every stitch. From his tiny backpack to his mushroom hat, Milo is the embodiment of a story.
This is the perfect project to create as a breathtaking, high-end gift or as a treasured keepsake, a testament to the beautiful things we can make with our own two hands.
| Attribute | Detail |
| 🧶 Difficulty | Intermediate – Advanced |
| 🕒 Est. Time | 8-10 Hours |
| 📏 Size | Approx. 8 inches (20 cm) tall |
This is the sacred moment where the separate pieces become a whole being. Work slowly, with intention. Every stitch is an act of love.
🧶 Materials & Tools Needed
To weave this creation, you will need to gather a few simple treasures. I recommend a DK weight yarn to create that fine, detailed quality.
- Yarn: DK Weight (8-ply) in the following colors:
- Creamy White (Cat)
- Warm Beige (Trousers, Backpack)
- Russet Orange (Jacket, Hat)
- Moss Green (Neckerchief)
- Earthy Brown (Details)
- Hook: 2.75mm (C)
- Other Materials: 12mm safety eyes, embroidery floss (dark brown or pink), fiberfill stuffing, tapestry needle, scissors, stitch markers.
[Image Placeholder: A flat-lay of the creamy white, beige, and russet orange yarns with a 2.75mm hook]
💡 Abbreviations & Stitches Used
We will be working in continuous rounds. Use a stitch marker to mark the first stitch of each round.
- ch – chain
- sl st – slip stitch
- sc – single crochet
- inc – single crochet increase (2 sc in one stitch)
- dec – invisible decrease (sc 2 stitches together through front loops)
- hdc – half double crochet
- MR – magic ring
- BLO – back loop only
- FLO – front loop only
- (…) – stitches in this round
📖 The Complete Milo the Forager Pattern
Let us begin our creation. We will start with the head and body, which are worked separately and seamed for a sturdy neck.
Head (in Creamy White)
Stuff firmly as you go.
- Rnd 1: Start with 6 sc in a MR (6 sts)
- Rnd 2: [inc] x6 (12 sts)
- Rnd 3: [sc, inc] x6 (18 sts)
- Rnd 4: [2 sc, inc] x6 (24 sts)
- Rnd 5: [3 sc, inc] x6 (30 sts)
- Rnd 6: [4 sc, inc] x6 (36 sts)
- Rnd 7: [5 sc, inc] x6 (42 sts)
- Rnd 8: [6 sc, inc] x6 (48 sts)
- Rnd 9: [7 sc, inc] x6 (54 sts)
- Rnd 10-18: (9 rounds) sc in all 54 stitches (54 sts)
- Place 12mm safety eyes between Rnds 15 and 16, about 9 stitches apart.
- Rnd 19: [7 sc, dec] x6 (48 sts)
- Rnd 20: [6 sc, dec] x6 (42 sts)
- Rnd 21: [5 sc, dec] x6 (36 sts)
- Rnd 22: [4 sc, dec] x6 (30 sts)
- Rnd 23: [3 sc, dec] x6 (24 sts)
- Rnd 24: [2 sc, dec] x6 (18 sts)
- Fasten off, leaving a long tail for sewing.
Body (Start in Warm Beige, then Creamy White)
Stuff firmly as you go.
- Rnd 1-8: Start with 6 sc in MR, increase by 6 sts each round until Rnd 8. (48 sts)
- Rnd 9-14: (6 rounds) sc in all 48 stitches (48 sts)
- Rnd 15: (Change to Creamy White) sc in all 48 stitches (48 sts)
- Rnd 16: sc in all 48 stitches (48 sts)
- Rnd 17: [6 sc, dec] x6 (42 sts)
- Rnd 18-19: (2 rounds) sc in all 42 stitches (42 sts)
- Rnd 20: [5 sc, dec] x6 (36 sts)
- Rnd 21-22: (2 rounds) sc in all 36 stitches (36 sts)
- Rnd 23: [4 sc, dec] x6 (30 sts)
- Rnd 24: sc in all 30 stitches (30 sts)
- Rnd 25: [3 sc, dec] x6 (24 sts)
- Rnd 26: sc in all 24 stitches (24 sts)
- Fasten off, leaving a long tail for sewing.
Artisan’s Note: The secret to a smooth finish is tension and stuffing. Use small bits of fiberfill at a time and push it firmly into all the corners to avoid lumpiness.
Legs (Make 2, in Warm Beige)
- Rnd 1: Start with 6 sc in a MR (6 sts)
- Rnd 2: [inc] x6 (12 sts)
- Rnd 3: [sc, inc] x6 (18 sts)
- Rnd 4-7: (4 rounds) sc in all 18 stitches (18 sts)
- Rnd 8: [sc, dec] x6 (12 sts)
- Rnd 9-12: (4 rounds) sc in all 12 stitches (12 sts)
- Stuff the foot, then stuff the leg lightly. Fasten off, leaving a long tail for sewing.
Arms (Make 2, in Creamy White)
- Rnd 1: Start with 6 sc in a MR (6 sts)
- Rnd 2: [inc] x6 (12 sts)
- Rnd 3-10: (8 rounds) sc in all 12 stitches (12 sts)
- Stuff lightly, leaving the top flat. Fasten off, leaving a long tail for sewing.
Ears & Tail (in Creamy White)
- Ears (Make 2): Rnd 1: 4 sc in MR (4). Rnd 2: [sc, inc] x2 (6). Rnd 3: [2 sc, inc] x2 (8). Rnd 4: [3 sc, inc] x2 (10). F/O.
- Tail (Make 1): Rnd 1: 6 sc in MR (6). Rnd 2-15: (14 rounds) sc in all 6 sts (6). Do not stuff. F/O.
Mushroom Hat (Start in Russet Orange)
- Rnd 1-9: Create a flat circle, increasing by 6 sts each round until you have 54 sts.
- Rnd 10: [8 sc, inc] x6 (60 sts)
- Rnd 11-12: (2 rounds) sc in all 60 stitches (60 sts)
- Rnd 13: (Change to Warm Beige, FLO) [4 sc, dec] x10 (50 sts)
- Rnd 14: [3 sc, dec] x10 (40 sts)
- Fasten off. You can embroider spots on the cap with beige yarn.
Jacket (in Russet Orange)
This piece is worked in rows. Ch 1 and turn at the end of each row.
- Row 1: Ch 37. In 2nd ch from hook, sc 36. (36 sts)
- Row 2-5: (4 rows) sc in all 36 stitches.
- Row 6 (Right Front): sc 8. (8 sts)
- Row 7-10: (4 rows) sc in all 8 stitches. F/O.
- Row 6 (Left Front): Rejoin yarn at other end of Row 5. sc 8. (8 sts)
- Row 7-10: (4 rows) sc in all 8 stitches. F/O.
- Row 6 (Back Panel): Rejoin yarn to middle 20 sts. sc 20. (20 sts)
- Row 7-10: (4 rows) sc in all 20 stitches. F/O.
- Sleeves: Join yarn at armhole. Work 15 sc around for 6 rounds. F/O.
🧵 Assembly & Final Touches
Here is where our creation truly comes to life. Be patient with your needle; this is where the soul is added.
- Body: Sew the head securely to the body. Sew the legs to the base of the body so Milo can sit.
- Face: Using dark brown floss, embroider a small ‘Y’ shape for the nose and mouth, centered below the eyes.
- Ears & Tail: Sew the ears to the top of the head. Attach the tail to the lower back.
- Arms: Sew the arms to the sides of the body, just below the neck.
- Jacket: Sew the shoulder seams of the jacket. Weave in all ends.
- Accessories: Dress Milo in his jacket. Create a simple triangle neckerchief (Moss Green) and a small rectangular backpack (Warm Beige) and put them on him. Place the mushroom hat on his head.
[Image Placeholder: A close-up of Milo’s embroidered face and neckerchief]
💡 Tips & Frequently Asked Questions
Q: Is this pattern suitable for beginners?
A: Due to the numerous small parts, clothing, and detailed assembly, this is a rewarding project for intermediate to advanced crocheters. It requires patience and a good understanding of amigurumi techniques.
Q: How do I get the smoothest finish?
A: The secret is tension and stuffing. Keep your stitches consistent and tight. When stuffing, use small bits of fiberfill at a time and push it firmly into all the corners to avoid lumpiness.
Q: Can I use different yarn or eye sizes?
A: Of course! Be aware that changing the yarn weight will alter the final size. A thicker yarn will create a larger Milo. You will need to adjust your hook and safety eye size proportionally.
💌 A Final Word
Your beautiful heirloom is complete. You have breathed life into yarn. This little forager is a reflection of your own patience, skill, and heart, a tangible piece of the joy you found in the act of creation.
May this little creation bring a whisper of magic to whomever it is destined for. Well done, my dear creator. Truly well done.